CEB Press/Manufacturing Instructions/Controller Mount: Difference between revisions
Jump to navigation
Jump to search
(→Tools) |
|||
| (19 intermediate revisions by 2 users not shown) | |||
| Line 1: | Line 1: | ||
{{Category=CEB press building instructions}} | {{Category=CEB press building instructions}} | ||
=Part Information= | |||
The controller mount attaches the controller box to the primary arms. | |||
=Tools | *The controller mount attaches the controller box to the primary arms. | ||
=Tools= | |||
*Hole punch with 13/16" die. | *Hole punch with 13/16" die. | ||
*Drill press with | |||
* | *Drill press with 5/16" bit. | ||
=Materials | |||
* | *Metal Marking Utensil | ||
* | |||
= | *Measuring Tape | ||
=Materials= | |||
*Steel Plate 40cm x 15cm x 0.6cm | |||
*Lug Box | |||
=Steps= | |||
*Set the steel plate on a flat surface. | |||
*Position the lug box over the steel plate such that the lug box is square with the steel plate and the lug box's top mounting hole is about 2cm from the top edge of the steel plate | |||
*Using the marking utensil and the center punch, mark then center punch the 3 aligned hole locations on the steel plate | |||
*Drill 5/16" holes through the steel plate at the marked points. | |||
*Punch 2 holes of 13/16" diameter near the bottom exposed region of the steel plate. | |||
[[Image:ControllerBoxMount.png]] | |||
Latest revision as of 00:29, 23 December 2011
Main > Housing and construction > CEB Press > CEB press building instructions
Part Information
- The controller mount attaches the controller box to the primary arms.
Tools
- Hole punch with 13/16" die.
- Drill press with 5/16" bit.
- Metal Marking Utensil
- Measuring Tape
Materials
- Steel Plate 40cm x 15cm x 0.6cm
- Lug Box
Steps
- Set the steel plate on a flat surface.
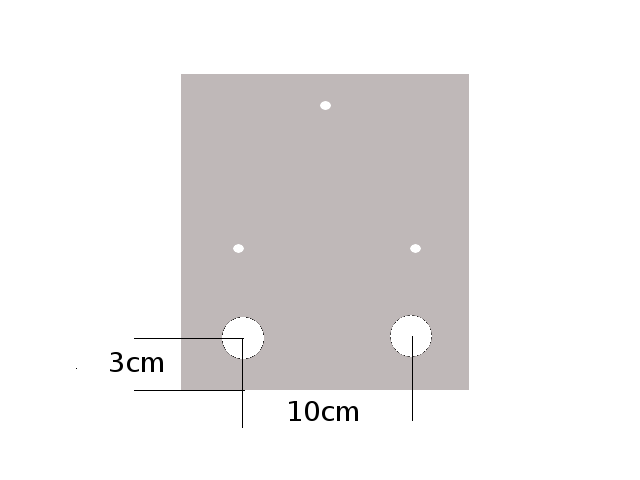
- Position the lug box over the steel plate such that the lug box is square with the steel plate and the lug box's top mounting hole is about 2cm from the top edge of the steel plate
- Using the marking utensil and the center punch, mark then center punch the 3 aligned hole locations on the steel plate
- Drill 5/16" holes through the steel plate at the marked points.
- Punch 2 holes of 13/16" diameter near the bottom exposed region of the steel plate.
