CEB Press/Manufacturing Instructions/Leg Holders: Difference between revisions
Jump to navigation
Jump to search
No edit summary |
No edit summary |
||
| (13 intermediate revisions by 3 users not shown) | |||
| Line 1: | Line 1: | ||
==Tools | |||
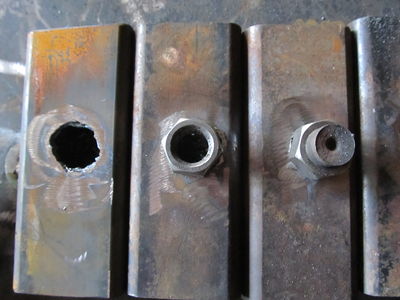
[[Image:legholders.jpg|thumb|right|400px| The fabrication steps of the leg holders]] | |||
<html><iframe src="http://sketchup.google.com/3dwarehouse/mini?mid=9ede5ca4cc4cd2301211da1f85706ccd&etyp=sw&width=400&height=300" frameborder="0" scrolling="no" marginheight="0" marginwidth="0" width="400" height="300"></iframe></html> | |||
=Tools= | |||
*Torch | *Torch | ||
*Welder | *Welder | ||
*Grinder | |||
*2 1/2” x 2 1/2" x 3/16" square steel tubing – 6” long | |||
*3/4” nut | =Materials= | ||
*3/4” x | |||
*2 1/2” x 2 1/2" x 3/16" thick square steel tubing – 6” long | |||
*3/4”-10 nut | |||
*3/4”-10 x 1.5” bolt | |||
=Steps= | |||
Note: It's suggested you prepare all leg holders at once, doing each step for all leg holders before moving on (14 leg holders required per CEB Press). | |||
*Torch a 3/4” hole in the center of one of the faces of the tubing; make sure it's large enough for a 3/4” bolt. | |||
*It's not crucial that the hole be centered. It just needs to be somewhere close to the center. | |||
*Weld the nut over the hole, ensuring the nut is level, and the hole is clear. Make sure no spatter goes into the threads by covering the top of the nut. | |||
*Thread the bolt into the nut. | |||
Latest revision as of 00:39, 23 December 2011
Tools
- Torch
- Welder
- Grinder
Materials
- 2 1/2” x 2 1/2" x 3/16" thick square steel tubing – 6” long
- 3/4”-10 nut
- 3/4”-10 x 1.5” bolt
Steps
Note: It's suggested you prepare all leg holders at once, doing each step for all leg holders before moving on (14 leg holders required per CEB Press).
- Torch a 3/4” hole in the center of one of the faces of the tubing; make sure it's large enough for a 3/4” bolt.
- It's not crucial that the hole be centered. It just needs to be somewhere close to the center.
- Weld the nut over the hole, ensuring the nut is level, and the hole is clear. Make sure no spatter goes into the threads by covering the top of the nut.
- Thread the bolt into the nut.
