CEB Press/Manufacturing Instructions/Hopper mounting plate: Difference between revisions
Jump to navigation
Jump to search
No edit summary |
|||
| (3 intermediate revisions by 2 users not shown) | |||
| Line 1: | Line 1: | ||
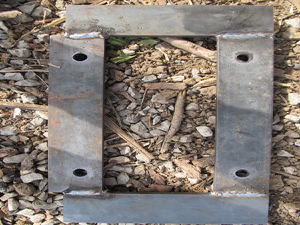
[[Image:hopper-mounting-plate.jpg|thumb]] | [[Image:hopper-mounting-plate.jpg|thumb]] | ||
<html><iframe src="http://sketchup.google.com/3dwarehouse/mini?mid=1951330c482561411211da1f85706ccd&etyp=sw&width=400&height=300" frameborder="0" scrolling="no" marginheight="0" marginwidth="0" width="400" height="300"></iframe> | |||
</html> | |||
=Tools= | |||
*Hole punch with 13/16" Die | *Hole punch with 13/16" Die | ||
*Welder | *Welder | ||
*Angle Grinder | *Angle Grinder | ||
=Materials= | |||
*[2] Steel Plate 1/2” x 3” x 11.25” | |||
[ | |||
*[2] Steel Plate 1/2” x 3” x 15” | |||
=Fabrication Steps= | |||
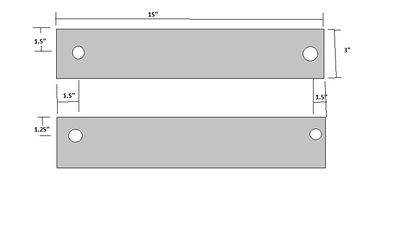
*Punch the 13/16" holes in the 15" pieces. | |||
[[Image:hoppermountholes.jpg|400px|The hole locations]] | |||
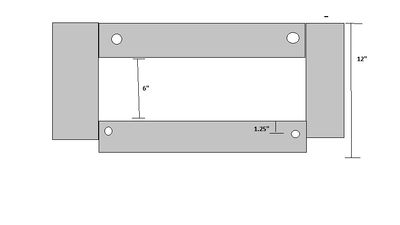
*Weld the pieces together on both sides (upper and lower), ensuring everything is square. | |||
[[Image:hoppermountweld.jpg|400px|How to prep the plate for welding]] | |||
*Grind one side (upper or lower) smooth to facilitate installation | |||
Latest revision as of 04:45, 23 December 2011
Tools
- Hole punch with 13/16" Die
- Welder
- Angle Grinder
Materials
- [2] Steel Plate 1/2” x 3” x 11.25”
- [2] Steel Plate 1/2” x 3” x 15”
Fabrication Steps
- Punch the 13/16" holes in the 15" pieces.
- Weld the pieces together on both sides (upper and lower), ensuring everything is square.
- Grind one side (upper or lower) smooth to facilitate installation


