CEB 3D Printer: Difference between revisions
mNo edit summary |
No edit summary |
||
| Line 153: | Line 153: | ||
<u>'''FUNCTION NAME''':</u> <br> | |||
<span style="color: blue">'''INPUT TO FUNCTIONS'''</span> <br> | |||
<span style="color: rgb(204, 102, 0);">'''OUTPUT OF FUNCTIONS'''</span> <br> | |||
<nowiki>*</nowiki>: unfinished or incorrect function, will change within a week. | |||
<u>'''Read Encoders Function:'''</u> Read digital encoders. This function will need to be written after testing is done, but I can provide skeleton code soon. | |||
<u>'''Read Encoders Function:'''</u> Read digital encoders and scale the value accordingly to return <span style="color: rgb(204, 102, 0);">'''current length'''</span> in feet. This function will need to be written after testing is done, but I can provide skeleton code soon.* | |||
<pre> | <pre> | ||
| | ||
| Line 160: | Line 166: | ||
</pre> | </pre> | ||
<u>'''Calculate Length Function:'''</u> Now that | |||
<u>'''Calculate Length Function:'''</u> Now that <span style="color: blue;">'''desired gripper position'''</span> & all 4 <span style="color: blue;">'''current lengths'''</span> are known, <span style="color: rgb(204, 102, 0);">'''desired length'''</span> for each cable can be calculated.*(current length is already known actually from previous function, will update code soon) | |||
<html> | <html> | ||
<pre> | <pre> | ||
| Line 211: | Line 218: | ||
<u>'''PID Function:'''</u> Now that desired length and current length are known, motor output and direction for each motor can be calculated. | <u>'''PID Function:'''</u> Now that <span style="color: blue;">'''desired length'''</span> and <span style="color: blue;">'''current length'''</span> are known, <span style="color: rgb(204, 102, 0);">'''motor output'''</span> and <span style="color: rgb(204, 102, 0);">'''direction'''</span> for each motor can be calculated. | ||
<html> | <html> | ||
<body> | <body> | ||
| Line 241: | Line 249: | ||
</body> | </body> | ||
</html> | </html> | ||
<u>'''Write to Motors Function:'''</u> Digital write to speed controllers (output is amplified using the higher current & voltage power source from 12V batteries. This function, just like the encoders will need to be written after/while testing is done, but I can provide skeleton code soon. * | |||
<pre> | |||
| |||
| |||
</pre> | |||
| Line 247: | Line 264: | ||
| Line 331: | Line 343: | ||
</body> | </body> | ||
</html> | </html> | ||
Revision as of 09:25, 20 December 2011
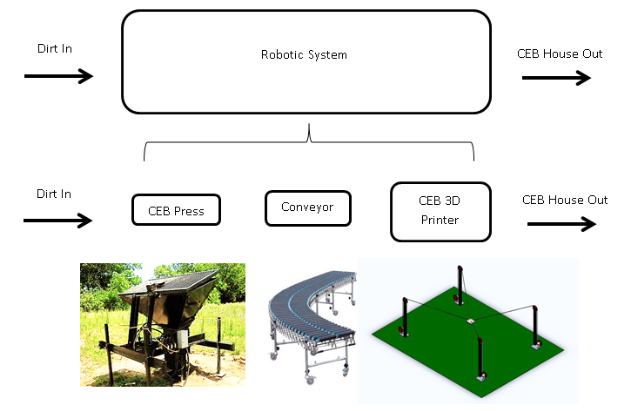
Concept (Illustrated Below): This idea is to develop an automated brick-laying system that can build homes from the ground up, literally. Using a combination of the CEB Press, a conveyor belt, gripper, and a common machine configuration (TBD), the machine acts like a large 3D printer which picks and places compressed bricks robotically.
Two video animations, originally made as Java applets, illustrate two such designs:
Animation (Gantry Design)
Animation (Cable Design)
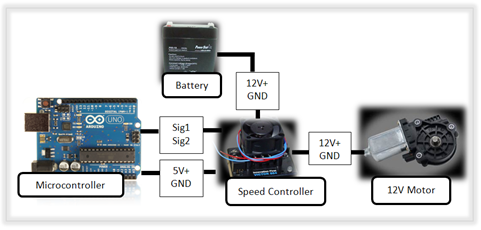
High-Level Actuator Architecture:
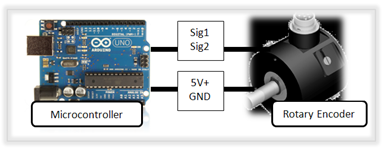
High-Level Feedback Architecture:
Sample Source Code:
|
Pseudo Code
|
Arduino Code |
| DECLARE VARIABLES & FUNCTIONS Initialize Output Channels // Tell microcontroller which pins are output Initialize Input Channels // Tell microcontroller which pins are input MAIN LOOP For Motors 1 to 4: Read Encoder Values Calculate Motor Output to Achieve Desired Position Write to Motor Output Channel // Note: the motor signal is sent to a speed controller // to be amplified END FOR LOOP END MAIN LOOP |
void setup() { pinMode(2, OUTPUT); // to Base motor 1 pinMode(3, OUTPUT); // to Base motor 2 pinMode(4, OUTPUT); // to Base motor 3 pinMode(5, OUTPUT); // to Base motor 4 pinMode(6, INPUT); // from digital Encoder 1 pinMode(7, INPUT); // from digital Encoder 2 pinMode(8, INPUT); // from digital Encoder 3 pinMode(9, INPUT); // from digital Encoder 4 } void loop() { for (int motorIndex = 0; motorIndex < 3; motorIndex++) { read_encoders(); pid(); write_to_motors(); } } |
FUNCTION NAME:
INPUT TO FUNCTIONS
OUTPUT OF FUNCTIONS
*: unfinished or incorrect function, will change within a week.
Read Encoders Function: Read digital encoders and scale the value accordingly to return current length in feet. This function will need to be written after testing is done, but I can provide skeleton code soon.*
Calculate Length Function: Now that desired gripper position & all 4 current lengths are known, desired length for each cable can be calculated.*(current length is already known actually from previous function, will update code soon)
float px, py, pz; // p (x,y,z) is the current position of the gripper
float dpx, dpy, dpz; // p (x,y,z) is the desired position of the gripper

float Bheight = 12.0, Blength = 18.0, Bwidth = 12.0; // Base dimensions at 12'x18'x12'

float B1x = 0.0,     B1y = 0.0,       B1z = Bheight; // top point of base rod 1
float B2x = 0.0,     B2y = Blength,   B2z = Bheight; // top point of base rod 2
float B3x = Bwidth,  B3y = Blength,   B3z = Bheight; // top point of base rod 3
float B4x = Bwidth,  B4y = Blength,   B4z = Bheight; // top point of base rod 4

float L1,L2,L3,L4, dL1,dL2,dL3,dL4; // Current and desired length variables

// This function calculates the length that each of the cables
// must be in order to attain the desired gripper position.
void get_lengths()
{

  // Lengths are determined from top of base rod to gripper,
  // so this does not include length from motor to pulley
  // at the top of the rod.

  L1 = dist3d(B1x, B1y, B1z, px,py,pz);  // Length of cable 1 in feet
  L2 = dist3d(B2x, B2y, B2z, px,py,pz);  // Length of cable 2 in feet
  L3 = dist3d(B3x, B3y, B3z, px,py,pz);  // Length of cable 3 in feet
  L4 = dist3d(B4x, B4y, B4z, px,py,pz);  // Length of cable 4 in feet

  // Desired lengths calculated the same way.

  dL1 = dist3d(B1x, B1y, B1z, dpx,dpy,dpz); // Desired length of cable 1
  dL2 = dist3d(B2x, B2y, B2z, dpx,dpy,dpz); // Desired length of cable 2
  dL3 = dist3d(B3x, B3y, B3z, dpx,dpy,dpz); // Desired length of cable 3
  dL4 = dist3d(B4x, B4y, B4z, dpx,dpy,dpz); // Desired length of cable 4

}

//____________CALCULATE_THE_3-D_DISTANCE_(L-3_NORM)________________//
float dist3d(float p1x, float p1y, float p1z, float p2x, float p2y, float p2z)
{
  float dist3 = sqrt((p2x-p1x)*(p2x-p1x) + (p2y-p1y)*(p2y-p1y) + (p2z-p1z)*(p2z-p1z));
  return dist3;
}
PID Function: Now that desired length and current length are known, motor output and direction for each motor can be calculated.
float[] err = new float[4];  // error array
float[] dir = new float[4];  // direction array
float[] out = new float[4];  // output array

float kp = 500;  // this gain is arbitrary, but must be positive
float Prop;      // Variable used for proportional gain.
float max_output = 100; // Saturate the output at 100, also arbitrary

//___________________PID_FUNCTION______________________//
void pid() // Actually just P for simplicity's sake
{

  Prop = kp*err[motorIndex]; // P = const*(desired_length - current_length)
  out[motorIndex] = Prop;    // output = P;

  if (out[motorIndex] > 0)  dir[motorIndex] = 1; // Get direction either 1
  else dir[motorIndex] = 0;                      // or 0

  constrain(out[motorIndex], -max_output, max_output); // saturate output
  out[motorIndex] = abs(out[motorIndex]); // now that we know direction, we
                                          // just need the absolute output
}
Write to Motors Function: Digital write to speed controllers (output is amplified using the higher current & voltage power source from 12V batteries. This function, just like the encoders will need to be written after/while testing is done, but I can provide skeleton code soon. *
PHASE 1: Proof-of-Concept (5-10 people)
1. Gripper Design
a.) Research what's available for this application in terms of ballpark specs and power requirements, decide if feedback is necessary
b.) Actuator Selection: motors/servos
c.) Produce CAD of all mechanical parts
2. Mechanical Design (ideally 2 people should be on this)
a.) Research materials
b.) Produce CAD models and assembly
c.) Perform FEA and verify deflection assumptions based on realist forces and prescribed displacement: i.e., if using Aluminum and part is being stretched laterally, how much does it deflect? If greater than 1 cm, redesign, consider alternative material, or simply account for this in software.
d.) Bill of materials
3. Communication to gripper
a.) Wireless would be nice: http://www.sparkfun.com/tutorials/128, research and justify selection of technology to go with.
b.) Test at least one solution once purchased for range and loss of communication.
c.) Find what data needs to be sent and how often (actually this is probably easy, could be as simple as grip/ungrip 10 Hz - not bad)
Goal: be able to manually input single position coordinates, e.g. (x,y,z)=(4.213',5.9234',1.512') and measure how accurate and consistent system is, i.e. is it biased to one side at a higher level? Can mechanical shortcomings be remedied in software.
PHASE 2: Scaling up and adding complexity
4. Data input - Using XML or .txt file, pass in from PC to microcontroller via serial connection a list of coordinates.
a.) Write program to design a structure & output XML file - the one complication here is to post-process the solid and write sub-routines to convert solid into something to be completely built from bricks.
i.) Tutorial on how to do so
ii.) Generate at least 2 sample files.
b.) Write program to read XML file and send to microcontroller
c.) Arduino sub-routine to read in data.
5. A simple control board for translational speed, display number of brick, start, stop, etc.
6. Base Mobile Platform - http://www.robotcombat.com/store_tanktreads.html either tank treads or wheels
a.) Research
b.) CAD
c.) Integration with current software
IRC Online Meeting Schedule: This is temporary section I'm experimenting with which doesn't quite belong here.
IRC Experimental Meeting Test Chart: This chart is used to display group meeting times on the OSE Internet Relay Chat (IRC) http://opensourceecology.org/wiki/Irc where groups can discuss project ideas and progress with realtime feedback. Group member names, IRC chat usernames, and status of sub-projects are listed.
| Task | Name/Pseudonym | IRC Username | Status of Project | Extra |
|---|---|---|---|---|
| Motor Testing | vc_nepo | vc_nepo | 10 % | Link |
| Encoder | User B | userBonIRC | 20 % | |
| Material Spec | User C | userConIRC | Complete |


