PowerCube6 Hydraulic Reservoir: Difference between revisions
Jump to navigation
Jump to search
Tom Griffing (talk | contribs) No edit summary |
Tom Griffing (talk | contribs) No edit summary |
||
| Line 22: | Line 22: | ||
# Weld the three flanges to the tank | # Weld the three flanges to the tank | ||
# Weld the "front" plate (ie: the one near the oil filter) to the end of the tube | # Weld the "front" plate (ie: the one near the oil filter) to the end of the tube | ||
# Drill the two holes for site gauge and securely install the site gauge | # Drill the two 1/2" holes for site gauge and securely install the site gauge | ||
# Tap the 7/16" hole for 1/4" NPTF threads, smooth the welds with the grinder. | # Tap the 7/16" hole for 1/4" NPTF threads, smooth the welds with the grinder. | ||
# Pressure test the tank by covering the filler neck with a plastic sheet, then securing the cap. Secure the smaller hole with a the fuel pickup and some 1/4" hose on the hose barb. Apply compressed air to the end of the rubber hose to pressurize the tank, then apply soapy water to all welds and check for bubbles. | # Pressure test the tank by covering the filler neck with a plastic sheet, then securing the cap. Secure the smaller hole with a the fuel pickup and some 1/4" hose on the hose barb. Apply compressed air to the end of the rubber hose to pressurize the tank, then apply soapy water to all welds and check for bubbles. | ||
Revision as of 01:32, 22 August 2012
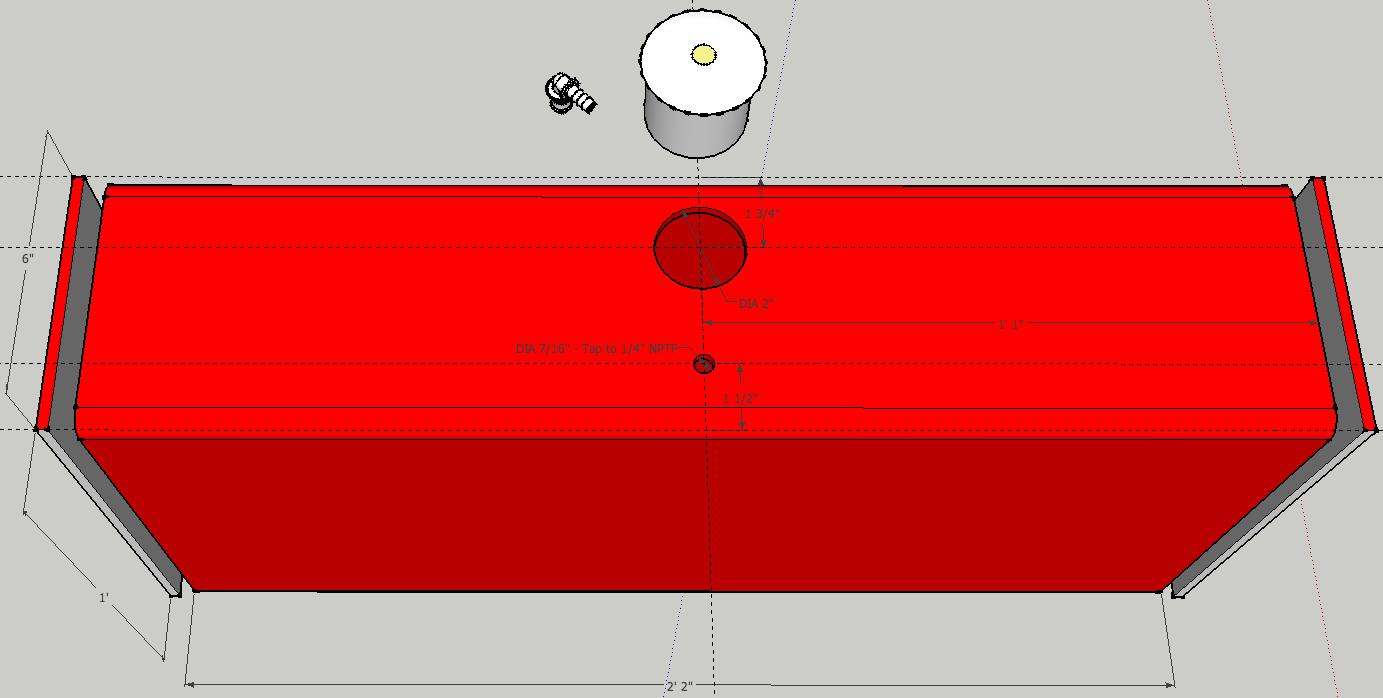
Procedure for fabricating the hydraulic reservoir. Note that the preparation of the edges for welding is critical, as the welded seams must prevent fluid leaks.
Part List:
1/4" x 6" x 12" - 26" Rectangular tube [2] 1/4" x 6" x 12" Flat Steel [2] 3/4" NPTF weld-in flange 3/4" NPTM plastic tank breather 1 1/2" NPTF x 3" union Hydraulic tank thermometer and sight gauge [2] 1/4" NPTM plug - Galvanized [2] 3/4" NPTM plug - PVC 1 1/2" NPTM plug - PVC Schrader air valve Soapy water
- Grind the 1/4" x 6" x 12" plates, rounding the corners to 1/2" radius and beveling the edges for welding.
- Grind the 1/2" x 6" x 12" Tube, beveling the edges for welding.
- Cut the 7/16", 1 7/16" and 2" holes in the tube as shown. The larger holes may be cut with an Oxy/Acetylene torch, then smoothed with a grinder.
- Tap threads in the two smaller holes with a 1/4" NPTF tap
- Weld the three flanges to the tank
- Weld the "front" plate (ie: the one near the oil filter) to the end of the tube
- Drill the two 1/2" holes for site gauge and securely install the site gauge
- Tap the 7/16" hole for 1/4" NPTF threads, smooth the welds with the grinder.
- Pressure test the tank by covering the filler neck with a plastic sheet, then securing the cap. Secure the smaller hole with a the fuel pickup and some 1/4" hose on the hose barb. Apply compressed air to the end of the rubber hose to pressurize the tank, then apply soapy water to all welds and check for bubbles.
- Mark any bubbling spots with a felt-tip marker and re-weld
- Re-test the tank and re-weld as necessary to stop all leaks
