Water Elf
These instructions are designed to help you program the waterelf device, a one-time step that you have to do before using the device. After programming, the device can be disconnected and when power is applied again, the program starts. All the normal communication and control (apart from initial programming) is done over wifi. The waterelf can be connected to waterproof temperature sensors, air humidity and temperature sensors, light level and pH level sensors. It can also control power sockets through 433MHz radio controls. It logs these both internally (limited space for data) and uploads them 'to the cloud' so you can see the data on the internet. The waterelf has a wifi station and webserver, and generates its own webpages. You can use these to see the data from the sensors and control the power socket:
For demonstration purposes, you can just do stage 1 and use a remote database that I'm making available for the workshop. In this case you can use almost any computer, and it can be either 32 or 64 bit. If not using linux (e.g Windows or Mac) follow the relevant instructions from the https://www.arduino.cc/en/Main/OldSoftwareReleases#previous page to get the version 1.6.5 arduino IDE installed instead of steps 2-8, then carry on with the steps as detailed:
First stage gets the arduino IDE installed to program the ESP8266 chip.
- To download our code for the device, goto https://github.com/hamishcunningham/fishy-wifi/archive/master.zip and save the file. Extract it to the home directory, then rename the folder from fishy-wifi-master to fishy-wifi.
- Visit http://www.arduino.cc/download.php?f=/arduino-1.6.5-r5-linux64.tar.xz. 90 MB download - takes a few minutes.
- Click on the downloaded file and extract it somewhere.
- Open up a terminal (click on ubuntu icon (top left), type terminal into search box, click on its icon).
- Type the following three commands into the terminal:
- cd <directory where extracted>/arduino-1.6.5-r5 - e.g. 'cd Downloads/arduino-1.6.5-r5'
- sudo chmod +x install.sh
- ./install.sh
- Now you should be able to find arduino IDE program from the ubuntu icon - click on it to run the arduino IDE.
- Open File, then Preferences.
- Set sketch folder to be /home/ubuntu/fishy-wifi/ardesp/Arduino (change ubuntu to match your username)
- In the Additional Board Manager URLs field put http://arduino.esp8266.com/staging/package_esp8266com_index.json and click OK.
- Open the Tools, Board: "Arduino/Genuine Uno", Boards Manager
- In the search box at the top right type "ESP" and then select the esp8266 by ESP8266 Community item and click install. 34MB download - takes 5 minutes. Sometimes it doesn't work the first time, just close down boards manager and try again.
- Now you can select Tools, Board - Choose the Adafruit HUZZAH ESP8266 board.
- When you plug in the board via the USB-serial/UART/FTDI thingy, you should see the port (Tools, Port) selected automatically.
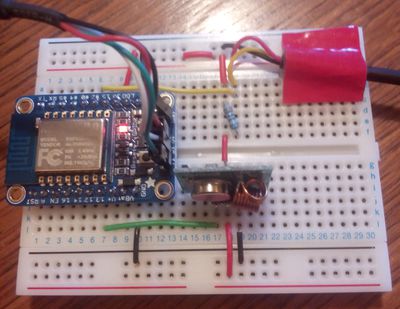
To actually program the waterelf sketch, open the fishy-wifi/ardesp/waterelf/waterelf.ino sketch with the arduino IDE, connect the device (and sensors and transmitter) as detailed here:
and hold the mode button (left one) whilst pressing and releasing the reset (right). In upload mode the red led glows dimly. Once in this mode, click on upload icon to program the device.
Once device is programmed, it generates a wifi access point called 'WaterElf-xxxxxxxx'. Join this network with your laptop (no password needed).
Open a browser to 192.168.99.1 - this should load the waterelf web-page. Sometimes the webpages don't load well (we're working on that one) and you need to refresh them once or twice. Give the device 5 seconds to respond before trying to refresh - it is only a little chip, after all!
In the waterelf page, click on the join a wifi network link, choose your network and enter it's password. Wait a few seconds, then goto the wifi status page to see if you joined the network ok. Once that is established, go to the main page (click on waterelf link at the bottom) and goto configure data sharing. The local server ip address is 81.187.237.62 - hit enter after typing this in.
You can check the sensor is working by clicking on the sensor data link. You can also control the external power socket with the External power radio buttons (set the power socket to settings IV and 2)
You can also goto http://81.187.237.62:5984/fishydata/_design/fishyapp/index.html to see the visualisation and data over the internet.
If you want to 'be your own cloud' then read on...
The following instructions are for running a local database and visualisation app. They were written for ubuntu 12.04, (note - docker requires 64 bit):
Second stage, get couchdb and associated app installed.
- In the terminal type the following:
- cd ~
- sudo add-apt-repository "deb http://us.archive.ubuntu.com/ubuntu/precise universe multiverse"
- sudo add-apt-repository "deb http://us.archive.ubuntu.com/ubuntu/precise-updates universe multiverse"
- echo -e "deb https://apt.dockerproject.org/repo ubuntu-precise main" | sudo tee -a /etc/apt/sources.list.d/docker.list
- sudo apt-key adv --keyserver hkp://pgp.mit.edu:80 --recv-keys 58118E89F3A912897C070ADBF76221572C52609D
- sudo apt-get update && sudo apt-get upgrade -y
- sudo apt-get install -y git python-dev python-pip docker-engine linux-image-generic-lts-trusty linux-headers-generic-lts-trusty xserver-xorg-lts-trusty libgl1-mesa-glx-lts-trusty (takes a couple of min)
- git clone https://github.com/hamishcunningham/fishy-wifi.git (this takes a few min)
- cd fishy-wifi/ardesp/wegrow
- sudo pip install -U docker-compose (takes a minute)
- DOCKER_HOST=localhost sudo docker-compose up (65MB takes a couple of min the first time)
Now the database should be up and running. Leave this terminal open but open another tab with control-shift-t. Type the following commands to get the app running.
- cd ~/fishy-wifi/ardesp/wegrow/
- sudo pip install couchapp
- cd fishyapp
- couchapp push fishydata
the app reports a URL to load e.g. http://127.0.0.1:5984/fishydata/_design/fishyapp/index.html open browser and load the URL given.


