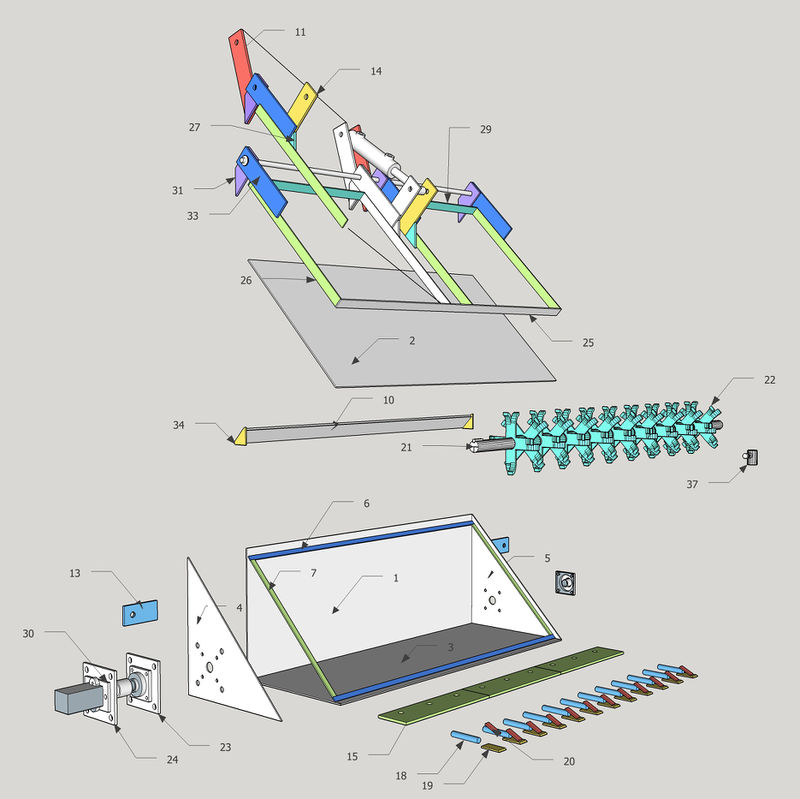
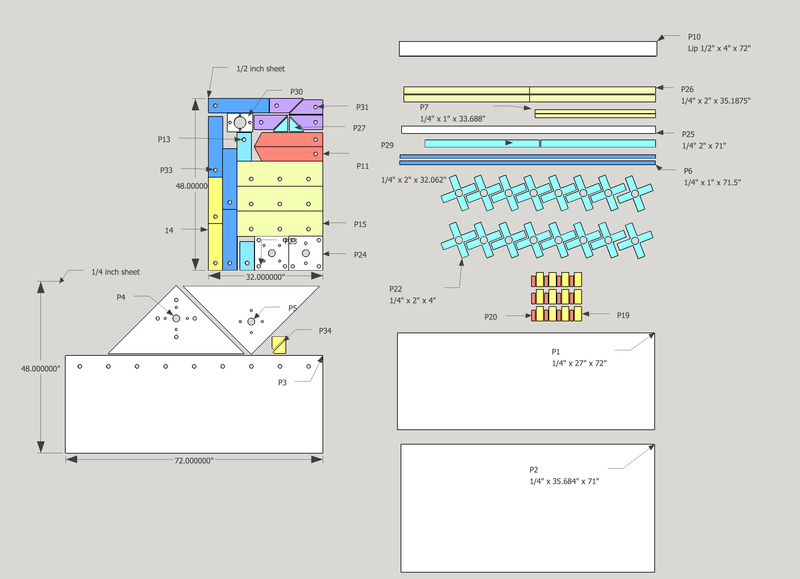
Soil Mixer - Overall Machine - Build Instructions
Preparing the Bucket
Note: the 2 side walls are different, and their orientation matters.
- Tack P4 to the bottom plate, P3. The lower edge of the triangular plate lies
on top of, not beside, the bottom plate.
- Tack the last triangular plate p5 on.
- Tack the large back plate on.
- Complete welds.
Source notes: I suggest adding the side plates before the back plate because
they are not as heavy, therefore easier to hold square etc.
quality control
- ensure side pieces are oriented and in the right positions.
- bolt the bearings and p23 on and check for fit with the rotor shaft. Leave
them on.
Bucket interior rim lip
- Tack a p6 shaped piece to the bottom, at a 45 degree angle.
- tack the two p7-shaped parts to the side walls
- tack p6 on.
- Don't finalize the welds yet, we want to make sure the lid fits relatively
well first.
Quick Attach Finger, side tabs
The "finger" is the industry term normally used for the big metal strip, p10.
- Tack the 2 P34 onto the outside of P10. The pieces are not symmetrical.
Take the 1/2 long flattened tip of the triangle and make it and the
hypotenuse face flush with the surfaces of p10.
- Tack the resulting p10+p34 to the back of the bucket.
- finish the welds
- Move the quick attach plate into position under the finger.
- Bolt p13, the side tabs, in place on the Quick Attach unit.
- tack both P13 parts to P1.
- Unbolt and remove the unit from the Quick attach unit.
- finish welding p13 parts to p1.
Rear Cylinder Mount pieces
- Add both 11 parts 34" from the side.
Lid, stage 1
- Tack the bottom P25 piece.
- tack the side struts (2x P26) to the lid plate.
- tack the P29 pieces.
Quality control
- it should be 6 7/8" between the middle p26 pieces.
Source note: p29 pieces are not very useful as a positioning aid for the
bottom end of the middle reinforcing strips because they are longer than the
gap from the side to p26.
hinge rod
- drill the hole in the end for the cotter pin, 3/4" from the end of the hinge
rod.
- weld the washer on the other end. Ensure 72.125" between the washer and pin.
quality control
- From the face of the washer to the side of the pin should be no less than
72.125". If it is, leave it for now, adjust it after the rest of the unit is
built, to ensure fit.
Source note: if the gap is too great, the space can be filled with washers.
If it is too small, it'd be a bother to grind off and re-add the washer on
the end. But we add the rod now so we can use it as an aid for alignment.
Hinge and Cylinder Mount pieces
- attach both p31 shaped parts, 7/8" from the edge.
- Place the partially fabricated lid on the bucket
- if necessary, adjust and grind the inner bucket rim to improve the fit.
- Hold the lid in position such that it's perimeter lies congruent with
perimeter of the bucket rim ledges.
- Insert the 1" hinge rod through the holes on all hinge parts, including the
washers that are between the hinge parts, so they are lined up on the shaft
in the right order. The p31 parts support the rod for now.
- add the cotter pin.
- weld all 4 p33 shaped parts on.
- weld the last 2 p31 shaped parts on.
- weld both p11 shaped parts on.
- add the hydraulic cylinder with the 1" bolts between p11.
- attach p14 to the cylinder end with a 1" bolt to aid positioning of p14
parts.
- weld both p14 shaped parts on.
- weld both p27 shaped parts on.
quality control
- check for fit by moving the lid through the whole range of motion with it
attached to the bucket, and the cylinder attached.
Check lid seal
- check that the lid seals to a degree with the lower bucket. Grind any areas
that could use some grinding to improve the fit.
Tine module Fabrication Process
Note: the tine modules explosion is not shown in the overall diagram yet.
- Cut the 3" pipe sections with a cold cut saw
- Cut the tines from the 1/4x2" stock, 4" each, using the ironworker. 72 of
them.
- Lay the tines out on the ground with the corners touching, and tack weld
them together.
- Put the 3" pipe section in a vice and place the tines in position around
it, then tack them together.
- cut the hole in the side of the pipe for the bolt to pass through with an
oxy acetylene torch.
- Thread the bolt onto the nut to aid positioning such that the bolt extents
1/4 or so past the end of the nut
- Tack the bottom p25 piece.
- Complete all welds while the tine module is in the vice.
- Remember there are 2 different tine module varieties, 9 of each type, the
only difference being the radial position of the nut and associated hole in
the side of the pipe. The bolt ends all tighten against the same flat
surface, so to prevent all 18 from being in a line, they are not all
identical. This is shown in the diagram. 9 are rotated 45 degrees relative
to the other 9.
- Cut a slit 1.5 inches down the center of each tine.
- Bend the tips of the tines with a monkey wrench by hand to produce the
curved tips.
Main rotor shaft
Bug note: 1 . There is no key used on the shaft in this design. Only the 1/2"
by 4" bolt passed through the coupler and shaft. 2. the flattenning of the
side of the shaft is not shown.
- Cut the shaft p21 from the 1 7/8" round stock. 81.5" long.
- Grind out a flat 1/4" deep on the shaft P21 for the bolts in the tine
modules to tighten against.
- Drill the hole for the coupler bolt: Place the 6 spline coupler on the
shaft, and use it as a guide to guide your drill bit. Start drilling the
hole radially through the shaft for the bolt, starting from the flattened
side of the shaft. After the hole is started, remove the coupler and
continue, to avoid damaging the coupler.
- Pass the shaft P21 through one bearing, with the drilled bolt hole on the
right end. Place the tines onto the shaft as it is being passed through to
the other bearing, then through the other bearing. You might want 2 people
for this one.
- The bolts on the tine modules can be tightened at the very end of the whole
module fabrication, no sense doing it now as the shaft may need to be removed
for some reason later.
Motor
- Place the 2x1/2" threaded rods into the holes of P30. Tack in place. Finish the weld.
- Grind the far side from where the motor is placed flat, so the assembly can fit flush against a flat plate.
- Bolt the motor to the plate.
Source note: this plate may appear to be unnecessary, but it allows the motor
to fit flush against surfaces, which the motor's built in SAE A type
interface does not. It also allows for easier removal of the motor, so it
can be used elsewhere. It is used elsewhere in the gvcs, too. It may be
eliminated in later versions for the mixer.
Drive
- Bolt the motor and quick attach plate to p24.
- Attach the 8 nuts, the 4 threaded rods with the tubes around them, and p23
in a sandwich. The tubes serve as spacers, countering the compressive forces
exerted by tightening the nuts. Tighten them lightly.
- Weld the nuts on the far side of P4 to the wall of p4.
- Attach the coupler on the motor to the drive shaft with the 1/2" x 4"bolt if
it is not yet attached.
- Tighten the screws in the collars of the bearings to the shaft.
Quality control checklist
- Ensure the system rotates freely 360 degrees. If the coupler, motor and
shaft are not sufficiently aligned on the same axis, it may lock up.
- Check that when torque is applied to the motor, in either direction, there
is no excessive twisting of p24 relative to p23. Dev:(how much torque?)
Teeth
Procedure
- Take p18
- Lay p19 flat
- Weld p18 with 1" overlap onto center of 19
- Weld p20 to make about 3/4" of 19 exposed at the cutting edge
- Repeat for the total 12 teeth
- Weld 4 teeth at the proper spacing (6" on center and 3" on center from the
edge) to part 15 (tooth bar bolt bar), with X inches overlap between 18 and
15, protruding from the side of the plate that is farthest from the holes.
- Repeat for the 2 other p15 shaped parts
- Grind teeth at 45 degree angle with tooth bar weldment in a vice
- Water harden or air harden the teeth by heating to red hot with acetylene
torch and then dunking in water
Quality control Checklist
- Make sure that 18 and 19 overlap by 1"
- Make sure that 18 and 19 are centered with respect to one another
- Make sure that about 3/4" of cutting knife is exposed, and that at least
1/2" is exposed after grinding
- Make sure that 15 is oriented with the holes pointing away from the teeth
- Make sure that the angle between 15 and 18 is 90 degrees
Add Hydraulics
- Add the cylinder using the 1" bolts if it is not on, though if the
proceedure above was followed it would be.
- the motor may already be attached, depending how closely the above
proceedure was followed
- Attach the fittings and hoses as shown in the hydraulic circuit diagram (see
the dev board)
- slide the firehose over the hose pairs to improve safety.
- double check that all fittings are adequately tightened.
Final
Ensure all bolts and hydraulic fittings are fully tightened. dev: a checklist would be good.

