LifeTrac/Trailer Ball Quick Attach: Difference between revisions
< LifeTrac
Jump to navigation
Jump to search
(Created page with "This is a plate for the life trak so you can tow trailers with it. 400px 400px ==Materials:== *1/2"x4" plate- 4" (2) [8" total]...") |
No edit summary |
||
| (6 intermediate revisions by 2 users not shown) | |||
| Line 1: | Line 1: | ||
This is a plate for the | This is a plate for the LifeTrac so you can tow trailers with it. | ||
<gallery widths="300" heights="200"> | |||
Image:balloff.jpg|The QA profile | |||
Image:Ballattached.jpg|The QA installed | |||
</gallery> | |||
==Materials:== | ==Materials:== | ||
*1/2"x4" plate- 4" (2) [ | *1/2"x4" plate- 4", 6" (2) [10" total] | ||
*1/2"x6" plate-10" (1) | *1/2"x6" plate-10" (1) | ||
*Trailer Ball | *Trailer Ball | ||
| Line 11: | Line 13: | ||
==Fabrication instructions== | ==Fabrication instructions== | ||
#Torch a hole to fit the trailer ball in | #Torch a hole to fit the trailer ball in the 1/2"x4"x4" piece, as close as possible to where it is to be welded. Insure the ball can still be turned and tightened. | ||
#Weld this plate centered, and square, about an inch from the top of the 1/2"x6" piece. | #Weld this plate centered, and square, about an inch from the top of the 1/2"x6" piece. | ||
#Flip the assembly over and weld the | #Flip the assembly over and weld the 4"x6" strip to the back, at the proper quick attach angle (a deflection of 2 1/4" over it's length) | ||
#Mount this to the tractor and mark where the hole at the bottom end needs to be torched | #Mount this to the tractor and mark where the hole at the bottom end needs to be torched | ||
#Torch the hole and clean it up. | #Torch the hole and clean it up. | ||
#Install the ball. | #Install the ball. | ||
Latest revision as of 01:59, 22 August 2011
This is a plate for the LifeTrac so you can tow trailers with it.
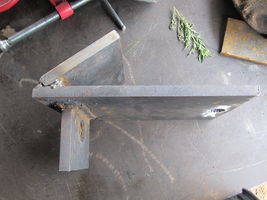
The QA profile
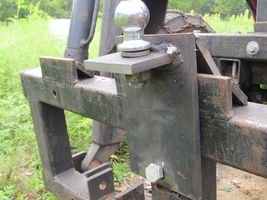
The QA installed


Materials:
- 1/2"x4" plate- 4", 6" (2) [10" total]
- 1/2"x6" plate-10" (1)
- Trailer Ball
- 3/4"x5" Bolt
Fabrication instructions
- Torch a hole to fit the trailer ball in the 1/2"x4"x4" piece, as close as possible to where it is to be welded. Insure the ball can still be turned and tightened.
- Weld this plate centered, and square, about an inch from the top of the 1/2"x6" piece.
- Flip the assembly over and weld the 4"x6" strip to the back, at the proper quick attach angle (a deflection of 2 1/4" over it's length)
- Mount this to the tractor and mark where the hole at the bottom end needs to be torched
- Torch the hole and clean it up.
- Install the ball.