CEB Press/Manufacturing Instructions/Dirt-Keeper Plate: Difference between revisions
Jump to navigation
Jump to search
No edit summary |
|||
| Line 1: | Line 1: | ||
{{Category=CEB press building instructions}} | {{Category=CEB press building instructions}} | ||
The dirt-keeper plate prevents dirt from falling out of the drawer when it is fully retracted. | =Part Information= | ||
=Tools | |||
*The dirt-keeper plate prevents dirt from falling out of the drawer when it is fully retracted. | |||
=Tools= | |||
*Hole punch with 1" dies | *Hole punch with 1" dies | ||
=Materials | |||
*1/8" | =Materials= | ||
*Steel plate 1/8" x 28.75" x 13.5" | |||
Note: This can be torched from the leftover plate from the hopper. Its OK if the corners are a bit chopped off, as they will be hidden and out of use under the primary arms. | Note: This can be torched from the leftover plate from the hopper. Its OK if the corners are a bit chopped off, as they will be hidden and out of use under the primary arms. | ||
=Diagrams= | =Diagrams= | ||
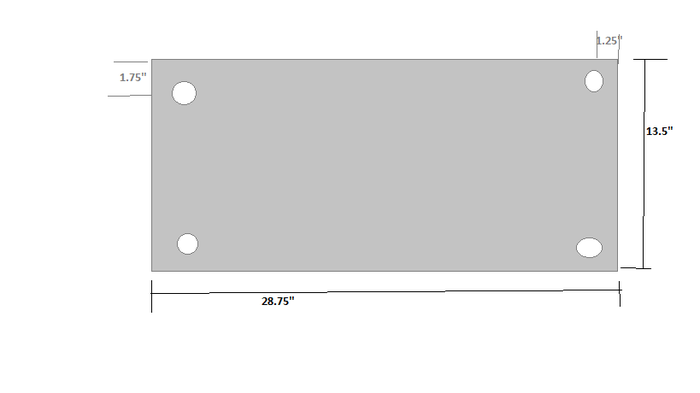
[[Image:dirtkeeper.png| | [[Image:dirtkeeper.png|700px|The hole locations]] | ||
= | =Steps= | ||
Punch the 1" holes in the proper locations. | Punch the 1" holes in the proper locations. | ||
Revision as of 23:37, 22 December 2011
Main > Housing and construction > CEB Press > CEB press building instructions
Part Information
- The dirt-keeper plate prevents dirt from falling out of the drawer when it is fully retracted.
Tools
- Hole punch with 1" dies
Materials
- Steel plate 1/8" x 28.75" x 13.5"
Note: This can be torched from the leftover plate from the hopper. Its OK if the corners are a bit chopped off, as they will be hidden and out of use under the primary arms.
Diagrams
Steps
Punch the 1" holes in the proper locations.
