CEB Press/Manufacturing Instructions/Valve Mount: Difference between revisions
Jump to navigation
Jump to search
No edit summary |
(→Tools) |
||
| (3 intermediate revisions by the same user not shown) | |||
| Line 1: | Line 1: | ||
{{Category=CEB press building instructions}} | {{Category=CEB press building instructions}} | ||
The valve mount holds the hydraulic solenoid valves to the primary arm. | =Part Information= | ||
*The valve mount holds the hydraulic solenoid valves to the primary arm. | |||
=Tools= | =Tools= | ||
| Line 8: | Line 10: | ||
*Drill Press with 5/16" or larger bit. | *Drill Press with 5/16" or larger bit. | ||
*Center Punch | |||
*Measuring Tape | |||
*Metal Marking Utensil | |||
=Materials= | =Materials= | ||
| Line 13: | Line 21: | ||
*Steel plate 1/4" x 6" x 12" | *Steel plate 1/4" x 6" x 12" | ||
*Solenoid Valve | *Solenoid Valve Subplate with Mount Angles | ||
=Steps= | =Steps= | ||
| Line 19: | Line 27: | ||
*Set the steel plate on a flat surface | *Set the steel plate on a flat surface | ||
*Position the solenoid valve | *Position the solenoid valve subplate with mount angles over the plate such that its work port surface is flush with the top edge and square with the side edges of the steel plate. | ||
*Using the marking utensil and the center punch, mark then center punch the 4 aligned holes at the sides of the steel plate | *Using the marking utensil and the center punch, mark then center punch the 4 aligned holes at the sides of the steel plate | ||
| Line 26: | Line 34: | ||
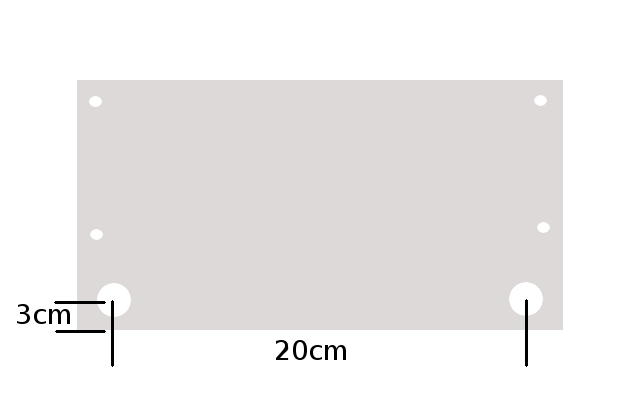
*Punch 2 holes of 13/16" diameter that are centered 20cm from each other and 3cm from the bottom edge of the steel plate. | *Punch 2 holes of 13/16" diameter that are centered 20cm from each other and 3cm from the bottom edge of the steel plate. | ||
[[Image:ValveMount.png]] | |||
Latest revision as of 00:30, 23 December 2011
Main > Housing and construction > CEB Press > CEB press building instructions
Part Information
- The valve mount holds the hydraulic solenoid valves to the primary arm.
Tools
- Hole puncher with 13/16" Dies
- Drill Press with 5/16" or larger bit.
- Center Punch
- Measuring Tape
- Metal Marking Utensil
Materials
- Steel plate 1/4" x 6" x 12"
- Solenoid Valve Subplate with Mount Angles
Steps
- Set the steel plate on a flat surface
- Position the solenoid valve subplate with mount angles over the plate such that its work port surface is flush with the top edge and square with the side edges of the steel plate.
- Using the marking utensil and the center punch, mark then center punch the 4 aligned holes at the sides of the steel plate
- Drill 4 holes of 5/16" diameter at the marked points of the steel plate
- Punch 2 holes of 13/16" diameter that are centered 20cm from each other and 3cm from the bottom edge of the steel plate.
