PowerCube Install Hydraulic Components: Difference between revisions
Jump to navigation
Jump to search
Tom Griffing (talk | contribs) |
Tom Griffing (talk | contribs) |
||
| (One intermediate revision by the same user not shown) | |||
| Line 4: | Line 4: | ||
* Connect adapter, nipple and male quick coupler for fluid power output port | * Connect adapter, nipple and male quick coupler for fluid power output port | ||
* Screw 3/4" male elbow into one end of oil cooler and female quick coupler to other end of elbow | * Screw 3/4" male elbow into one end of oil cooler and female quick coupler to other end of elbow | ||
* Screw 3/4" | * Screw 3/4" NPT to 3/4 JIC elbow into other end of oil cooler and 1' hose to JIC elbow connector | ||
* Connect opposite end of hose to JIC | * Assemble the filter head and Tee connectors as show and screw into hydraulic reservoir | ||
* | * Connect opposite end of hose to JIC adapter on filter head input | ||
* NOTE: The pump will be installed after installing the engine | |||
::[[Image:Hydraulics.png]] | ::[[Image:Hydraulics.png]] | ||
Latest revision as of 15:50, 24 December 2011
Install Hydraulic Components
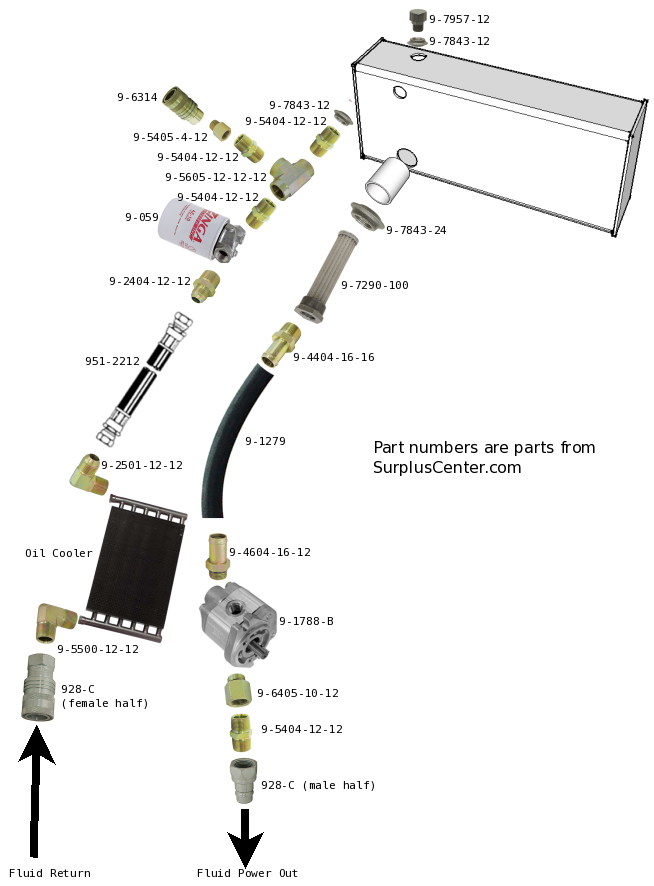
- Install hydraulic suction filter in tank and hose barb in suction filter
- Connect one end of suction hose to strainer hose barb, the other end to the hose barb on pump and secure with hose clamps
- Connect adapter, nipple and male quick coupler for fluid power output port
- Screw 3/4" male elbow into one end of oil cooler and female quick coupler to other end of elbow
- Screw 3/4" NPT to 3/4 JIC elbow into other end of oil cooler and 1' hose to JIC elbow connector
- Assemble the filter head and Tee connectors as show and screw into hydraulic reservoir
- Connect opposite end of hose to JIC adapter on filter head input
- NOTE: The pump will be installed after installing the engine
