Dairy Milker/Manufacturing Instructions: Difference between revisions
Jump to navigation
Jump to search
No edit summary |
|||
| (2 intermediate revisions by the same user not shown) | |||
| Line 2: | Line 2: | ||
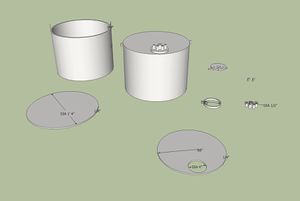
[[File:milkbucket.jpeg|thumb|Milk Bucket]] | [[File:milkbucket.jpeg|thumb|Milk Bucket]] | ||
'''Milk Bucket''' | '''Milk Bucket''' | ||
*Milk Bucket Fabrication Diagram: | *Milk Bucket Fabrication Diagram: [[File:milkbucket.skp]] | ||
[[File:milkbucket.skp]] | |||
#Fabricate milk bucket | #Fabricate milk bucket | ||
#Install gaskets | #Install gaskets | ||
#Install tubing, pulsator, check valve | #Install tubing, pulsator, check valve | ||
'''Teat Cups''' | '''Teat Cups''' | ||
If you bought them prefabricated, install inflations and connect to milk and vacuum tubes coming from the milk bucket. | *If you bought them prefabricated, install inflations and connect to milk and vacuum tubes coming from the milk bucket. | ||
*If you are fabricating them: | |||
If you are fabricating them: | |||
#Remove plungers from 600 cc syringe | #Remove plungers from 600 cc syringe | ||
#Drill vacuum hole | #Drill vacuum hole | ||
| Line 16: | Line 14: | ||
#Connect tubing | #Connect tubing | ||
<html><img src="https://docs.google.com/drawings/pub?id=10Pq42mA7_E7_kINm72rdTR_R2TufWdhMH4HVS2kDPLI&w= | <html><img src="https://docs.google.com/drawings/pub?id=10Pq42mA7_E7_kINm72rdTR_R2TufWdhMH4HVS2kDPLI&w=270&h=390"></html> | ||
[https://docs.google.com/drawings/pub?id=10Pq42mA7_E7_kINm72rdTR_R2TufWdhMH4HVS2kDPLI&w=960&h=720 edit drawing] | [https://docs.google.com/drawings/pub?id=10Pq42mA7_E7_kINm72rdTR_R2TufWdhMH4HVS2kDPLI&w=960&h=720 edit drawing] | ||
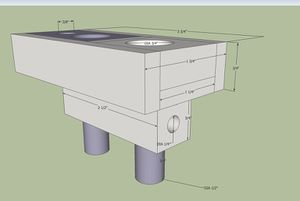
[[File:pulsator.jpeg|thumb|Pulsator]] | [[File:pulsator.jpeg|thumb|Pulsator]] | ||
'''Pulsator''' | '''Pulsator''' | ||
*Pulsator Fabrication Diagram: | *Pulsator Fabrication Diagram: [[File:pulsator.skp]] | ||
[[File:pulsator.skp]] | |||
#Fabricate pulsator body | #Fabricate pulsator body | ||
Latest revision as of 16:07, 20 December 2012
Fabrication Diagrams
Milk Bucket
- Milk Bucket Fabrication Diagram: File:Milkbucket.skp
- Fabricate milk bucket
- Install gaskets
- Install tubing, pulsator, check valve
Teat Cups
- If you bought them prefabricated, install inflations and connect to milk and vacuum tubes coming from the milk bucket.
- If you are fabricating them:
- Remove plungers from 600 cc syringe
- Drill vacuum hole
- Install barb coupler and seal with silicone
- Connect tubing
Pulsator
- Pulsator Fabrication Diagram: File:Pulsator.skp
- Fabricate pulsator body
- Install gasketry
- Assemble solenoids
- Connect tubing
Vacuum pump
- Install vacuum regulator (if necessary)
- Connect tubing to milk bucket

