Compressed Air Water Pump: Difference between revisions
No edit summary |
No edit summary |
||
| (16 intermediate revisions by 4 users not shown) | |||
| Line 1: | Line 1: | ||
{{Category=Water}} | |||
=Research= | =Research= | ||
http://www.hydromissions.com/products.htm | http://www.hydromissions.com/products.htm | ||
http://www.hydromissions.com/slapshotconstruction.pdf | http://www.hydromissions.com/slapshotconstruction.pdf | ||
| Line 9: | Line 10: | ||
[[Image:compressedairwaterpump.jpg]] | [[Image:compressedairwaterpump.jpg]] | ||
==Timer== | |||
===COTS Commercial Off The Shelf timers=== | |||
*http://www.grainger.com/Grainger/items/2A560 | |||
*http://www.groworganic.com/item_GP797_7Day_Digital_Timer.html | |||
===Arduino timer by Ralf=== | |||
*http://factorefarm.org/content/compressed-air-water-pump#comment-238 | |||
===Do it yourself el-cheapo timer=== | |||
By mimarob | |||
[[File:airpump.gif]] | |||
This is my first attempt at the wiki so I hope I will do this right. | |||
If you are really looking for an el-cheapo solution and all you need to do is to turn a solenoid on and off at adjustable intervals, take a look at the 555 IC. | |||
It is about $1.69 at Radioshack, then you need two potentiometers (turning knobs), and a handful of passive components, getting away with the uC and laptop altogether. | |||
With the values in the schematics, we would get 2 seconds on and 6 seconds off when putting the knobs in the middle. | |||
I don't know enough about triacs so I would probably go for an old-fashioned relay and a transistor to amplify the current for the coil and isolate galvanically. | |||
The relay could then in turn be used to control the air-solenoid. | |||
'''Always be careful both with high currents, high voltages and pressurized air!''' | |||
I took most of the construction from: | |||
http://www.kpsec.freeuk.com/555timer.htm | |||
===Another timer circuit design by Earthling=== | |||
*http://factorefarm.org/content/compressed-air-water-pump#comment-236 | |||
[[file:timercurcuit.pdf]] | |||
==Solenoid valves== | |||
*http://export.farnell.com/camozzi/a331-1-c2-a7d/solenoid-valve-110vac/dp/285080 | |||
=Design 1= | =Design 1= | ||
[[Image:Compressed_Air_Water_Pump.jpg|thumb]] | |||
==BOM== | |||
*2' x 2" PVC pipe | |||
*2" flat PVC cap | |||
*2" Spigot x 3/4" Fips [http://www.plumbingsupply.com/pvc.html#plug] [[Image:plug.jpg|thumb]] | |||
*3/4" male thread coupling | |||
*[http://www.lowes.com/lowes/lkn?action=productDetail&productId=61252-34146-M31SL&lpage=none 3/4" brass check valve] | |||
*2 x 3/4" male threaded PVC plugs | |||
*2' x 3/4" PVC pipe | |||
*2 x 3/4" hoses long enough to go down the well | |||
==Construction== | |||
#Ream out one 3/4" male threaded PVC plug with a 3/4" hole for the 2' x 3/4" pipe and attach them. | |||
#Drill two 5/8" holes in the flat PVC cap and tap them to 3/4" for the air in and water out 3/4" male threaded PVC plugs. Use plumbers tape and attach the plugs. Glue the PVC cap to the 2' x 2" pipe. | |||
#Remove the spring of the metal check valve like in the hydromissions slapshot instructions. | |||
#Glue the 2" to 3/4" plug to the other end of the 2' x 2" pipe, attach the 3/4" male threaded coupler and the 3/4" check valve. | |||
#Attach the hoses to the plugs with plumbers tape and clamps and test the pump. | |||
==Assembly Diagram== | |||
[[Image:airpump.jpg]] | |||
==Video== | |||
<html> | |||
<object width="425" height="344"><param name="movie" value="http://www.youtube.com/v/NVnshYe7yyQ&hl=en&fs=1&"></param><param name="allowFullScreen" value="true"></param><param name="allowscriptaccess" value="always"></param><embed src="http://www.youtube.com/v/NVnshYe7yyQ&hl=en&fs=1&" type="application/x-shockwave-flash" allowscriptaccess="always" allowfullscreen="true" width="425" height="344"></embed></object> | |||
</html> | |||
=Katie's Work= | |||
[[ | [[Image:goodpump.gif]] | ||
Latest revision as of 14:06, 7 February 2011
Research
http://www.hydromissions.com/products.htm
http://www.hydromissions.com/slapshotconstruction.pdf
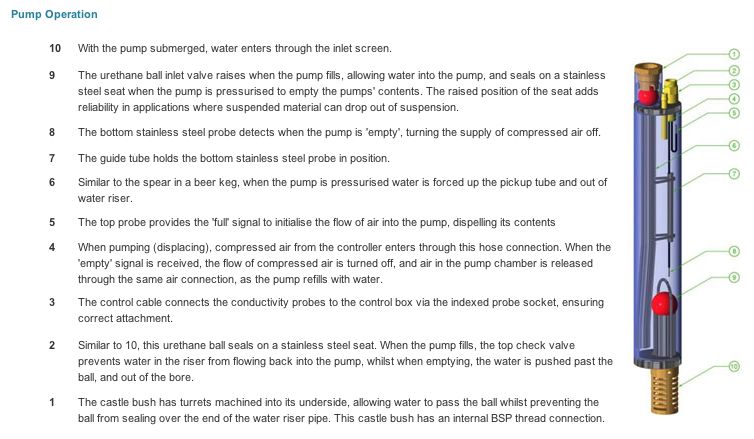
From http://www.airwellpumps.com/HowDoesItWork.aspx :
Timer
COTS Commercial Off The Shelf timers
- http://www.grainger.com/Grainger/items/2A560
- http://www.groworganic.com/item_GP797_7Day_Digital_Timer.html
Arduino timer by Ralf
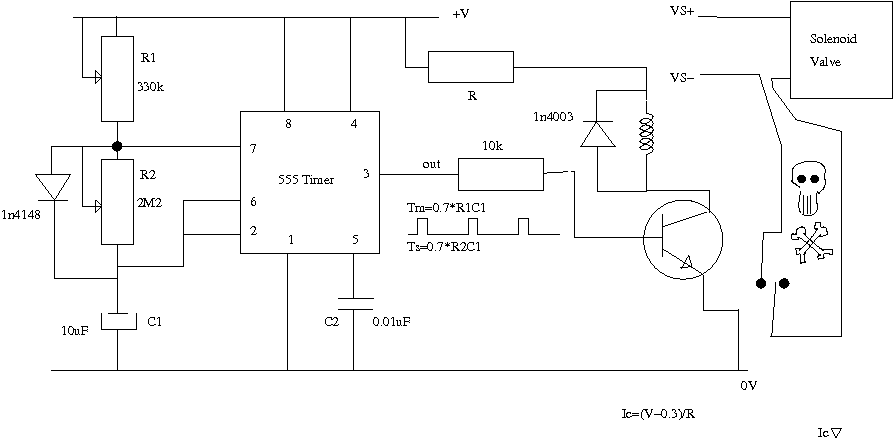
Do it yourself el-cheapo timer
By mimarob
This is my first attempt at the wiki so I hope I will do this right.
If you are really looking for an el-cheapo solution and all you need to do is to turn a solenoid on and off at adjustable intervals, take a look at the 555 IC.
It is about $1.69 at Radioshack, then you need two potentiometers (turning knobs), and a handful of passive components, getting away with the uC and laptop altogether.
With the values in the schematics, we would get 2 seconds on and 6 seconds off when putting the knobs in the middle.
I don't know enough about triacs so I would probably go for an old-fashioned relay and a transistor to amplify the current for the coil and isolate galvanically.
The relay could then in turn be used to control the air-solenoid.
Always be careful both with high currents, high voltages and pressurized air!
I took most of the construction from:
http://www.kpsec.freeuk.com/555timer.htm
Another timer circuit design by Earthling
Solenoid valves
Design 1
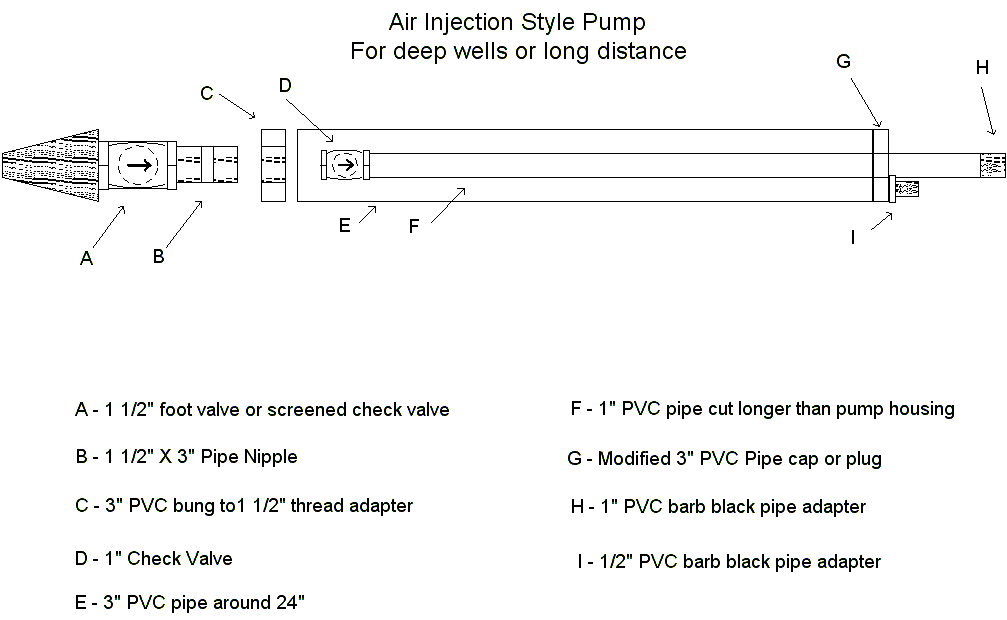
BOM
- 2' x 2" PVC pipe
- 2" flat PVC cap
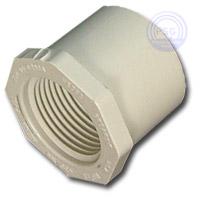
- 2" Spigot x 3/4" Fips [1]
- 3/4" male thread coupling
- 3/4" brass check valve
- 2 x 3/4" male threaded PVC plugs
- 2' x 3/4" PVC pipe
- 2 x 3/4" hoses long enough to go down the well
Construction
- Ream out one 3/4" male threaded PVC plug with a 3/4" hole for the 2' x 3/4" pipe and attach them.
- Drill two 5/8" holes in the flat PVC cap and tap them to 3/4" for the air in and water out 3/4" male threaded PVC plugs. Use plumbers tape and attach the plugs. Glue the PVC cap to the 2' x 2" pipe.
- Remove the spring of the metal check valve like in the hydromissions slapshot instructions.
- Glue the 2" to 3/4" plug to the other end of the 2' x 2" pipe, attach the 3/4" male threaded coupler and the 3/4" check valve.
- Attach the hoses to the plugs with plumbers tape and clamps and test the pump.
Assembly Diagram
Video
