How to:Write Image to SD Card: Difference between revisions
(Created page with "This page will explain how to write an Image to an external drive, like a SD card or a USB Stick The process will be demonstrated with the OSE 3dPrint Cluster Software under t...") |
No edit summary |
||
| Line 3: | Line 3: | ||
=Using Disk Image Writer= | =Using Disk Image Writer= | ||
'''WARNING: This process will delete all data from the SD card or USB Stick. Backup any data beforehand!!!''' | '''WARNING: This process will delete all data from the SD card or USB Stick. Backup any data beforehand!!!''' | ||
First you should assure that the external drive has enough space. When no other information is given, a minimum of 4 Gigabyte should be appropriate. | First you should assure that the external drive has enough space. When no other information is given, a minimum of 4 Gigabyte should be appropriate. | ||
After Downloading the image, the Image will probably be zipped. To unzip it, | |||
After Downloading the image, the Image will probably be zipped. To unzip it, right click and "extract it" | |||
[[File:Extract_Folder.png | 800px]] | |||
After Downloading the image, right click on it and choose "Open with" -> "Disk Image Writer" | After Downloading the image, right click on it and choose "Open with" -> "Disk Image Writer" | ||
[[File:Disk_Image_Writer_Choosing.png | 800px]] | [[File:Disk_Image_Writer_Choosing.png | 800px]] | ||
| Line 14: | Line 19: | ||
This will open a window with a pop-up to choose the drive upon which the image should be written. | This will open a window with a pop-up to choose the drive upon which the image should be written. | ||
[[File:Disk_Image_writer_Interface.png | 800px]] | [[File:Disk_Image_writer_Interface.png | 800px]] | ||
For this Scenario, the SD Card reader gets selected. After clicking restore the process will begin. | For this Scenario, the SD Card reader gets selected. After clicking restore the process will begin. | ||
Revision as of 21:11, 30 June 2017
This page will explain how to write an Image to an external drive, like a SD card or a USB Stick The process will be demonstrated with the OSE 3dPrint Cluster Software under the OSE Linux Distribution (Ubuntu).
Using Disk Image Writer
WARNING: This process will delete all data from the SD card or USB Stick. Backup any data beforehand!!!
First you should assure that the external drive has enough space. When no other information is given, a minimum of 4 Gigabyte should be appropriate.
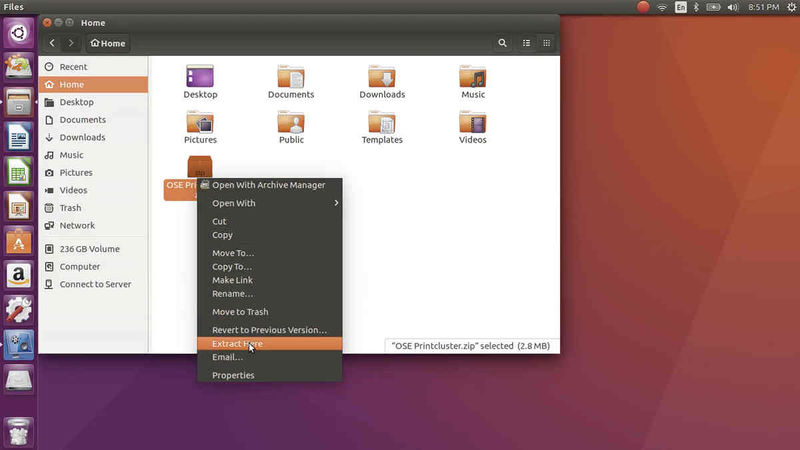
After Downloading the image, the Image will probably be zipped. To unzip it, right click and "extract it"
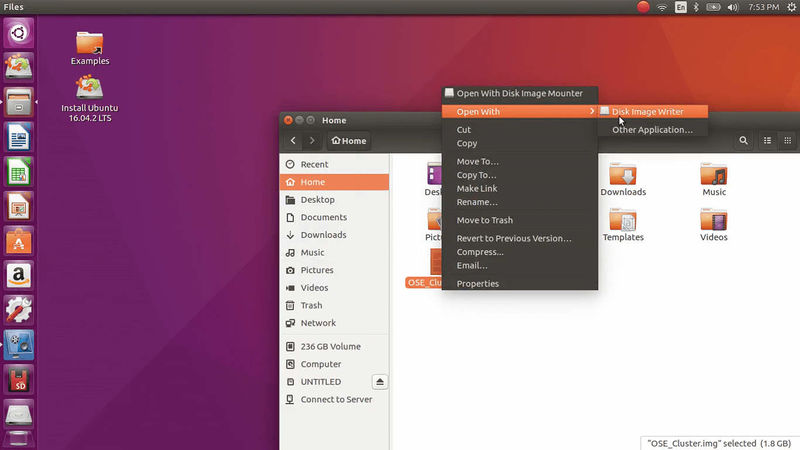
 After Downloading the image, right click on it and choose "Open with" -> "Disk Image Writer"

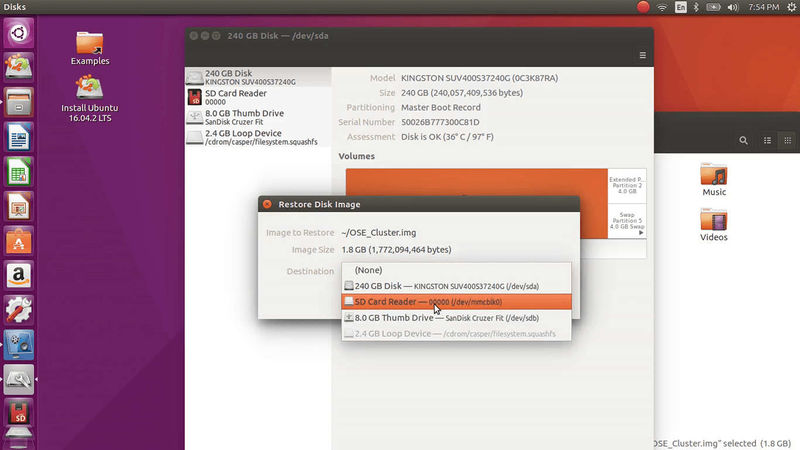
This will open a window with a pop-up to choose the drive upon which the image should be written.

For this Scenario, the SD Card reader gets selected. After clicking restore the process will begin.
And you're done!
After this, there may be some kind of customization to make, however this is very specific and should always be handeled with care.
In the case of the OSE 3dPrint Cluster Software, you can put in your wifi credentials so the Raspberry Pi will automatically connect to your network.
For achieving that, we have to modify a textfile. Go to the external partition called 'boot' and open the octopi-network.txt.
Now you have to customize depending on the network, there are three options here: WPA/WPA2, WEP and unsecured.
Uncomment the lines (meaning: remove the #) below your kind of network authentification (which is problably and hopefully WPA2) and fill in your SSID (this means the name of your network) and the WIFI password inside the "". Don't forget to save the file.
After that the SD Card should be ready. Test on your PI and turn it on!