Cut CEB Metal: Difference between revisions
Jump to navigation
Jump to search
No edit summary |
No edit summary |
||
| Line 1: | Line 1: | ||
Cut 10 pieces of [[7/16"x6" heavy u-channel]] (this link should be filled with (1) a technical drawing from a library of any professional CAD package); (2) a real picture of the material, (3) a real picture or video of someone cutting it (all of: abrasive, cold cut, band, plasma, or oxy torch) | Cut 10 pieces of [[7/16"x6" heavy u-channel]] (this link should be filled with (1) a technical drawing from a library of any professional CAD package); (2) a real picture of the material, (3) a real picture or video of someone cutting it (all of: abrasive, cold cut, band, plasma, or oxy torch) | ||
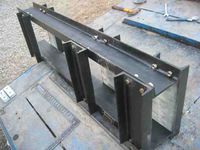
[[Image:3_cebfab.jpg|200px]] | [[Image:3_cebfab.jpg|200px|Proto 1 - now frame is updated to 3/4" bolts and longer mid pieces.]] | ||
[[Image:3_cebfab.jpg|200px|Proto 1 - now frame is updated to 3/4" bolts and longer mid pieces.]] | |||
*[4] 21" long - top and bottom of frame | *[4] 21" long - top and bottom of frame | ||
| Line 23: | Line 24: | ||
* - hopper | * - hopper | ||
=Step 1= | |||
Build frame from 6 inch heavy (7/16") u-channel | |||
=Hopper= | |||
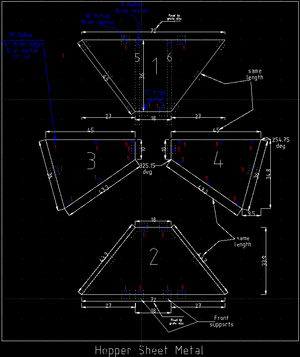
*Plasma cut sheet metal | |||
*Punch 3/4" holes in all 28 hinges, in center of rounded part | |||
*Punch holes in hopper sheet metal (all the blue holes, 3/4") | |||
[[Image:hopperfab.png|thumb]] | |||
*Bolt all hinges to sheet metal at the red locations marked "1" with 3/4" bolts | |||
*Weld bottom hinges of ''hopper sheet 1'' to hopper mount plate | |||
*Weld top hinges of hopper sheet 1 to grate | |||
*Install hopper supports to hold hopper sheet 1, and bolt with the 2 bolts (1/2") | |||
*Weld hinges to hopper supports for sheet 2 | |||
*Weld hinges at base of sheets 2, 3, 4 | |||
*Weld hinges between sheets 3&1, 4&1, and between 2&3, and 2&4 | |||
*At this point, the entire hopper is erected. It remains to weld the remaining hinges to the grate. | |||
*Upon completing these steps, the 3/4" bolts can be replaced with 1/2" bolts for successive deconstruction and reconstruction of the hopper. | |||
* - hopper supports | * - hopper supports | ||
Revision as of 23:01, 3 July 2011
Cut 10 pieces of 7/16"x6" heavy u-channel (this link should be filled with (1) a technical drawing from a library of any professional CAD package); (2) a real picture of the material, (3) a real picture or video of someone cutting it (all of: abrasive, cold cut, band, plasma, or oxy torch)
- [4] 21" long - top and bottom of frame
- [2] 29" long - mid of frame
- [2] 10" long - compression chamber spacers
- [2] 42" long - frame sides - see Note on CEB Frame Height
- [2] 44" long - frame sides - see Note on CEB Frame Height
- [4] 6' long - arms
- [4] 4' long - legs
- [4] 6" long - 2.5"x3/16" square tubing - feet tubes
- [4] 10"x10"x1/4" flats - feet
- [2] 1/4"x2" angle, 21" long - hopper closure
- [2] 1/4"x2" angle - 7" long - hopper closure tab for cylinder alignment
- [2]
- - drawer
- - hopper
Step 1
Build frame from 6 inch heavy (7/16") u-channel
Hopper
- Plasma cut sheet metal
- Punch 3/4" holes in all 28 hinges, in center of rounded part
- Punch holes in hopper sheet metal (all the blue holes, 3/4")
- Bolt all hinges to sheet metal at the red locations marked "1" with 3/4" bolts
- Weld bottom hinges of hopper sheet 1 to hopper mount plate
- Weld top hinges of hopper sheet 1 to grate
- Install hopper supports to hold hopper sheet 1, and bolt with the 2 bolts (1/2")
- Weld hinges to hopper supports for sheet 2
- Weld hinges at base of sheets 2, 3, 4
- Weld hinges between sheets 3&1, 4&1, and between 2&3, and 2&4
- At this point, the entire hopper is erected. It remains to weld the remaining hinges to the grate.
- Upon completing these steps, the 3/4" bolts can be replaced with 1/2" bolts for successive deconstruction and reconstruction of the hopper.
- - hopper supports
- - shaker
- - hopper interface plate
- [2] 3/4" pipe, 1" long - cylinder aligner
- [2] u-channel, 3" - cylinder align

