CEB Press/Manufacturing Instructions/Hopper sheet metal: Difference between revisions
Jump to navigation
Jump to search
(Created page with " == Tools Required == torch welder hole punch == Materials Required == sheet metal ? hinges 3/4" bolts 1/2" bolts == Diagrams == thumb == Fabrica...") |
No edit summary |
||
| Line 1: | Line 1: | ||
== Tools Required == | == Tools Required == | ||
torch | *torch | ||
welder | *welder | ||
hole punch | *hole punch | ||
== Materials Required == | == Materials Required == | ||
sheet metal ? | *sheet metal ? | ||
hinges | *hinges | ||
3/4" bolts | *3/4" bolts | ||
1/2" bolts | *1/2" bolts | ||
== Diagrams == | == Diagrams == | ||
Revision as of 07:21, 7 March 2011
Tools Required
- torch
- welder
- hole punch
Materials Required
- sheet metal ?
- hinges
- 3/4" bolts
- 1/2" bolts
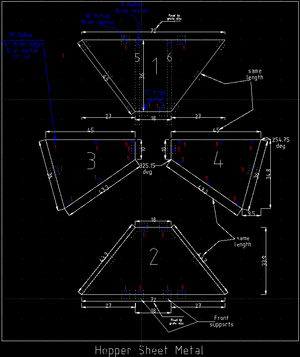
Diagrams
Fabrication Steps
- Plasma cut sheet metal
- Punch 3/4" holes in all 28 hinges, in center of rounded part
- Punch holes in hopper sheet metal (all the blue holes, 3/4")
- Bolt all hinges to sheet metal at the red locations marked "1" with 3/4" bolts
- Weld bottom hinges of hopper sheet 1 to hopper mount plate
- Weld top hinges of hopper sheet 1 to grate
- Install hopper supports to hold hopper sheet 1, and bolt with the 2 bolts (1/2")
- Weld hinges to hopper supports for sheet 2
- Weld hinges at base of sheets 2, 3, 4
- Weld hinges between sheets 3&1, 4&1, and between 2&3, and 2&4
- At this point, the entire hopper is erected. It remains to weld the remaining hinges to the grate.
- Upon completing these steps, the 3/4" bolts can be replaced with 1/2" bolts for successive deconstruction and reconstruction of the hopper.
