Hab Lab: Difference between revisions
Margaret Ida (talk | contribs) |
Margaret Ida (talk | contribs) |
||
| Line 57: | Line 57: | ||
==CEB Columns== | ==CEB Columns== | ||
===Setting the column pad forms=== | |||
*Collect equipment and supplies needed | |||
**16 Pre-built column pad forms | |||
**16 Pre-built column pad rebar assemblies | |||
**64 rebar chairs | |||
**128 form stakes | |||
**Hammer(s) | |||
**Rake(s) | |||
**shovel | |||
**4'spirit Level | |||
**Water level | |||
**tape measure | |||
*Set the pre-built column pad forms in place under the string lines with the inside of the forms under the strings. | |||
*Stake them in place with form stakes per lay-out - 2 on each side. | |||
*Remove stone 2” deep inside forms (rake it out) | |||
*Pack removed stone around outside of forms and 1/2" under frames to create 6" deep form. | |||
*Check level across each form with spirit level. | |||
*Check East/West rows with water level to be in line with 6" slope down to the East across the building. | |||
*Check North/South rows with water level to be on level with each other across the building. | |||
*Use one prebuilt column pad rebar assembly for each column pad site. | |||
*Center the rebar assembly with 3” gap between assembly and form wall on every side. | |||
*Set rebar chairs under corners of prebuilt column pad rebar assemblies per diagram. | |||
[[File:Setting Column Pad Forms Diagram.png|thumb|600 px|center]] | |||
==Insulated Roof== | ==Insulated Roof== | ||
Revision as of 18:51, 30 September 2011
The need for all-weather housing to shelter year-round members of the community, located where summers can be unpleasantly hot and winters unpleasantly cold, can be met with superinsulated designs. Here we will examine some possible options and our progress in bring them into existence. Planning tools, instructions, modifications, etc. will be included.
The Design Page is a good place to see what has been offered and to post any of your own great ideas. More ideas are great for everybody!
Survey & Design
The area on the property for the first group habitation was on a noticeable slope. OSE staff members worked with a home-made water level to take measurements over a 100' square area.
How to make a water level: http://www.youtube.com/watch?v=nAcT_1T25LM
Ideas submitted for this project are located on the Hab Lab Design Gallery page.
Building Orientation
Planning
Kitchen/Bath Water
Utility/Storage Area
Heating
Source Material
http://dnr.mo.gov/pubs/pub781.pdf
Site Preparation
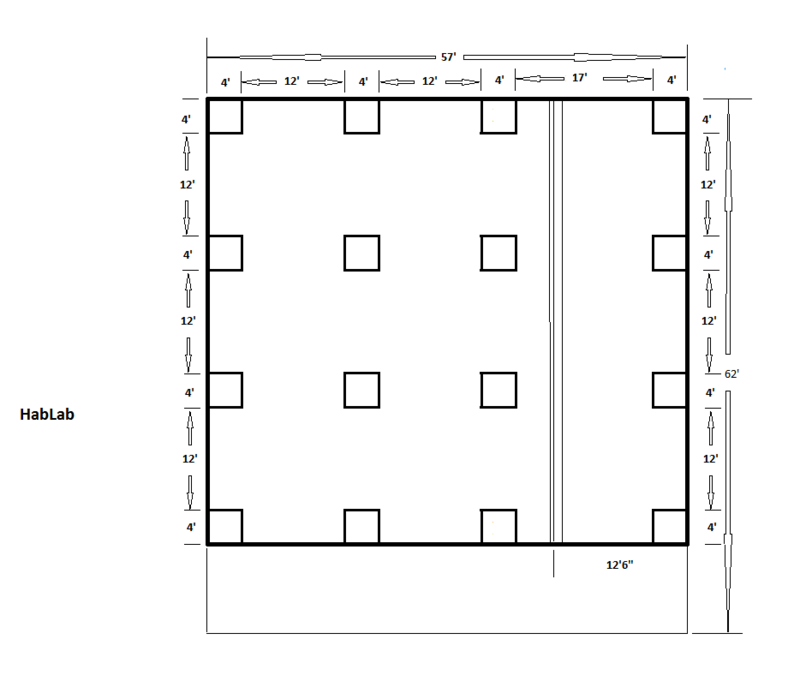
Here is a picture with a preliminary excavation layout for the column pad sites and the retaining wall in the Hab Lab.
- When you are laying out the excavation site, be sure to add 5' in each direction for the excavator to work to.
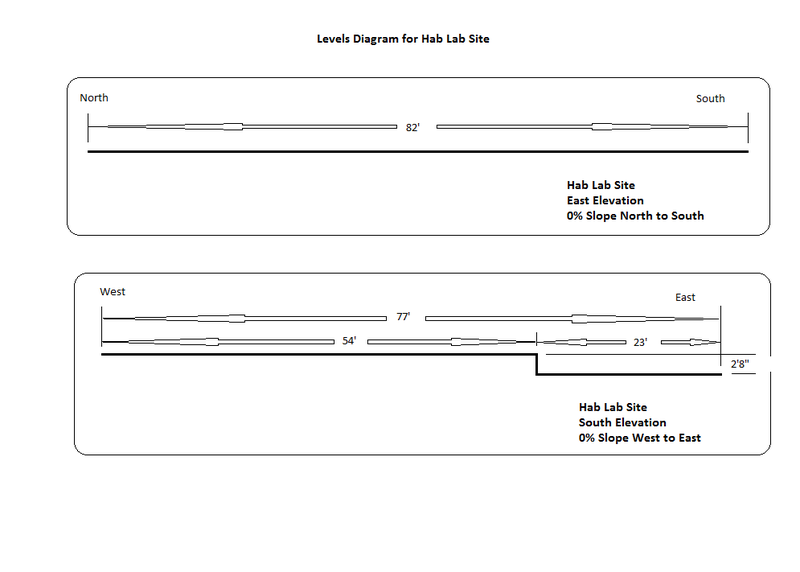
This levels diagram is from our theoretical measurements - we actually wound up with a 2' drop, not a 2'8" drop. That will make only a minor difference in raising the building - changing the size of the retaining wall and removing one or two CEB's at the top of the lower columns to maintain the planned roof pitch.
Foundations & Column Slabs
- With the site leveled, the foundation holes for the column slabs must be laid out.
- After excavation, the stone fill for the foundation goes into the holes.
- At the same time, the 6" stone floor foundation is spread.
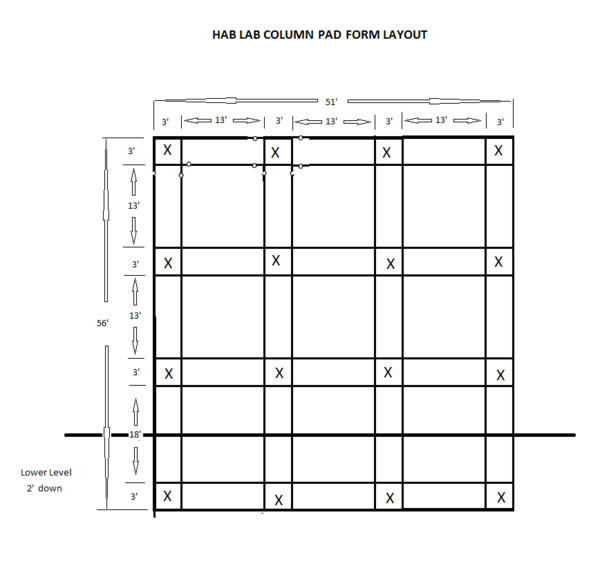
- Then we get to laying out the locations for the forms on top of the foundations.
- After doing this in real life - More comments on that to come!
- Here is the layout diagram to place the column forms.
Concrete Work
Insulated Outside Wall Support Slabs
We are planning to put concrete the full 3' width of the Column Support Pads all the way around the outside of the building. They will be 3-1/2" (2x4 lumber size) deep and will support the two CEB walls that enclose the hay bale insulation.
Narrow Wall Support Slabs
We will support and stabilize the interior CEB walls with a 12" wide x 3-1/2" deep concrete slab.
Kitchen and Bath Areas
The Kitchen and Bath Floor Areas both have a potential for receiving noticeable amounts of water. We consider it advisable to pave them both with concrete and include a central drain.
Retaining Wall for Lower Level
CEB Columns
Setting the column pad forms
- Collect equipment and supplies needed
- 16 Pre-built column pad forms
- 16 Pre-built column pad rebar assemblies
- 64 rebar chairs
- 128 form stakes
- Hammer(s)
- Rake(s)
- shovel
- 4'spirit Level
- Water level
- tape measure
- Set the pre-built column pad forms in place under the string lines with the inside of the forms under the strings.
- Stake them in place with form stakes per lay-out - 2 on each side.
- Remove stone 2” deep inside forms (rake it out)
- Pack removed stone around outside of forms and 1/2" under frames to create 6" deep form.
- Check level across each form with spirit level.
- Check East/West rows with water level to be in line with 6" slope down to the East across the building.
- Check North/South rows with water level to be on level with each other across the building.
- Use one prebuilt column pad rebar assembly for each column pad site.
- Center the rebar assembly with 3” gap between assembly and form wall on every side.
- Set rebar chairs under corners of prebuilt column pad rebar assemblies per diagram.


