CEB Press/Manufacturing Instructions/Wide Cylinder Supports: Difference between revisions
Jump to navigation
Jump to search
No edit summary |
No edit summary |
||
| Line 1: | Line 1: | ||
<html><iframe src="http://sketchup.google.com/3dwarehouse/mini?mid=31ebd3ea006a79211211da1f85706ccd&etyp=sw&width=400&height=300" frameborder="0" scrolling="no" marginheight="0" marginwidth="0" width="400" height="300"></iframe></html> | |||
=Tools Required= | =Tools Required= | ||
*Welder | *Welder | ||
Latest revision as of 02:45, 16 December 2011
Tools Required
- Welder
- Torch
- Punch with 3/4" dies
- Angle Grinder
- Speed square
Materials Required
Monster CEB
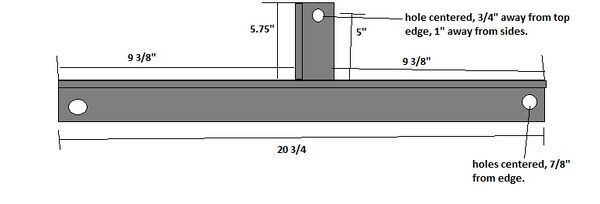
- 6" Light (1/4") U-Channel: 41.5" total; Wide cylinder support horizontal: 20 3/4" (2)
- 2"x2"x1/4" angle: 11.5"; Wide cylinder support verticals: 5.75" (2)
- 3/4" Steel Nuts-(2)
- 3/4" Galvanized Nuts-(2)
Normal CEB
- 2"x2"x1/4" Angle: 53"
- Wide cylinder support horizontal: 20 3/4" (2)
- Wide cylinder support verticals: 5.75" (2)
- 3/4" Steel Nuts-(2)
- 3/4" Galvanized Nuts-(2)
Diagrams
Fabrication Instructions
- For the "Normal CEB," torch 3/4" holes in the angle for the cylinder supports in the same manner as with the horizontal members.(19" apart, 3/4" diameter)
- For the monster, don't worry about the holes, you'll mag-drill them later.
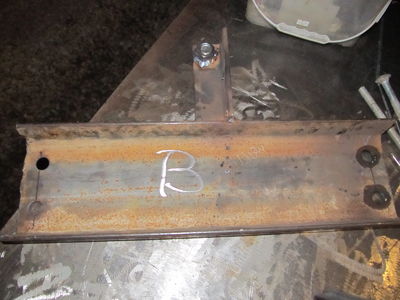
- Weld the 2"x2" angle (5.75") centered and squared on one side of the U-Channel(for "monster") or angle (for "normal", weld it to the side without the holes).
- Torch a hole (3/4" for "normal") (1" for "monster") away from the end of the 2"x2" for a 3/4" bolt and grind it clean.
- Place a steel nut over the hole and insure it is clear for a bolt and flush.
- Weld the nut in place.
- Put a galvanized nut on a 3/4"x2.5" bolt and thread through the welded nut on each side.

