Modular Stove Fabrication Procedure: Difference between revisions
Jump to navigation
Jump to search
(→Step 3) |
(→Step 3) |
||
| Line 34: | Line 34: | ||
==Step 3== | ==Step 3== | ||
*Plasma Cut all panels | |||
**Includes ash tray and flame deflector panels | |||
==Step 4== | |||
*Cut door and panel holders from 1/8"x1/2"x1/2" angle | |||
==Step 5== | |||
*Weld frame - all 1/4"x2" angle - as this: | *Weld frame - all 1/4"x2" angle - as this: | ||
| Line 40: | Line 48: | ||
**Mitered corners welded, ground flat | **Mitered corners welded, ground flat | ||
**Rails for flame deflector and ash tray are not mitered | **Rails for flame deflector and ash tray are not mitered | ||
==Step 6== | |||
*Weld all panel holders and door slides | |||
*Weld on holding nuts | |||
==Step 7== | |||
*Weld ash tray | |||
*Weld handles to doors | |||
==Step 8== | |||
*Plasma cut flue panel | |||
*Plasma cut flue sections, including damper section | |||
*Plasma cut flue section joints | |||
*Fabricate damper | |||
==Step 9== | |||
*Lay brick foundation for stove as in Concept Drawing | |||
*Stack ash chamber and burn chamber sections | |||
*Mount panels and doors | |||
*Insert flame deflector and ash tray | |||
Revision as of 01:17, 17 October 2012
BOM
Start with BOM.
- [12] - 4' long
- [18] - 2' long
- [6] - 1' long
Mild Steel
- 1/4"x2"x2" angle - $2.41/ft
- 1/8"x1/2"x1/2" angle - $0.66/ft
- 1/8"x4'x8' sheet - $100
Build
Step 1
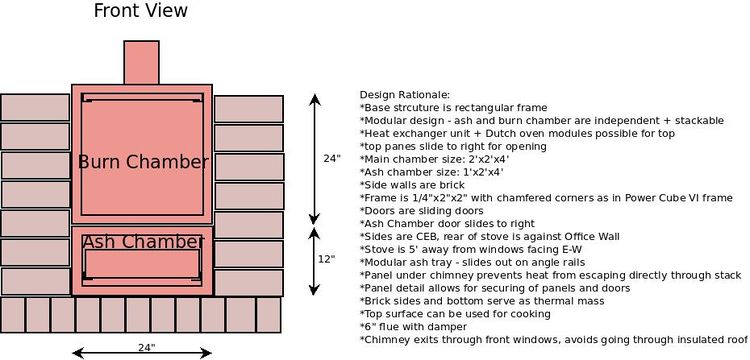
Study Concept: 2 boxes with slideable cover plates clamped down. Ash tray and flame deflector plates side in similar fashion.

Step 2
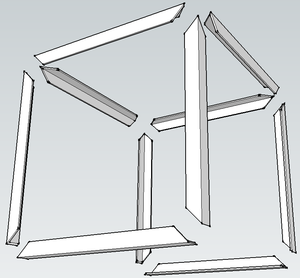
- Cut angle for 2 mitered frames, just like for Power Cube 6. 1/4"x2"x2" angle BOM:
- Use Ironworker for mitered cuts:
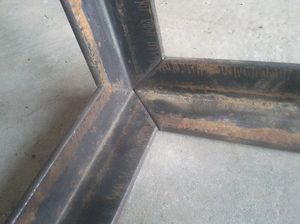
- Result: corners fit together such that all metal angle form flat planes
Quality Control
- 3 corners fit so there is no more than 1/8" space anywhere
- length of members within 1/4" tolerance
Then, the build:
Step 3
- Plasma Cut all panels
- Includes ash tray and flame deflector panels
Step 4
- Cut door and panel holders from 1/8"x1/2"x1/2" angle
Step 5
- Weld frame - all 1/4"x2" angle - as this:
- Mitered corners welded, ground flat
- Rails for flame deflector and ash tray are not mitered
Step 6
- Weld all panel holders and door slides
- Weld on holding nuts
Step 7
- Weld ash tray
- Weld handles to doors
Step 8
- Plasma cut flue panel
- Plasma cut flue sections, including damper section
- Plasma cut flue section joints
- Fabricate damper
Step 9
- Lay brick foundation for stove as in Concept Drawing
- Stack ash chamber and burn chamber sections
- Mount panels and doors
- Insert flame deflector and ash tray

