FreeCad to WebGL
Jump to navigation
Jump to search
Michel Method
GLTF Loader Technique
No Part Explosions
Current Issues: Not all colors are processed by THREE. The colors appear when you view the glTF file in various software but not in WebGL.
Benefits of this approach:
- Much smaller file sizes
- Not much more html editing
Step 1: FreeCad to glTF
- In FreeCad, export your part as .obj and open it in Blender. Follow FreeCad to Blender guide.
- Make sure Blender has the GLTF Export Addon installed.
- Edit->Preferences->Addons-> Search for GLTF and install Import-Export as GLTF 2.0
- In Blender, File-> Export -> GLTF 2.0
- Save your file. It will save with filetype .glb
Step 2: Create Project Folder
- Create a project folder
- Create a subfolder for your javascript libraries. Include three.min.js , GLTFLoader.js, and OrbitControls.js
- Put your .glb file in your project folder
Step 3: Create WebGL HTML File
- For now, just use my crappy template. With THREE.js you create a scene with controls, cameras, lights, perspective, window size. Don't worry about all that.
- Just start by downloading this file: glTF Loader Template and saving it in your project folder as Project Name.html
- Open the html file in your choice of html editor and change the part name on line 66 to Project Name.glb. If the .glb file is in a different folder than the html file then you need to direct it to the proper subdirectory when you edit that line.
- Also download the style.css file and include that in the same folder as the WebGL HTML file.
Step 4: Create Index.html File
- This file will be at the root folder of your github repository. It does not go in the same folder as your WebGL file. But it could. The best hierarchy would be Repository with Index file, subfolder with WebGL html files and .glTF files, and then a subfolder with javascript libraries.
- Again, just download my sample which I copied from Michel. Or if you are good with HTML then create something better.
- Change the following things:
- Line 5 is your page title
- Line 8 is a basic text title
- Line 10 is where the list of links begins. For you this would say <li><a href="PROJECT NAME/PROJECT NAME.html"> TITLE OF LINK </a> PROJECT DESCRIPTION </li>
- Change project name to match your project and put in a title of the link and a description of the file
Step 5: GitHub or GitLab
- For Github: Create a repository called username.github.io
- the repo title is case sensitive.
- Put the Index.html file in the repository
- Put your project folder in the repository
Step 6: Viewing File
- Navigate to username.github.io/Index.html
- Click the link to your project
- The project should appear.
Step 7: Changing Camera Start Point (optional)
If you need to you can change the starting point of the camera.
- On lines 31-33 of the WebGL file you can modify the camera parameters including start point and where it is pointing at. Angles are in radians
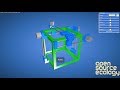
Directly from FreeCad to WebGL
No Part Explosions
Primitive example from Aidan Log
Playing around with WebGL stuff. Here's a VERY primitive workflow:
- Starting with A2+ assembly file
- Select all on object tree
- Export to WebGL.
- Put resulting .html file in a folder with a subfolder containing three.min.js
- Open resulting .html file in a text editor
- Edit three.min.js source as per Michel's instructions
- Also can add antialiasing if desired. See video:
- http://img.youtube.com/vi/18nL5wN8Pbg/default.jpg
- Optional: make an index.html file. Embedding the index seems to be more stable.
- Create a github.io page
- In your github account: Make a new repo with name username.github.io
- My username is CabbageBreath
- Upload your project files to that repo
- https://username.github.io/modelname.html is where the project will be hosted.
- In your github account: Make a new repo with name username.github.io
All things FreeCAD