OSE Roof Instructions
Jump to navigation
Jump to search
ASSEMBLY SHEET FOR WORKSHOP ROOF FRAMES
- Assemble supplies and tools:
- Each Frame requires (11) 16’ 2x6” boards.
- 2-1/2 large tubes of Liquid Nails for each assembly
- Large caulking gun(s)
- 3" deck nails
- Carpenter's square
- (2) 25' tape measures
- Power screw driver(s)
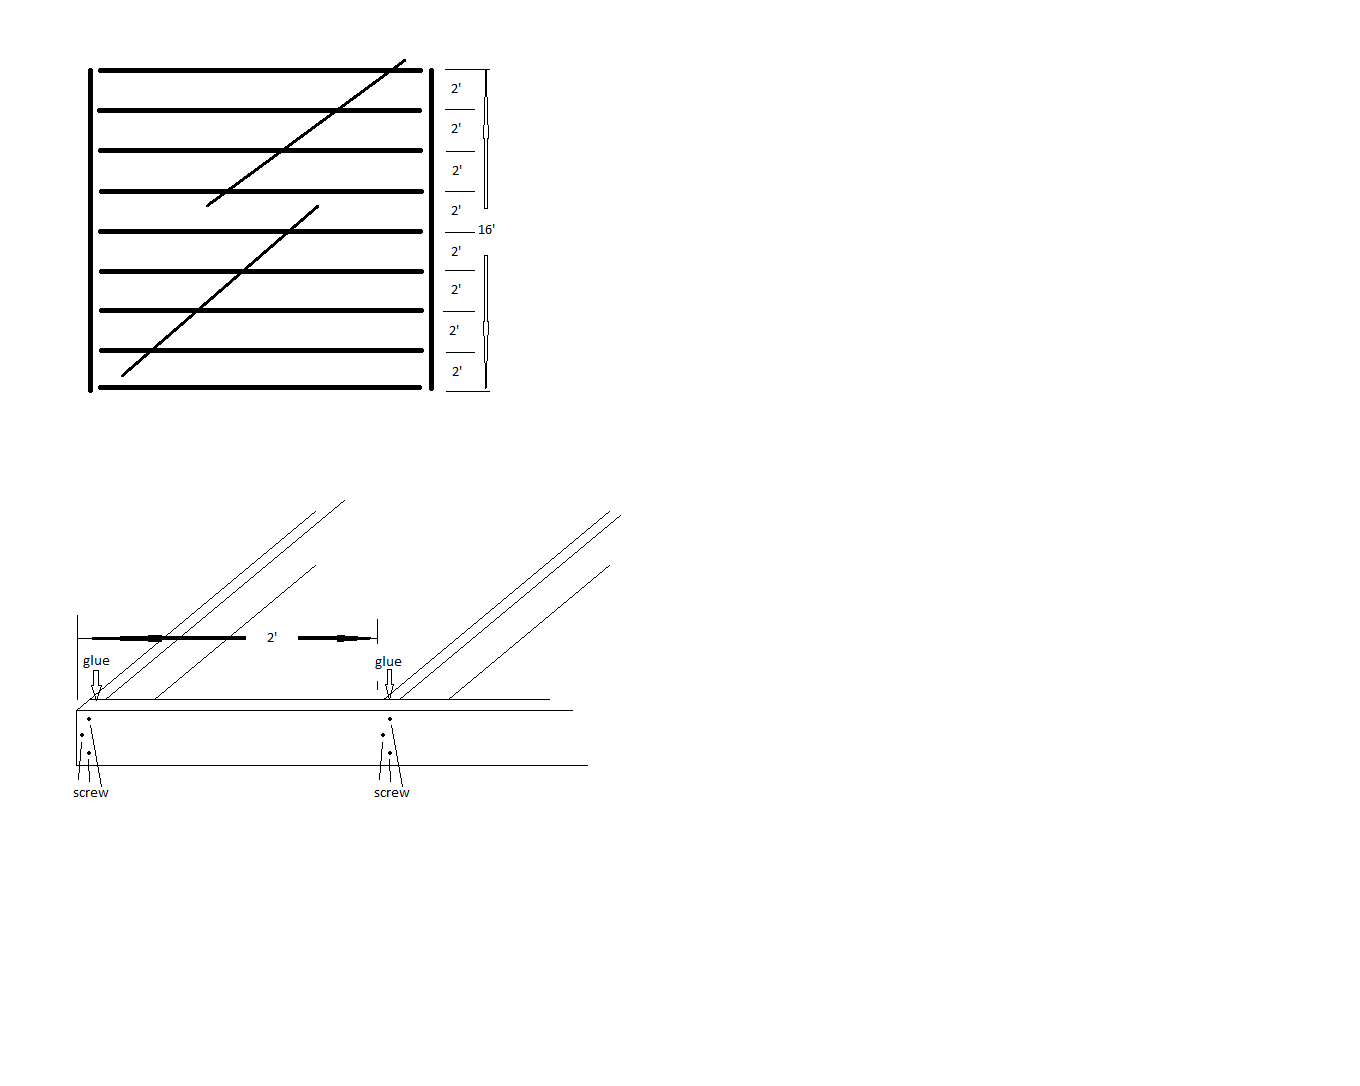
- Lay out boards according to diagram, spacing 9 boards 2 feet apart.
- Butt each board to the two perpendicular ones, fastening with glue and screws according to diagram.
- Verify square by checking that both diagonals are the same.
- Maintain square by attaching lath or other scrap lumber diagonally across the frame.
Build 24 roof frame assemblies

ASSEMBLY SHEET FOR WORKSHOP ROOF STRINGERS
- Assemble supplies and tools:
- (14)2x6"x16' beams for each set of assemblies.
- 2-1/2 large tubes of Liquid Nails for each assembly
- Large caulking gun(s)
- 3" deck nails
- Circular saw
- Power source
- Pencil
- Tape measure (50')
- Carpenter's square
- Power screw drivers
- Clamps (>5")
- Saw horses
- Measure and mark each of the following beams
- Next to the cut line mark the size of the board on that side of the line
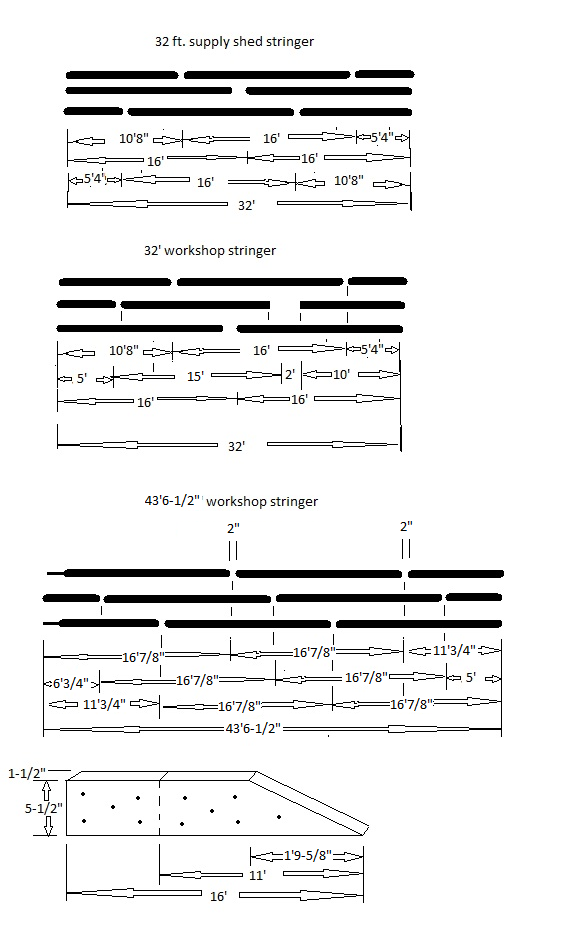
- One 16’ 2x6” beam to create one 10’8” piece and one 5’4” piece
- One 16’ 2x6” beam to create one 10’ piece and one 6’7/8" piece
- Two 16’ 2x6” beams to create two 11’7/8" pieces and two 5’ pieces
- One 16’ 2x6” beam at 15’ in length (cut off 1'7/8").
- One 16’ 2x6” beam with a diagonal 1'9-7/8" from one end.
- One of the 11'7/8" pieces with a diagonal 1'9-7/8" from one end
- Cut the marked pieces.
- Lay out a 32’ assembly as shown in the diagram
- Start 2 screws at the end of each outside beam piece.
- Spread glue on one 5-1/2” face of the center beam pieces.
- Set one set of outside beams on the glued pieces.
- Clamp at each beam end and screw together as shown in the detail, adding more screws at about 18” intervals.
- Turn the assembly over and spread glue on the other 5-1/2" face of the center beam pieces.
- Set the other set of outside beams on the glued pieces.
- Clamp at each beam end and screw together as shown in the detail, adding more screws at about 18” intervals.
- Lay out a 43”6-1/2" assembly as shown in the diagram.
- Start 2 screws at the end of each outside beam piece.
- Spread glue on one 5-1/2” face of the center beam pieces.
- Set one set of outside beams on the glued pieces.
- Clamp at each beam end and screw together as shown in the detail, adding more screws at about 18” intervals.
- Turn the assembly over and spread glue on the other 5-1/2" face of the center beam pieces.
- Set the other set of outside beams on the glued pieces. Be sure the points of the diagonal cuts are on the same side of the stringer.
- Clamp at each beam end and screw together as shown in the detail, adding more screws at about 18” intervals.
Make (5) 32" workshop assemblies and (5) 43"6-1/2" assemblies.
ASSEMBLY SHEET FOR SUPPLY SHED ROOF STRINGERS
- Assemble supplies and tools:
- (6)2x6"x16' beams for each set of assemblies.
- 1 large tubes of Liquid Nails for each assembly
- 3" deck nails
- Circular saw
- Power source
- Pencil
- Tape measure
- Carpenter's square
- Power screw drivers
- Clamps (>5")
- Saw horses
- Measure and mark the following beams
- Next to the cut line mark the size of the board on that side of the line
- Two 16’ 2x6” beam to create two 10’8” pieces and twoe 5’4” pieces.
- Lay out a supply shed stringer assembly as shown in the diagram.
- Start 2 screws at the end of each outside beam piece.
- Spread glue on one 5-1/2” face of the center beam pieces.
- Set one set of outside beams on the glued pieces.
- Clamp at each beam end and screw together as shown in the detail, adding more screws at about 18” intervals.
- Turn the assembly over and spread glue on the other 5-1/2" face of the center beam pieces.
- Set the other set of outside beams on the glued pieces.
- Clamp at each beam end and screw together as shown in the detail, adding more screws at about 18” intervals.
Make 2 assemblies.
