Strawboard Log
Jump to navigation
Jump to search
Thu May 15, 2014
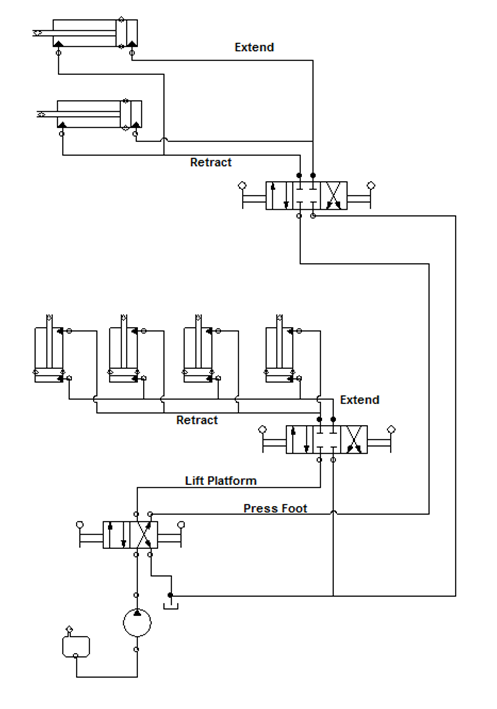
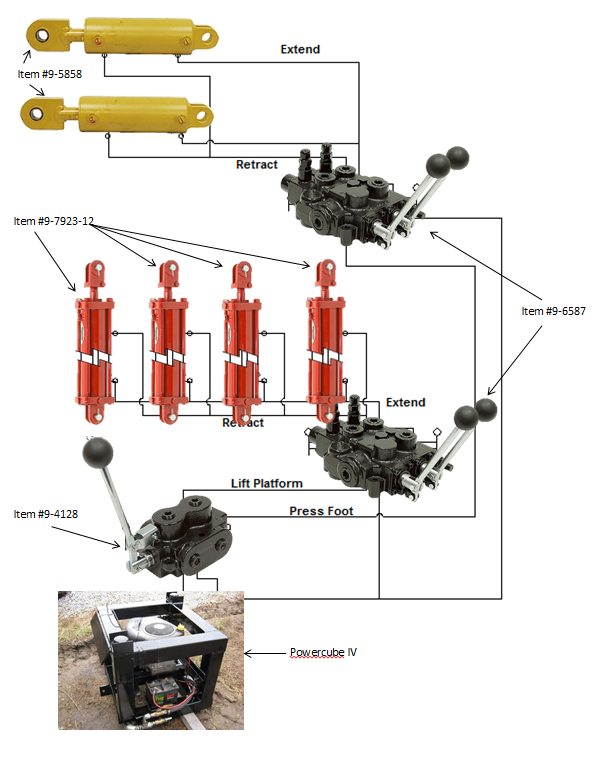
Hydraulic Diagrams
Sat May 10, 2014
Procedure for Use
- Step One: Clear mold cavity of any residue left over from previous use of strawboard machine.
- Step Two: Activate Power Cube. Turn on heating elements to begin pre-heating of chamber.
- Step Three: Make sure the hydraulic cylinders are in starting position (pressure foot is retracted completely, and lift is extended completely). Verify gear rack is in the forward position.
- Step Four: Add straw to fill level in hopper (to be determined).
- Step Five: Move pressure foot forward until cylinder is fully extended, hold for ten seconds.
- Step Six: Retract pressure foot.
- Step Seven: Move gear rack back one length.
- Step Eight: Repeat steps four to seven until desired length is achieved.
- Step Nine: Lower lift cylinders.
- Step Ten: Move gear rack back to forward position and remove completed strawboard.
- Step Eleven: Raise lift cylinders back to starting position.
- Step Twelve: Repeat steps four to eleven until desired amount of strawboard has been produced.
- Step Thirteen: Turn off Power Cube and heating elements.
- Step Fourteen: After sufficient time has gone by and machine has completely cooled, clean machine of debris to ensure future quality.
- Step Fifteen: Build civilization.
- Note: Times are subject to change
Fri Apr 18, 2014
Questions for further development:
- What sort of heat will we need for the mold? From what we've been able to find, we need heat to break down lignin, which occurs between 100-200C. Do you know if this is accurate?
- This one says 200-500C - http://www.cellulosechemtechnol.ro/pdf/CCT9(2010)/P.353-363.pdf
- What type of steel is typically used in your designs? We are looking for heat transfer products and would like to know the specific steel used.
- Mild Steel - 1030 ASTM grade
- For the back end of the mold (opposite the side with the hydraulic ram), we were thinking of using a power screw/rack and pinion/pneumatic system that would move back roughly 3-4 inches after every stroke of the ram, and at the end will reverse direction to push the finished product out. Do you think this is feasible?
- Finally, using the information you gave us about the power cube, we determined that the maximum force we can achieve is 25000 pounds at maximum pressure. How much force do you think we will need to compact the strawboard?
- I do not know.
- We're trying to get CAD files of cylinders, pumps, hoses, etc, and were going to get these items from the CEB press. However, the Master CAD File is said to be located at openpario, which no longer exists. Did you archive those files elsewhere?
Mon Feb 3, 2014
Process: recruit feedback from mechanical engineering advisors as part of the process. Discuss ways of obtaining feedback - Facebook, ESW Facebook, professors, recruiting of stakeholders, etc.
Next:
- Biweekly meeting. Next: Research straw material. Sketchup rough drawing by next meeting - Feb 17 - post design to FB.
- Ask Dr. Stevens to be a technical reviewer
- How to edit wiki - Instructions
- See how to use documentation platform - Dozuki
- Start a log at Strawboard_Log
- Review
- ESW RIT - Facebook
- Team pictures
- Development Board - [1]
Strawboard Machine Requirements
Phase 1
- Design is such that it can be modified readily to the continuous version
- Fed with chopped straw (1-2" pieces), manually though an elongated hopper
- Mold size for the heating/compression chamber is adjustable
- Piston creates pressure and feeds straw into chamber
- Piston foot size is adjustable to match heating/compression chamber aperture
- Heating elements are applied to flat plates in adjustable chamber
- Batch system - one end of the compression chamber
- Arduino temperature regulator controls temperature
- Temperature display shows temperature
- Pressure sensor shows pressure
- Uses Warehouse 4" square tubing for frame
- Length of frame is 8' long, but first prototype involves 4' length of heating area.
- Heating area is modular in 4' sections.
- Heating elements are insulated from the outside tom minimize heat loss
- Dual side heating
- 1/2" plate is used to form the chamber
- Screw-down mechanism adjusts size of chamber
- Board prototype chamber is scalable in units of 4'
- 2 hydraulic cylinders are used on the press foot
- Press foot is made from layered-up 1/2" steel
- Development Boards are used for each module
- We begin with Concept Design - Modules Definition - Interface Design, then all teams start working
- End side of strawboard machine is plugged to allow pressure buildup.
- Use a 4" cylinder - from [2]
- 0-2000 psi - system pressure
- Power would be a Power Cube 27 hp gas engine - in the form of hydraulic flow
- 0-14 gallons per minute
- Hydraulic Power Output from Power Cube feeds a hydraulic valve - [3]
- Heating element takes heat up to 240F
Design goals -
Phase 2
- Addition of straw chopper for automatic chopping and feeding
- Continuous version - end side is opened for continuous throughput
- Pressure buildup is achieved by friction against compression chamber
- Chamber length is extended to build up pressure as needed, while retaining the same length of the heating chamber
Google Drawing - Conceptual Design

