Noise Removal from Sound: Difference between revisions
Jump to navigation
Jump to search
No edit summary |
|||
| (3 intermediate revisions by the same user not shown) | |||
| Line 2: | Line 2: | ||
Steps: | Steps: | ||
#Drag and drop your video clip into Audacity | #Drag and drop your video clip into [[Audacity]] | ||
#Go to Effects and Normalize. | #Go to Effects and Normalize. | ||
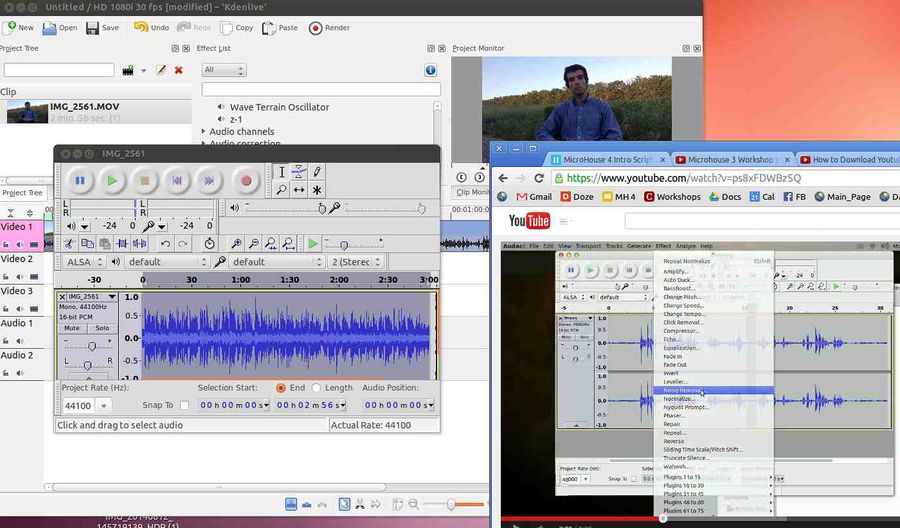
#Go to Effects and Noise Removal as seen in screenshot above | #Go to Effects and Noise Removal as seen in screenshot above | ||
#Select area of noise and click Get Noise under Noise Removal | #Select area of noise and click Get Noise under Noise Removal. Note that any operations get performed on a selection. The noise area is the area between known sounds, for example when a person is not speaking. | ||
#Then select whole clip and Remove Noise - just by hitting OK under Noise Removal. | #Then select whole clip. Use Ctrl-A. To select the whole clip and Remove Noise - just by hitting OK under Noise Removal. | ||
=Audacity Notes= | |||
*See [[Audacity]] | |||
[[Category:Audacity]] | |||
Latest revision as of 23:44, 19 April 2016
Steps:
- Drag and drop your video clip into Audacity
- Go to Effects and Normalize.
- Go to Effects and Noise Removal as seen in screenshot above
- Select area of noise and click Get Noise under Noise Removal. Note that any operations get performed on a selection. The noise area is the area between known sounds, for example when a person is not speaking.
- Then select whole clip. Use Ctrl-A. To select the whole clip and Remove Noise - just by hitting OK under Noise Removal.
Audacity Notes
- See Audacity
