D3D Controller: Difference between revisions
(→Code) |
(Remove extra =from Endstop Wiring title) |
||
| (24 intermediate revisions by one other user not shown) | |||
| Line 1: | Line 1: | ||
= | =Wiring= | ||
<html><iframe src="https://docs.google.com/presentation/d/e/2PACX-1vRVzCWZfHY4PPf7-n0pNINSqYhwVONmnLpwFp9pk0p6wiKb753mvw1p3S_O-q6Ow6JA0Z-nGdTtQs_z/embed?start=false&loop=false&delayms=3000" frameborder="0" width="700" height="400" allowfullscreen="true" mozallowfullscreen="true" webkitallowfullscreen="true"></iframe> | |||
</html> | |||
[https://docs.google.com/presentation/d/12OmDz6ix10E9V1jefEJnvquGJm2EPEXXNoxy5W4Pt1o/edit edit] | |||
Long version - [https://docs.google.com/presentation/d/16gYPbV7rrAa3SgwIzilxaqd1lnfmIxAzUHEO_AEAgcE/edit] | |||
=Endstop Wiring= | |||
*Power is | |||
==Checklist== | |||
#The back is defined as the location of the Z axis | |||
#X motor on left side | |||
#X motor faces the back | |||
#X endstop is on left side of X axis | |||
#Y endstop is on Y1 at the back | |||
= | ==Notes== | ||
* | *Fan - 2 fan wires go directly to the power supply + and - 12volt. Make sure you don't connect them to the 120V on the power supply. Make sure the fan blows inside the extruder, not outside. Reverse fan polarity if fan blows outside. | ||
*Extruder heater wires go to D10. | |||
*The filament goes in the small hole in the top of the extruder. Depress the sprung lever to allow the filament in. | |||
=Code= | =Code= | ||
Download code at [[D3D Marlin]]. You can upload to your board using the [[Arduino Environment]]. | |||
=Machine Control= | |||
You can download and install [[Lulzbot Cura]] to run D3D. | |||
Cura shows the control window only after you load a print file, such as the [[10 mm Calibration Cube]] .stl file. | |||
==Lulzbot Cura Configuration Wizard== | |||
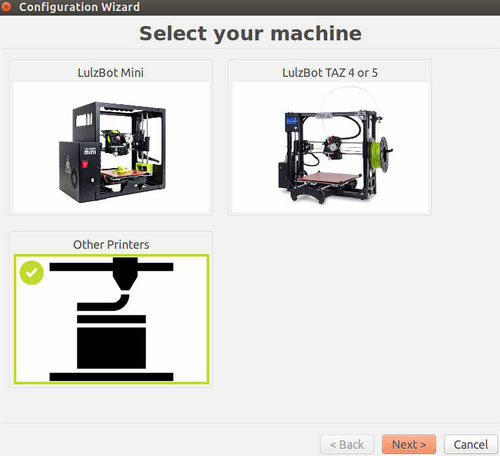
You need to set up the D3D Printer as a new machine. Go to the Machine menu, select Add new machine... Then select Other Printers: | |||
[[File:otherprinters.jpg|500px]] | |||
Then select Other, then select Custom, then in the Custom RepRap information, give the machine a name such as D3D. Give a bed size of 110x110x110 for D3D Mini, and 200x200x200 for D3D. Nozzle size is 0.4 mm for printers from the April 29, 2017 D3D build. Check the Heated Bed box (some machines come without a heated bed). | |||
==Printer Profile== | |||
Motion speed, extruder speed, and other parameters are set in a Printer Profile. We have created a printer profile for D3D for Cura. It works for both D3D and D3D Mini. When you open up Cura, go to the file menu -> Open Profile, and then load this file: | |||
[[File:D3D_Profile.ini]] | |||
Machines from the April 29, 2017 build will run with this printer profile. This profile begins with homing the axes and running the automatic bed leveling procedure, which probes 9 points on the print bed. | |||
'''It is important that we optimize all parameters for a perfect print. The first person with a perfect print should upload a new version of the D3D Profile.ini.''' | |||
=RAMPS Wiring= | |||
*For RAMPS wiring detail, see [[Prusa i3 Build Optimization]] | |||
=BOM= | |||
*Splitter - [http://www.ebay.com/itm/321581271549?_trksid=p2060353.m2749.l2649&ssPageName=STRK%3AMEBIDX%3AIT] | |||
*Coupler - [https://www.amazon.com/gp/product/B00FQMKZU2/ref=oh_aui_detailpage_o02_s00?ie=UTF8&psc=1] | |||
Latest revision as of 01:44, 18 January 2020
Wiring
Long version - [1]
Endstop Wiring
- Power is
Checklist
- The back is defined as the location of the Z axis
- X motor on left side
- X motor faces the back
- X endstop is on left side of X axis
- Y endstop is on Y1 at the back
Notes
- Fan - 2 fan wires go directly to the power supply + and - 12volt. Make sure you don't connect them to the 120V on the power supply. Make sure the fan blows inside the extruder, not outside. Reverse fan polarity if fan blows outside.
- Extruder heater wires go to D10.
- The filament goes in the small hole in the top of the extruder. Depress the sprung lever to allow the filament in.
Code
Download code at D3D Marlin. You can upload to your board using the Arduino Environment.
Machine Control
You can download and install Lulzbot Cura to run D3D.
Cura shows the control window only after you load a print file, such as the 10 mm Calibration Cube .stl file.
Lulzbot Cura Configuration Wizard
You need to set up the D3D Printer as a new machine. Go to the Machine menu, select Add new machine... Then select Other Printers:
Then select Other, then select Custom, then in the Custom RepRap information, give the machine a name such as D3D. Give a bed size of 110x110x110 for D3D Mini, and 200x200x200 for D3D. Nozzle size is 0.4 mm for printers from the April 29, 2017 D3D build. Check the Heated Bed box (some machines come without a heated bed).
Printer Profile
Motion speed, extruder speed, and other parameters are set in a Printer Profile. We have created a printer profile for D3D for Cura. It works for both D3D and D3D Mini. When you open up Cura, go to the file menu -> Open Profile, and then load this file:
Machines from the April 29, 2017 build will run with this printer profile. This profile begins with homing the axes and running the automatic bed leveling procedure, which probes 9 points on the print bed.
It is important that we optimize all parameters for a perfect print. The first person with a perfect print should upload a new version of the D3D Profile.ini.
RAMPS Wiring
- For RAMPS wiring detail, see Prusa i3 Build Optimization
