CNC Torch Table Z Height Control: Difference between revisions
(→Wiring) |
(→Wiring) |
||
| Line 80: | Line 80: | ||
=== TB6600 to Ramps/Arduino, Motor and Power === | === TB6600 to Ramps/Arduino, Motor and Power === | ||
The | The TB6600 stepepr driverhas three phoenix contact like connectors, | ||
- one 6-pin to the Ramps | |||
- one 4-pin to the motor | |||
- one 2 pin to power-supply | |||
The 6-pin has the lines ENA-, ENA+, DIR-, DIR+, PUL-, PUL+. | |||
Make a bridge between ENA- and DIR-, together with a second bridge from DIR- to PUL-. The PUL- contains a second cable which goes towards GND on the Ramps Extruder E0 port. So in total there are 4 wires going either to the Ramps or directly to the Arduino-Mega: | |||
1. Ramps: | |||
ENA+ --> EN | |||
DIR+ --> DIR | |||
PUL+ --> STEP | |||
PUL- --> GND | |||
2. Arduino-Mega: | |||
ENA+ --> D24 | |||
DIR+ --> D28 | |||
PUL+ --> D26 | |||
PUL- --> GND | |||
<gallery widths="420" heights="400" perrow="2"> | <gallery widths="420" heights="400" perrow="2"> | ||
Revision as of 10:39, 25 June 2017

Manual adjustable version of CNC Torch Table Height Controller
This is a simple POC-version that allows a manual adjustment of the Z height by turning a jog wheel. The wheel can be 3d-printed [1] and is connected to a rotary encoder of type KY-040.
- manually steered height control
TB6600, Arduino_Mega/Ramps, KY-040 rotary encoder
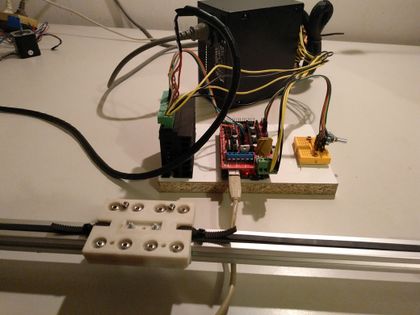
stepper driven lineardrive


- demonstration video on youtube: [2]
Design Rationale
With this rig it should be possible to manually operate the torch table height by following its slowly moving and regulate the height personally. This can be useful even if in the full version there is a capacitive sensor is doing automatically that task, but one may use it then for setting the starting height or use it in other applications where a frequent manual control is an appreciated option.
The rotary encoder gives up to 20 pulses per revolution to an Arduino-Mega, which translates it into a number of motor steps and triggers these by a TB6600-based stepper-driver. A RAMPS 1.4 may act as a connection layer on top of the Arduino, but can also be omitted. We will show here which pins to wire on the Arduino and on the Ramps as well.
The firmware consist only of a few lines of Arduino-code, which makes it easy to extend and modify.
BOM
Wiring
There are 3 kind of connections:
- Power-supply to Ramps/Arduino
- Rotary Encoder to Ramps/Arduino
- TB6600 to Ramps/Arduino
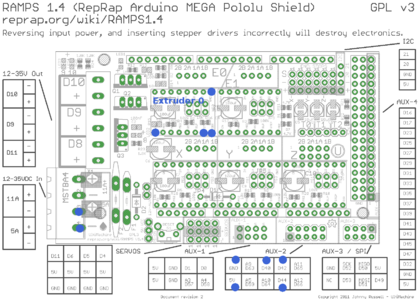
Ramps-pins to connect are marked with a blue point
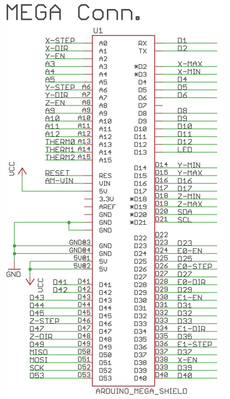
Mapping of the Ramps-Pins onto the Arduino-Mega ports


Power-supply to Ramps/Arduino
1. Ramps: Connect a 12V/5A-Line to the MSTBA4-Port an the Ramps, by using a phoenix-contact plug. This will provide power for Motor as well as board-power for the Arduino-Mega.
2. Arduino standalone: The Arduino musst be supplied with 5V to 12V. This can be done by the USB-connection to a desktop-pc or by a standard wall-wart ac/dc-adaptor (5V, 2A) for the Mega.
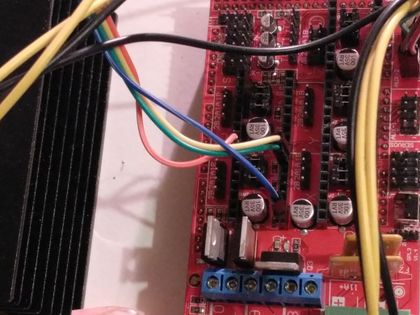
RotaryEncoder to Ramps/Arduino
The KY-040 RotaryEncoder has 5 Lines: GND, +5V, SW, DT, CLK. Connect these either to the AUX2 port of the Ramps, or directly to the digital I/O ports on the Arduino-Mega.
GND --> GND
5V --> 5V
SW --> D44
DT --> D42
CLK --> D40

The pins at the AUX2 port are conected to the rotary encoder

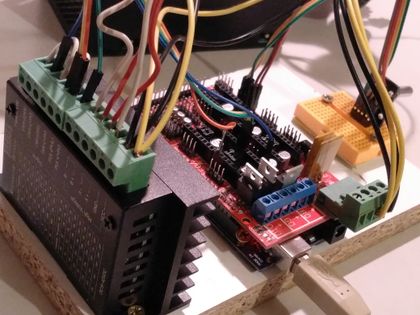
TB6600 to Ramps/Arduino, Motor and Power
The TB6600 stepepr driverhas three phoenix contact like connectors,
- one 6-pin to the Ramps
- one 4-pin to the motor
- one 2 pin to power-supply
The 6-pin has the lines ENA-, ENA+, DIR-, DIR+, PUL-, PUL+.
Make a bridge between ENA- and DIR-, together with a second bridge from DIR- to PUL-. The PUL- contains a second cable which goes towards GND on the Ramps Extruder E0 port. So in total there are 4 wires going either to the Ramps or directly to the Arduino-Mega:
1. Ramps:
ENA+ --> EN
DIR+ --> DIR
PUL+ --> STEP
PUL- --> GND
2. Arduino-Mega:
ENA+ --> D24
DIR+ --> D28
PUL+ --> D26
PUL- --> GND
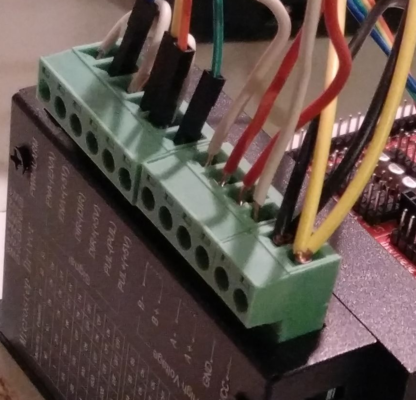
upper left corner: 2 white cables make a bridge between ENA-, PUL- DIR-. The PUL- contains an additional cable (orange) that connects to GND on the Extruder E0 port of the Ramps/Arduino
The pins at the extruder E0 port are connected to the TB6600

