Husam Log: Difference between revisions
Husam Nasser (talk | contribs) |
Husam Nasser (talk | contribs) |
||
| Line 11: | Line 11: | ||
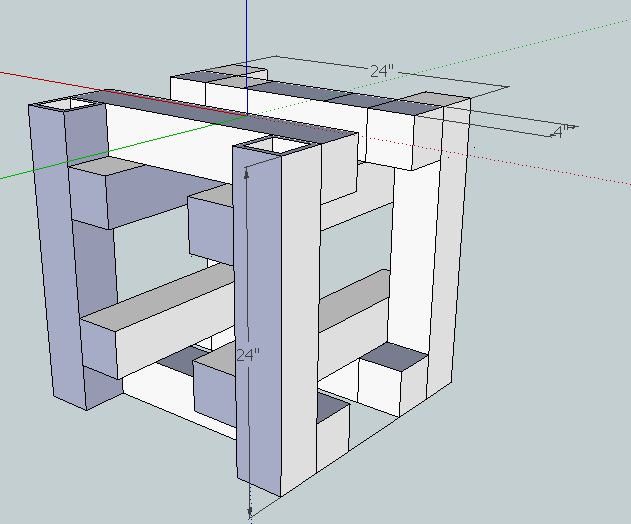
'''Tractor Wheel''' | '''Tractor Wheel''' | ||
While developing an initial wheel design, I learned that it is important to lean few skills in SketchUp that will help you during the design process. | While developing an initial wheel design, I learned that it is important to lean few skills in SketchUp that will help you during the design process. [http://www.youtube.com/watch?feature=player_embedded&v=Kc0yunYvM7U Grouping and making component] are essential steps in SketchUp. | ||
== '''Tue May 14, 2013''' == | == '''Tue May 14, 2013''' == | ||
Revision as of 19:44, 15 May 2013
Sat May 11, 2013
SketchUp Box Tutorial
It took me about 45 minutes to finish the box. I had to watch the tutorial and rewind several times to understand how to build the box. This was my first "design" with SketchUp. The lessons I learned through the box design were:
- It is important to notice where the lines are being drawn; are the lines drawn on the surface or in space?
- Draw reference lines to help you understand where your endpoints will be. You can delete those lines later.

Tractor Wheel
While developing an initial wheel design, I learned that it is important to lean few skills in SketchUp that will help you during the design process. Grouping and making component are essential steps in SketchUp.
Tue May 14, 2013
I Installed CADSpan Plugin for generating STL files from Sketchup. The CADSpan was not a great success. Every time I tried to export STL files, no progress occurs. However, the CADSpan is has an important feature called preview style that help you find out if your SketchUp model is in a good shapte to be printed in a 3d printer. After you have installed the CADSpan plugin, open SketchUp and go to tools> CADSpan tools > preview style. This feature will highlight in a red any surface that is not a watertight surface. Remember, only watertight surfaces can be printed in 3d. TO learn more about watertight surfaces and CADSpan visit "https://www.youtube.com/embed//8QfS1162i9w"
Since I did not have much luck exporting stl files wtih CADSpan, I download a different plugin to convert my sketchup files to stl format. The link for dowload can be found at [1]. After the file is downloaded: open SketchUp and click on the install extensions button. The button is found under Windows> Preferences > Extensions > Install Extension. Clicking this button will bring up a file browser window where you can can select skp_to_dxf.rbz from your harddrive, and SketchUp will then install it for you.
To export you . skp file to . stl format
- Select the object you want to be 3d printed.
- Click on the drop down menu for “ Tools” and select “EXPORT TO DXF OR STL”
- Select you export unit, “inches” for example
- Select export format “stl”
- Select the desired location and name for your stl file. Note it may be necessary to type the extension “.stl” to the end of the name depending on what version you SketchUp you are using.
I Generated sample tractor tubing STL in 13/32" size in Sketchup - File:Beam half size scaled 13-32.skp
Important Notice regarding the Lulz Bot AO-100 3d printer:
The power switch is located at the top corner opposite from the RAMPS electronics
For more information on how to print files with the Lulz Bot AO-100 3d printer please visit: OSE Lulzbot , http://youtu.be/d708J9iichE.
I was not successfull in getting the LulzBot AO-100 3d printer to work. I am not sure if the problem is with my computer or the printer. I am going to install Linux operating system to see if it will work and will update as I go.
Wed May 14, 2013
I Was able to get the LulzBot AO-100 3d printer to work. The AO-100 Software for windows you need to install in order to get the printer to work are all available in the LulzBot website.
- Install the arduino-1.0.1-windows.zip file and unzip ti to a desired location
- Install the printrun-win-Mar2012-slic3r.zip and unzip ti to a desired location
- Install the slic3r-mswin-x86-0-8-2.zip and unzip ti to a desired location
After you unzip the arduino file, plug in to your 3d printer. you computer will recognize the arduino device that is hooked up to your printer.
The following steps will help you figure what type of arduino device you are using and what port in your computer the arduino is hooked up to:
- Go to control Panel > device manager

- Click on the the drop menu "port" and your computer should tell you the type of arduino device you have and what port its is connected to. for example the one I am connected to is an arduino 2560 and its connected to COM4.

- Next go to you zipped and arduino folder and open ardunio.exe. go to tools>Board: Select the type of your arduino device.

- go tools>serial port: select your port "COM4 in my case"
- Congratulation now you are ready to run your 3d printer. Just open printrun.exe ( the file is found in the location you extracted your printrun zipped file). Make sure you set the correct port and hit connect. The printer should connect.