Part Library for the Raspberry Pi Tablet: Difference between revisions
ChrisCaswell (talk | contribs) |
|||
| Line 6: | Line 6: | ||
=Part Library= | =Part Library= | ||
[[File:pitab.jpg|100px]][[File:1batpack.png|100px]][[File:5batpack.jpg|100px]] [[File:PiTabConcept.png|100px]] [[File:TouchScreenPrimitive.png|100px]] [[File:PiBase.png|100px]] [[File:raspi.png|100px]] [[File:raspi2.png|100px]] [[File:piincase.png|100px]] [[File:5batpack2.png|100px]] [[File:Fabletlayout.png|100px]] | [[File:pitab.jpg|100px]][[File:1batpack.png|100px]][[File:5batpack.jpg|100px]] [[File:PiTabConcept.png|100px]] [[File:TouchScreenPrimitive.png|100px]] [[File:PiBase.png|100px]] [[File:raspi.png|100px]] [[File:raspi2.png|100px]] [[File:piincase.png|100px]] [[File:5batpack2.png|100px]] [[File:Fabletlayout.png|100px]] [[File:dumbscreen.png|100px]] | ||
<gallery perrow=6> | <gallery perrow=6> | ||
| Line 12: | Line 13: | ||
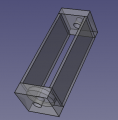
File:pitab.jpg|'''Tablet Final Assembly''' - FreeCAD -[[File:raspiassy.fcstd]] | File:pitab.jpg|'''Tablet Final Assembly''' - FreeCAD -[[File:raspiassy.fcstd]] | ||
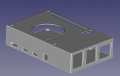
File:piincase.png|'''Raspberry Pi in case.''' - FreeCAD -[[File:piincase.fcstd]] | File:piincase.png|'''Raspberry Pi in case.''' - FreeCAD -[[File:piincase.fcstd]] | ||
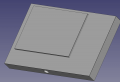
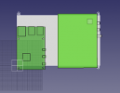
File: | File:dumbscreen.png|'''TouchScreenPrimitive''' - size:nullkb - FreeCAD -[[File:TouchScreenPrimitive.fcstd]] | ||
File:raspi2.png|'''Raspberry Pi 4 Board''' - FreeCAD -[[File:raspi.fcstd]] | File:raspi2.png|'''Raspberry Pi 4 Board''' - FreeCAD -[[File:raspi.fcstd]] | ||
File:1batpack.png|'''1 Battery Power Pack''' - FreeCAD -[[File:1batpack.fcstd]] | File:1batpack.png|'''1 Battery Power Pack''' - FreeCAD -[[File:1batpack.fcstd]] | ||
Revision as of 20:05, 1 February 2020
Working Doc
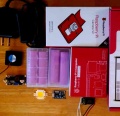
Part Library


Tablet Final Assembly - FreeCAD -File:Raspiassy.fcstd
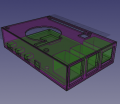
Raspberry Pi in case. - FreeCAD -File:Piincase.fcstd
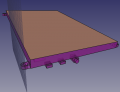
TouchScreenPrimitive - size:nullkb - FreeCAD -File:TouchScreenPrimitive.fcstd
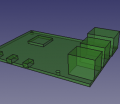
Raspberry Pi 4 Board - FreeCAD -File:Raspi.fcstd
1 Battery Power Pack - FreeCAD -File:1batpack.fcstd
5 Battery Power Pack - FreeCAD -File:5batpack.fcstd. FreeCAD -File:5batpack.stl
PiTabletConcept - FreeCAD -File:PiTabPrimitive.fcstd
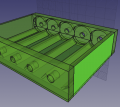
Pi Base + External Ports WIP - size:nullkb - FreeCAD -File:PiboardandMount.fcstd
Tablet Layout WIP - FreeCAD - File:TableCase.fcstd
Add-On Modules
- Cordless welder battery pack that also serves as a long-life battery add-on
Data Collection
- 4.2V after charging 5-set of batteries
- One battery was loose - the connector wire was not over the hole but offset to the side
Build
- Parts start - [1]
Software
Android options
Industrial Android on rPi: https://emteria.com/ Not sure it might be NC, or maybe that's just the service layer they are selling on top of what seems to be mostly a business use case
Also trying other Android Options:
- LineageOS (formerly Cyanogenmod): https://konstakang.com/devices/rpi3/LineageOS15.1/
- Android for RPi: https://www.makeuseof.com/tag/install-android-raspberry-pi/
Keyboard options
Note: Best touchscreen keyboard application on the Raspbian so far is Florence
> sudo apt-get install florence
Also trying several other linux on screen keyboard options while building android images to try:
- GOK (GNOME Onscreen Keyboard)
- kvkbd
- onboard
- Florence
Raspbian installation
Based on the NOOBS install: https://www.raspberrypi.org/downloads/noobs/
SD card must be FAT formatted, at least 8GB and preferably 16GB: https://www.raspberrypi.org/documentation/installation/noobs.md
It's handy to have a usb keyboard and mouse to navigate the install process once the prepared SD card is on the rPi.
Cura
I had issues trying to run Cura on the Raspbian, it kept crashing. It seems like someone has compiled a version and posted it in the ultimaker forums that will run on the RPi processor: https://community.ultimaker.com/topic/28746-experimental-cura-build-for-raspberry-pi-4-now-available/
Downloads: https://www.dropbox.com/sh/s43vqzmi4d2bqe2/AAADdYdSu9iwcKa0Knqgurm4a?dl=0
Install procedure:
Once the appimage file is downloaded (I used Cura-mb-master-armhf-20191209.AppImage), make the file executable
> chmod +x Cura-mb-master-armhf-20191209.AppImage
Then you just need to run the app image file:
> ./Cura-mb-master-armhf-20191209.AppImage
Camera
From https://projects.raspberrypi.org/en/projects/getting-started-with-picamera/3
Once it's plugged in, Camera just needs to be toggled on in the config -> "interfaces"
Once restarted, you can take a picture like this:
> raspistill -o Desktop/image.jpg
This will activate the camera module and show a view finder, until you hit "Enter" and it saves a picture to the specified location.