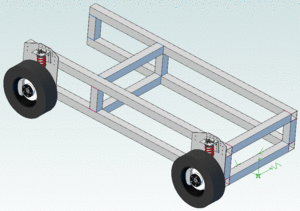
Wikispeed SGT01
Team Wikispeed has open sourced their first car! They agree with OSE, and the open source movement, that everyone will benefit faster when there are fewer barriers to innovation and collaboration.
It is important to note, however, that the STG01 is not the GVCS car. It was designed to compete in the Progressive Automotive X-prize, not to be made out of the common modular pieces of the GVCS.
Wikispeed STG01
Chassis
The Wikispeed car(s) is always evolving, so it's best to start with a piece that hasn't significantly changed in a while. The basic chassis is nothing more than 4" square aluminum extrusion welded into a series of boxes. However, it has a 5-star crash equivalency rating. It is only around $550 in parts and those parts are commodities, so they can be overnighted pretty much anywhere in the world. All you need to build the chassis is an average sized garage, a saw to cut the aluminum, and a welder to fasten it together.
Illustrations are on the way.
BOM
- 4" x 1/8" thick square tube
- 120" long (x4)
- 40" long (x4)
- 12" long (x6)
- Yeah, that's it. That's all the frame is made out of :-)
Project Steps
- Cut aluminum tube to specified lengths
- The only location that needs to be measured
- The center vertical tube is 36" from the inside of the vertical tubes on the open end of the chassis and 72" from the inside of the vertical tubes on the closed end
- Other than that, everything lines up on obvious edges
Notes
Rolling Chassis
Chassis
- receive in mail or cut and weld on location.
- cut and weld on location requires bandsaw set to cut square, jig plates (can be mailed or CNC'd locally), speed square and accurate 48" tape measure with 1/16th" or smaller tick marks.
- If made on site, chassis must then be drilled, requires centering punch, hammer, centering 3/8ths drill bit and drill (drill press or coal drill preferred).
Suspension Module
- receive in mail or CNC on location.
- Assemble
- compare to photos for test.
- bolt on to car
- recieve grade 8, 3/8" bolts, washers, and lock nuts
- 9/16ths wrench and socket with ratchet required
- compare to photos for test.
Wheels & Tires
- receive wheels with tires and lungnuts in mail (tirerack)
- jack up chassis; set up car jack; put wood block on car jack to avoid scratching frame.
- bolt on wheels; Lug wrench required
Braking Chassis
Pedal Plate
- receive pedal plate in mail or CNC on location.
- bolt pedal plate onto chassis; recieve grade 8, 3/8" bolts, washers, and lock nuts
- receive brake pedal in mail (willwood)
- receive brake master cylinder in mail (willwood)
- receive accelerator pedal in mail.
- bolt pedals and master cylinder to pre-drilled holes on pedal plate; recieve grade 8, 1/4" bolts, washers, and lock nuts
Brake Lines
- receive brake lines in the mail, pre-flared or flare on location; if flaring on location, requires bubble flare tool, metric AND SAE brake line fittings.
- bend lines to match diagram
- receive brake line clips in the mail
- attach clips to existing holes on pedal plate and chassis according to diagram
- screw on brake line fittings; line/flare wrench required, SAE and Metric
Brake Fluid
- buy, locally, DOT3 brake fluid; CAUTIION: Brake fluid is one of the few seriously toxic fluids we deal with. Be careful, goggles and latex gloves are suggested.
- fill brake fluid resevoir
- bleed brakes; Requires brake bleeder kit or modified empty water bottle or 3/16th surgical tube.
- Verify brake pressure; Step on brake and verify rock-hard pedal before pedal is fully depressed. Have friends heave on the car and verify car slides before wheels rotate.
Steering Chassis
Steering Rack
- receive steering rack in the mail.
- receive steering rack mounts in the mail or make locally with CNC.
- bolt steering rack mounts to pedal plate; recieve grade 8, 3/8" bolts, washers, and lock nuts
- bolt steering rack to steering rack mounts; recieve grade 8, 3/8" bolts, washers, and lock nuts
- receive tie rod extendors in the mail or tap locally from hexagonal bar stock.; if tapping locally, need metric tap, I believe M14x1.5.
- receive tie rods in the mail.
- thread tie rods onto tie rod extendors.
- thread tie rod extendors onto steering rack.
- bolt tie rods to steering knuckles.
- verify can heave on front wheel by hand and one wheel does not move at all without the opposite wheel moving.
Steering Column
- receive steering column in the mail.
- receive interior module in mail or cut and weld locally; same tools required as making a chassis.
- set interior module in chassis, and bolt in; recieve grade 8, 3/8" bolts, washers, and lock nuts
- receive steering wheel in the mail.
- slide steering column onto steering rack, tighten pinch bolt; metric socket set required.
- attach steering column to interior module.
- Bolt steering wheel to steering rack; SAE socket set required
- verify steering wheel turns both wheels without wobbling.
- align wheels (professional alignment or local with speed square, plumb bob, and level).
Body On
Body Top Mount Frame
- receive body top mount frame in the mail
- receive button-head hex bolts in mail.
- bolt body top mount frame to car
- receive body by freight.
- set body onto body top mount frame.
- bolt body on to body top mount frame with button-hread hex bolts.
- push and shake body, verify does not flex, wobble, or make noise under force that would dent a fender on a new car.
- dust and polish car body.
