Tom: Dallas Log
August 10, 2014
- Completed my first independent Micro Power Cube workshop with participants from the University of Waterloo in the area of Toronto Canada. The facility used was "DIYode" - of a local maker community located in Guelph, Ontario.

The Workshop began on August 8th and concluded on August 10. The event was initiated by members of the University of Waterloo and 15 participants were in attendance - mostly from the University. Two of the attendants had PhD degrees in engineering. I brought materials for three Micro Power Cubes.
The first day was spent with a presentation about OSE and the procedure for fabricating the Micro Power Cube. Everybody participated in the "hands on" Crash Courses in metalworking: cutting torch, band saw and angle grinder. We only one small band saw operational, but the blade frequently slipped off the pulleys and broke. The participants all tried their hand with the tools and left as time wore on and little progress was made due to band saw blade issues.

The second day continued with the presentation, a Crash Course on MIG welding and fabricating the frames and the motor mounting plates.

We also spent time measuring the three different motors and designing assemblies for mounting the motors using the 3D modeling tool "Sketchup". We then completed the motor assemblies.

The third day started quickly by finishing the motor assemblies, mounting them to the frames, completing the wiring and testing the Micro Power Cubes by powering a log splitter. During the testing, there were some last minute hiccups with one motor smoking and the belts slipping off the pulleys. The participants eagerly jumped in with some last-minute design changes and fabricated some parts and made some changes. In the end, we successfully used the Micro Power Cubes to successfully drive the log splitter and split some logs.

After the workshop concluded, I discussed the workshop results with the promoters and they were very happy with the results and said they were interested in doing more OSE workshops.

They also mentioned special interest in designing and building a DIY log splitter soon, as they are very popular in Canada before the winter weather.
July 27, 2013
- Spoke with James, who said that after the arrival in New Orleans, the LifeTrac was unloaded and a few issues found and resolved. Otherwise, it was working well.
July 26, 2013
- James and I found a gunsmith with a machine shop who could repair the shaft coupling. Several hours later, we had it mounted on the engine. We spent extra time with the mounting, making sure that the shaft coupling was centered on the flywheel and that the pump was centered on the shaft coupling. The result was that it then rotated the pump without wobble.
- Moved the Power Cube back into the engine compartment and secured it in place. Then, James did a short field test and loaded it onto the trailer.
- Shortly later, James started the long drive to New Orleans.
July 25, 2013
- Finished assembly of the Power Cube, loaded it into the LifeTrac.
- James did a short field test and we found some leaks in the hydraulics and electrical issues. During the test, the shaft coupling came apart.
- Removed the pump and shaft for replacement tomorrow.
July 24, 2013
- Today, James and I continued working on the Kubota Power Cube. We got some supplies at Stuart Hose and Pipe and also met a really neat guy at Superior Cooling Services, Inc., named Mark Spence. He gave us some hose to use to couple the engine and radiator.
- Afterwards, we drove to "the farm" and started work on the Power Cube. It was hot - somewhere around 95 degrees! We worked until 3:30 AM and made good progress, mounting the engine, fuel and hydraulic tanks, mounting the pump to the flywheel.
- During this process, I noticed the 1", 18 tooth spline shaft on the front of the engine and after some consideration, thought this was a better place to mount the pump - the only caveat was no nearby mounting holes on the engine. Something to think about next time.
- One note: I am still uncomfortable with the pump / shaft / flywheel, as I have reservations about the shaft coupling alignment. But there's nothing I can do at present due to time constraints.
- Tomorrow, James will continue working on the Power Cube and I will make a run for more parts, then continue working on the Power Cube.
July 19, 2013
- The Spark crew showed up, along with James, Jason and the tractor. James parked the truck/tractor. The Spark crew departed for New Orleans and James and Jason left for Austin.
July 15, 2013
- Continued working on the Power Cube. It was unfinished, yet I had to leave - I drove from OSE to my home in Dallas.
July 14, 2013
- Working on the Kubota Power Cube at OSE.
July 9, 2013
Picked up a U-Haul trailer and drove for parts with Derin. Picked up Kubota diesel engine and related parts, radiator, tools and hydraulic parts.
July 8, 2013
- Drove from Dallas to OSE.
Notes on My OSE Objectives
- First of all: I have a background in R&D hardware and software development. I also am highly interested in this line of work.
- The time I spent in Missouri on the Dedicated Project Visit was inspiring. I went there with the idea that there should be a profitable business model in the OSE product development and production.
- If not already apparent, after returning from the OSE Project Visit, I decided to get into OSE production by building a Power Cube and a LifeTrac in Dallas. The time in Missouri was an introduction and this would provide a "hands on" understanding of the fabrication process for myself.
- Following that, I plan to do some OSE promotion in the Dallas area and test the market for demand for OSE products.
- If demand is sufficient, set up shop to fabricate and refine OSE machines as kits or turnkey machines.
- Of course, this would require "giving back" to OSE in the form of improvements in design, documentation and parts sourcing. This is part of the Open Source model with which I am very familiar.
- Toward that end, I have continued documenting the Power Cube, LifeTrac and CEB press as well as corresponding with Marcin about design changes. I have also shared ideas with a friend in the DFW metroplex who is interested in helping in this endeavor. We've amassed most of the tools and equipment we'll need for production. I'm ready to forgo regular work and do this full time if I find sufficient demand.
- The necessary parts have either arrived or are on order for a Power Cube.
- I continue to work with the LifeTrac CAD designer toward completing the documentation necessary to order and build a LifeTrac, as this will be necessary after completion of the Power Cube.
- I have been looking for "an appropriate" place to set up shop for fabrication. Initially, we will use my friend's garage, but that will quickly change for security, privacy and personal reasons.
- One of the unknown challenges about OSE machines is the demand and the need for marketing. It would be great if overwhelming demand were already present, but I have yet to see it and don't expect it to be that easy. So, we must develop a means of developing demand.
June 16
I've been checking out the ignition switches and I like the look of the John Deer style switches, I have not found a matching connector or simple wiring harness. John deer sells a complete wiring harness, but at a steep price.

I finally found the matching connector:

I sent a query about where to find the electrical contacts to go in the connector.
Alternatively, I will use either wires & spade connectors or use the "Universal" switch and wiring harness. Here is a switch and harness:


June 8
Back in Dallas, checking out sourcing for electrical connectors. The engine wires end in a white plastic connector with 6 pins:

I don't like cutting wires leading to the engine, then re-splicing them later. The connector makes it easy to remove the engine if necessary.
I found the mating connector as well:

I will use the connector for connecting the engine and a second connector to connect the other wiring in the Power Cube. To this end, I ordered some male and female connectors and corresponding crimp-on contacts:
| Index | Quantity | Part Number | Description | Backorder Quantity | Unit Price | Extended Price |
|---|---|---|---|---|---|---|
| 1 | 50 | A1456-ND | CONN PLUG 6POS 94V-2 UNI-MATE | 0 | 0.28580 | $14.29 |
| 2 | 50 | A97889CT-ND | CONN SOCKET 20-14AWG TIN UMNL | 0 | 0.04660 | $2.33 |
| 3 | 25 | A1457-ND | CONN CAP 6POS 94V-2 UNI-MATE | 0 | 0.32080 | $8.02 |
| 4 | 100 | A97893CT-ND | CONN PIN 20-14AWG TIN UMNL | 0 | 0.10190 | $10.19 |
| Subtotal | $34.83 |
I also purchased a Paladin 1306 tool to crimp "open barrel and round contacts" - this was necessary to properly crimp the contacts to the wires. It cost around $71.00 (with tax) from Altex electronics.
June 7
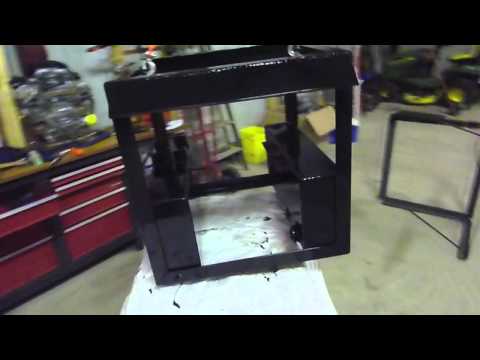
Painted the frame using Rustoleum glossy black premium paint for metal.
June 6
Completed welding the frame, engine mounts and hoist points.
June 5
Pressure testing the hydraulic reservoir and the fuel tank.
June 4
Continued grinding angle iron and finished the fuel tank.
May 20
This past week, I began cutting steel for Power Cube, prototype 6. This stands to be a big improvement over my prior Power Cube. It is a true cube in shape, at 27" on each side.

To accomplish this frame, I cut the steel with a band saw set at 45 degree mitered joints, as shown below:

To weld them, I used the "Strong Hand" tool to align the angle iron for welding:

I bought the tool from CyberWeld:
Note that when welding the frame, I had to continually check and re-check the "squareness" of the members - even with the Strong Hand tool, as they did require some slight adjustment before completing the squares.
April 23
OK ... I've been slacking in my log and am overdue for an update.
Here is the video of PowerCube5 running:
It has since been sold and delivered to customer.
Now I am beginning PowerCube6 and expect to have more activity to report. I begin with the latest design, as shown below:

I will begin with the frame, as it will be totally different, with the angle iron mitered and forming a more perfect cube, 27" on each side. More log details with progress.
March 9
Frederick Moor volunteered to help with the drawings for the Power Cube and has proven quite skilled with SolidWorks. We have had some dialog and he re-worked my Sketchup drawing in SolidWorks and generated some layout drawings. This is a BIG help for Power Cube 6.
My work on Power Cube 6 is progressing - I hope to begin cutting steel soon, but have been busy with some other activities (hope to make an announcement soon).
Some of the other projects are calling for a direct mechanical connection of the engine shaft rather than via hydraulic power. To this end, I have begun work on a more modular Power Cube. The concept is that the current Power Cube will be split into modules, with the engine module providing direct mechanical power and separate modules use this power. I think of these as the "engine module" and the "driven modules".
- The driven modules can provide power in various ways:
- Hydraulic pump for fluid power
- Electrical generator for electric power
- Water pump
- Mechanical transmission for torque
... and so on. Here is a sketch of the engine module I have been considering:

February 18
James was passing through Dallas on his way North to FeF in Missouri and stopped by to pick up the Power Cube to deliver to Marcin. Yahoo - my first sale!
February 7
In the last month, I've finished the Power Cube 5 prototype and now have it sold and am delivering it next week. With this complete, I am starting Power Cube 6.
January 14
Drove to Austin and visited with Dan Nash, who treated us to a tour of his aquaponics facility. His facility grows fish and vegetables in a symbiotic environment to produce high quality foods for local groceries and restaurants. We were all very impressed. Afterwards, I departed for Dallas and Marcin was taken to the Austin airport for his return flight to Missouri.
January 13
We drove to visit Ben's fabrication shop (an associate of James). Quite impressive, as he had built a CNC torch table. He wasn't there to discuss / demonstrate.
Next, we drove to visit Bret's house and were treated to a tour. He showed us his setup employing solar panels, water treatment and other advanced features of his updated house.
Later that evening, we returned to Ben's shop for discussion and a demonstration of his torch table. Quite impressive!
January 12
Marcin visits Texas!
Picked up Marcin at the DFW airport and we both visited with Dallas Maker Space - an organization interested in prototyping one or more OSE machines. After a show and tell, a meeting was held where Marcin described OSE, the goals and asked for involvement. It was received well and the details of a cooperative project are being discussed.
Drove to my house, where Marcin reviewed the Power Cube V prototype. He had some suggestions for modifications, but seemed to like the prototype.
Drove to the Austin area for a visit with Creation Flame. Arrival was late, but we managed to get a tour and some talk before settling down for the evening.
December 26
It's been a while since my last log entry - I've been busy. Powercube V is nearly complete - just need to wire starter switch, fill with fluids and fire it up. Hope to have photos soon.
November 25, 2011 - Thursday
- Made significant headway on my enhanced power cube today. Welded the hydraulic reservoir to the tank, finished welding the pump/engine assembly together, welded the battery holder.
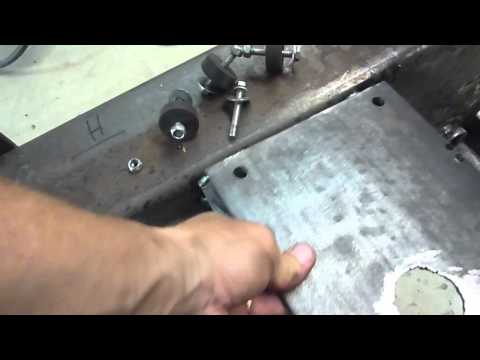
- Fabrication of the engine/pump support was tricky, as the pump plate must be parallel to the engine mounting plate. If not, the shaft coupling will bind. With this in mind, we had to prepare a means of aligning the plates 4 1/2" apart while they are welded in place. To this end, we welded two pieces of angle iron to the engine plate and ground them to be slightly less than 4 1/2" from the engine plate:

- Cut two more pieces of angle iron to exactly 4 1/2" long, with both ends as parallel as possible. Place the new angle iron pieces at the open corners of the engine plate, place the pump plate on top of all 4 pieces of angle iron and secure with C Clamps, then weld:

Note: I would have preferred to us a 2" x 8" I-beam or C channel, but I didn't have one and used the angle iron instead. The important thing was for the alignment jig(s) to have both ends precisely cut and polished to be parallel and exactly 4 1/2" long.
- Lastly, welded the engine support angle iron to the reservoir, aligned the two engine plates and welded them together:

November 21, 2011 - Monday
- Had dinner with former hydraulics instructor and discussed many aspectes of hydraulic design. I now have many updates to make to the power cube and other machines.
November 13, 2011 - Thursday
- We're getting some excitement over the replication of OSE machines and I have created a new page to begin promoting replication activities:
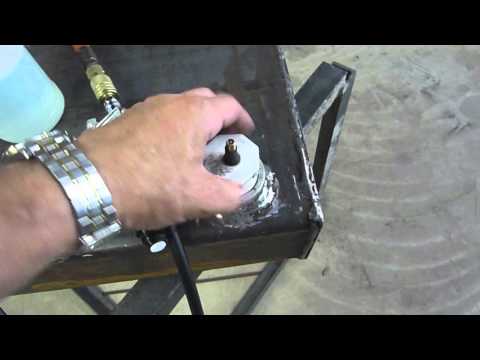
- Here is my procedure for performing the "bubble test" on the hydraulic reservoir using parts from your local hardware store:
- 2 ea: 3/4" PVC plugs
- 1 ea: 1 1/2" PVC plug
- 1 Automotive valve stem
- You can see in the photo below that I have drilled a 9/16" hole in the larger plug and inserted the tire valve. Also shown are the three weld-in flanges for the three holes in the reservoir:

- The store didn't have plugs threaded for 3/4", so I assembled them from two parts and glued them together using PVC cement:
- 3/4" thread to 1/2" PVC adapter
- 1/2" PVC plug
- To test the tank after welding:
- Wrap threads with teflon tape and screw the three plugs into the flanges and it should be air tight. Be careful not to cross-thread, as the PVC threads are easily damaged against steel threads.
- Add air pressure to add 5 - 10 PSI using bicycle air pump or air compressor (don't overdo it, as the plugs aren't steel).
- Brush soapy water on all welds and look for bubbles. Re-weld any leaks.
- I hope to have a video to share tomorrow.
November 10, 2011 - Thursday
- Broke out the new welding torch, as the old one has a problem with excessive heating in the mixer handle. Cut 6" steel for the hydraulic reservoir and the pump mounting plate. Torched holes in the pump plate and three holes in the hydraulic reservoir tube.
- Drilled holes in the mounting plates. The largest drill bit available was 1/2" and the spec sheet called for 9/16", so it may have to be enlarged later. Didn't get much welding done, as the argon gas ran out for the TIG welder.
- Did some "dry fitting" of the engine, hydraulic tank, oil filter and fuel tank in the frame, as there will be less room available since the fuel tank is larger than original.
- Saw some discrepancies between the parts ordered and those received (example: 1' hydraulic hose was 3' long).
November 6, 2011 - Saturday
- Returned to Creation Flame and talked with James and Thad for some time.
- Went to the shop and cut two 27 1/2" lengths of 1/4" x 6" x 12" tubing needed for building a Power Cube in Dallas. This tube has been difficult to find in lengths less than 20 ft - which yields an expensive excess if not used soon.
- Talked with James and Thad and during the dialog, we coined the term "OSE Corridor", as we are all located near I-35, in Cedar Creek TX, Bertram TX, Dallas TX and Maysville, Mo.
- From left to right: Thad, James, Tom
- F*** ya'll, we're from Texas

November 5, 2011 - Saturday
- Drove from Dallas to Austin to visit with OSE developers at 'Creation Flame'.
- James has a working CEB Press and most of the steel required for building a LifeTrac. James performed a test run, pressing a few hundred blocks the day before. We talked about James' experience making blocks.
- His CEB press was operating more slowly than the one Marcin had been using - pressing 4 blocks / minute, compared to Marcin's 16 blocks / minute. This is attributed to using a pump with less hydraulic volume.
- The blocks pressed just the day before were already exhibiting some drying, surface cracks and some of the corners had broken off. This brought us to the discussion of soil composition for pressing blocks. James had done some research on the issue and shared an excellent document describing the ideal soil composition for making blocks:
- The next thought is how to get this "ideal soil" for pressing blocks. James had bought some soil from a local vendor, but concluded that it may be best to have piles of sand, gravel, silt and clay available for mixing and pressing blocks. I suggested the idea of using a cement truck, as it could mix soil ready for pressing and deliver it to the site.
I expect to have more information and photos to share tomorrow.
October 30, 2011 - Sunday
- Welded the initial Power Cube Frame for the first Dallas Cube.
- Continued working on the LifeTrac documentation (this will take a while)
October 23, 2011 - Sunday
- Welded the initial Power Cube Frame for the first Dallas Cube.
- Began work on the LifeTrac documentation
October 19 - Wednesday
- Received the last two components: The oil cooler and the shaft coupler. Notified the vendor that the keystock is missing for the engine shaft - it should arrive soon. Hooray! ready to build (after the steel is acquired)!
October 16 - Monday and Tuesday
- OK ... It's been a while since the last update, but I've been making progress.
- Angle Iron for Power Cube and Jig cut. Bottom frame for Jig complete need to weld upper part.
- Worked out new geometry for Power Cube using new muffler, fuel tank and pump support:


- Planning on securing remaining steel and fabricating soon.
October 9 - Sunday
- Finally got started - chopped up angle iron using my new saw, the DeWalt DW872 14 inch Multi Cutter Saw:

- Amazon sells the saw for $441.99: http://www.amazon.com/DEWALT-DW872-14-Inch-Multi-Cutter-Saw/dp/B0000302QS/ref=sr_1_1?ie=UTF8&qid=1319454779&sr=8-1, but I bought mine used for $125. The blade was slightly dull, sharpening cost an extra $20. New blades cost $92.41 at Amazon.com.
- It is Not an abrasive saw, but cuts with carbide teeth. The result is that freshly cut steel is cool to the touch. The secret to long blade life: Don't apply too much downward pressure - use just one hand lightly so it spews a few sparks at a time. One review noted this and claims that the blade will yield thousands of cuts if not forced. Excessive downward pressure breaks the carbide teeth and quickly ruins the blade. Also: make sure the steel to cut is securely clamped to prevent shifting during the cut.
- Specs:
- Motor: 15 Amp, 4 HP
- Blade: 14", 70 tooth, carbide tips
- Large capacity cuts: 5-3/16" round & 4-1/2" x 6-1/2" rectangular
- Patented quick fence and quick lock vise for securing steel to cut
- 4 times faster than chop saws, 8 times faster than band saws
- Video of cutting the initial 1/4" x 2" x 2" angle iron:
October 3-4 - Monday and Tuesday
- Finally purchased angle iron for the Power Cube. Hope to start chopping and welding the frame soon.
- Still waiting on items from Sweiger Shop: Shaft coupling and oil cooler.
- Corresponded with Andrew about his progress and he does have questions about the designs and about the changes I have documented in my Blog entries.
- Began a new contract, doing Linux system administration for a large telecom company here in the DFW metroplex. Together with all my other activities, this may slow Power Cube construction.
September 28-29 - Wednesday & Thursday
- Received the fuel tank, solenoid and used Sketchup to draw the muffler - should anyone need its dimensions:

September 27 - Tuesday
- Worked on the Power Cube R&D section, added information about the different couplings, what works, what doesn't work and the preferred options.
- Received the muffler today:

September 26 - Monday
- Not much here, as I'm mostly waiting for delivery of ordered items.
- Did some work on the Power Cube documentation.
- Spent time researching real estate websites - found an interesting property nearby that may serve as a fabrication facility. This has been a challenge, finding suitable workspace for OSE development with land to serve as a "proving ground" and an appropriate building that is not too far from my home in Dallas.
September 23 - Friday
- Ordered the hydraulic oil cooler and shaft coupling from Sweiger Shop. I was hoping to hear from one other cooler supplier, but they didn't return my message.
- Ordered a kit with fan & thermostat switch from Amazon.com - with a couple of caveats:
- I believe the cooler fin dimensions are 12" by 20" and the fans come in 10, 12, 14 and 16 inch sizes. I decided to go with the 14" cooler as it has 33% more air movement than the 12" fan and the mounting bolts appear to be 12" apart. This will "waste" 1" of air movement from the fan edges, but I believe it will provide better cooling and mounting.
- The 14" fan kit has two options for the thermostat: one that is immersed in the oil and the other clips to the radiator fins. I chose the latter, as I didn't want to deal with the extra plumbing to connect a 3/8" probe in a 3/4" pipe. The 12" fan kit didn't have the option for the fin mounted thermostat.

September 22 - Thursday
- Got radical today and ordered a 5.5 gallon fuel tank from Surplus Center and also the solenoid I neglected in prior order. The larger fuel tank departs from original designs, but it addresses the limitation of the smaller fuel tank.

- Also ordered a Briggs and Stratton muffler. The is a departure from the original Power Cube design, but I wanted it for two reasons:
- Study the muffler design in case we decide to create an OSE muffler
- This one should be significantly quieter than the original design and will only send exhaust out one side - and away from the plastic fuel tank

- The alternate fuel tank may require relocating the ports in the hydraulic tank, but it will provide more than 3 times the fuel capacity.
- The commercial muffler may also present an installation challenge, but it will provide significantly quieter operation.
- I've been looking at cooler options and will order from Sweiger Shop, along with a shaft coupling.
- I found a cooling fan and thermostat switch from Amazon for less than 50 USD:
September 21 - Wednesday
- Updated CEB BOM with electronic parts for building the Arduino Breakout board.
- This Printed Circuit Board is no longer available completely built. It comes as a bare board and parts must be ordered separately and the board must be assembled.
- Proposed higher capacity fuel tank for Power Cube - 5.5 gallons and added the info the to R&D section.
September 20 - Tuesday
- Logging will likely slow to a crawl, as I will be starting a full-time job as a Linux administrator with a national telecom company. Of course, my side jobs of teaching Tai Chi, Kung Fu and teaching a class at Richland College are already having that effect.
- Worked on resolving which oil cooler to order - Talked twice with a Dallas supplier who has coolers, but they have not given a price as yet.
September 19 - Monday
- Took a few days' break from logging.
- Reorganized BOM Steel sheet to match the order of the 2D Fab document and sent the author questions about discrepancies.
- Surplus Center called and said they only have 5.5' of the 6' hydraulic suction hose I ordered - they said they would send it all, but only charge for 5'.
- Spoke with Sweiger Shop about coolers and coupling and they are responsive. Here is their reply:
The oil cooler is $208.00 plus freight for 1 unit.  If you order 10 at a time the price goes down.
We don't know exactly what the freight will be yet to us or to your zip code.

The cooling fan for this unit is $133.64 each.  You can put 2 fans on this if you want.
The adjustable control is $30.54 each.

The coupling:  5/8 hub--$6.45
                      1 1/8 hub--$6.45
                      connector--$8.86
                      offset keystock-- $5 each
                       labor to weld together=  $6
                       total=  $32.76
I am checking on a local Dallas-based supplier for coolers and will make a decision when I hear from them. BTW: Sweiger Shop is a great outfit that supplies steel and other items for OSE. They can take orders over the phone and ship light items (not steel). Here is their contact info:
Sweiger Shop, Inc.
5502 N.E. Dallas Rd.
Weatherby, MO 64497
Phone: 816-449-2292
E-Mail: mocop1120@yahoo.com
- Corresponded with Marcin about a new engine/pump support design. Objectives were to retain engine shaft for warranty and to permanently weld nuts in place to simplify pump mounting. This requires longer spacers between the pump plate and the engine plate - and therefore stiffer support between the two. Using angle iron instead of bolts shrinks the size of the pump plate by 3" and therefore makes room for the muffler I want to add. Here is my proposed design:

September 16 - Friday
- Continued documenting and digging out details about the best procedure for building the engine/coupling/pump assembly.
- Got copy of E-Mail from Andrew, who will be building a Power Cube and LifeTrac. How exciting! Sent message with links to log and manufacturing directions.
- UPS delivered the engine today and it had some damage to the plastic housing, but otherwise looks OK. Contacted the sender asked how to proceed.
- Good news: This engine has an "Electronic Fuel Management System" and does not have a manual choke. This will simplify things.
- Composing list of Misc things to get to test engine:
- 12 V Battery
- Gas container and gasoline
- Oil - 2 quarts 10W-30
- 3 feet: 1 Gauge wire & ring connectors (or copper tubing)
- 2 feet: 1/4" rubber fuel line
September 15 - Thursday
- Spent more time reviewing the BOM lists and found many more updates. Called Surplus Center and they changed several items in the order before it was released for shipping.
I will submit an updated order list when I receive it.Already updated. - While on the phone with SurplusCenter, I asked them about couplings and gave them the shaft sizes for the Power Cube - they said it would come in 3 pieces and cost 52 dollars total, so I added this to the order as well.
- Marcin said: Our experience with spider couplings and hytrel showed that they don't last more than 40-100 hours, so we went to solid couplings. The plastic wears out.
- OK - With that information, I cancelled the coupling from the order and will be going with a custom fixed coupling instead.

- Called a local vendor for hydraulic coolers and found a company here in Dallas that sells with or without fan and thermostatic switch. Looking at the photo made me think that if we used their fan, we could do without the expanded steel protecting the oil cooler fins - but at what cost? Waiting on reply from vendor.

September 14
- Spent time studying the documentation and design drawings for the LifeTrac tractor and compared them against the old BOM for steel parts. Did lots of updating and send requests for revision to the current maintainer - Will. Last correspondence said he is packing up in England and soon traveling to Factory-E-Farm in Missouri.
- Spent hours analyzing discrepancies between the BOM part list and the actual parts for the Power Cube - found lots of differences and made some adjustments for design updates and parts available from the vendor. Will update BOM tomorrow accordingly. Finally, got the first round ordered. Here is the order:
            1  9-1788-B              0.976 cu in PRINCE SP20B16A9H2R HYD        187.95
            1  9-7290-100            1-1/2" NPTM TO 1" NPTF 14 GPM TANK S        19.95
            3  9-5500-12-12          3/4 NPTM TO 3/4 NPTM 90 ELBOW               15.00
            1  928-C                 3/4" QUICK COUPLER S40-6 F/F                25.95
            1  9-7843-24             1-1/2" NPT FORGED WELD-IN TANK FLANG         4.50
            1  9-7843-4              1/4" NPT FORGED WELD-IN TANK FLANGE          2.40
            1  455-AA                HOSE BARB 1/4" X 1/4" NPTM 4244-4-4          1.25
            6  9-1279                1" HYD SUCTION/RETUN HOSE (SOLD BY T        30.00
            1  951-2212              3/4" X 12" JIC 12F X JIC 12F 3000 PS        15.00
            1  9-059                 3/4" NPT 20 GPM FA1200-10 RETURN FIL        17.95
            1  9-4404-16-16          1 HOSEBARB TO 1 NPTM ADAPTER 4404-16         6.00
            4  9-5404-12-12          3/4 NPT HEX NIPPLE                          10.60
            1  9-7957-12             3/4" NPT PLASTIC TANK BREATHER               4.49
            1  9-5605-12-12-12       3/4 X 3/4 X 3/4 NPTF TEE                     7.00
            1  9-5404-4-4            1/4 NPT HEX NIPPLE                           0.95
            1  9-6314                1/4" NPT QUICK COUPLER S40-2                17.95
            2  9-7843-12             3/4" NPT FORGED WELD-IN TANK FLANGE          5.50
            1  9-4604-16-12          1 HOSEBARB TO SAE 12M ADAPTER 4604-1         7.89
            1  9-2501-12-12          JIC 12M x 3/4 NPTM 90 ELBOW                  5.59
            1  9-2403-12-12          JIC 12M x JIC 12M UNION                      2.75
            1  9-6505-12-12          JIC 12F TO 3/4 NPTM SWIVEL                   6.00

                                                        Total $:                394.67
          ____________________________________________________________________________

                                                           Order Recap:
                                                        Total Product $:        394.67
                                                        Net Product$:           394.67
                                                        Shipping:                15.81
                                                        Sales Tax:                0.00
                                                        Insurance :               2.00
                                                        Grand Total:            412.48
          ____________________________________________________________________________
- Note that when searching for items, you must be creative. For example, a "Hose Barb" is sometimes spelled "HOSEBARB" and isn't found by searching for "hose" or "barb". Try multiple ways of searching or just call the vendor.
- Immediately after pressing the confirm button, I realized that I was missing a part or two, but that they should be easy to find in Dallas, but it will mean another trip to a vendor.
September 13
Since my return from the Dedicated Project Visit, I have been continuing my documentation efforts on the Power Cube. The documentation is critical when ordering parts and steel, as I want to have everything necessary, but not be short either.
I have also collected a set of tools for building Power Cubes. This video shows some of the tools:
- Tools collected so far
- Oxy-Acetylene cutting torch, tanks, hose, regulators, cart (Used: $400)
- Heavy Duty Metal cutting chop saw (Used: $125 + $20 to re-sharpen carbide blade)
- 1/2" Hand Drill
- 7" Angle Grinder ($70 at Northern Tool - 5 Yr in-store warranty)
- 4" Angle Grinder (Used: $30)
- Shop Vacuum (Used: $15)
- 3 pair Vise Grip pliers - to clamp metal for welding
- Socket Set
- 2 Crescent wrenches
- Face shield for grinding
- Eye protection
- Other tools not shown in the video include:
- TIG Welder
- Safety Equipment (steel toe boots, welding hood, welding jacket, hearing protection)
- Drill press
- Paint sprayer
Ordered Engine
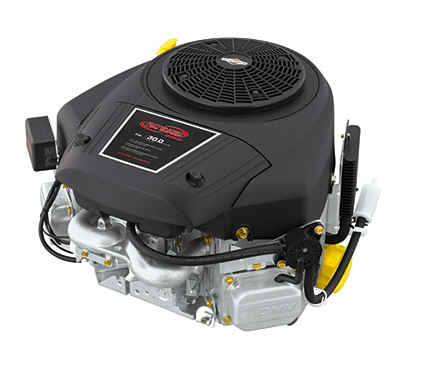
Scoured the web for sources on engines and finally came across Small Engine Suppliers and ordered a suitable 28 HP model:
- Briggs & Stratton 49M777-various 28 HP Professional Series

- Order:
--PRODUCT INFORMATION--

Quantity:      1
Product:       Briggs & Stratton 49M777-various 28 HP Professional Series ($ 699.95 ea.)
Options:
Cost (each):   $ 699.95
Item Subtotal: $ 699.95
Wt. each:      100
Total Wt.:     100
Product ID:    04390
Whse:          sed

SUBTOTAL:      $ 699.95
SHIPPING:      $ 74.95
Agreed to terms

TOTAL:         $ 774.90
- Next step: Order Power Cube parts and steel