UELVE MBC/v0.1: Difference between revisions
No edit summary |
|||
| Line 69: | Line 69: | ||
Construct in 4 subassemblies: | Construct in 4 subassemblies: | ||
* Bonnet, front, dashboard and 1/4 of the floor (assemble whole floor, brace | * Bonnet, front, dashboard and 1/4 of the floor (assemble whole floor, al9ng with floor support; brace - double-up the bamboo with epoxy - then separate at the footwell line) | ||
* Driver seat-box, "Back" box on floor, then brace around the Driver seat-box and separate another 1/4 of the floor | * Driver seat-box, "Back" box on floor, then brace around the Driver seat-box and separate another 1/4 of the floor | ||
* Roof and top section of the "Back box" | * Roof and top section of the "Back box" | ||
* Rear frame continuation of the remaining "Back box" and add bumper | * Rear frame continuation of the remaining "Back box" and add bumper | ||
=Videos= | =Videos= | ||
Revision as of 06:18, 25 January 2023
Basics
- A lightweight (200 kg) 3 occupant vehicle design that can be mostly DIY constructed.
- Dimensions 1.5 x 3.1 x 1.1 metres for a front surface area of approx 1.5 sq. metres
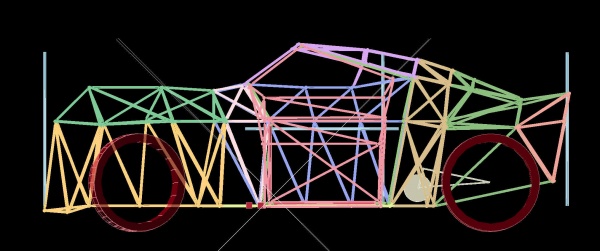
- Geodesic Frame skeleton is bamboo and PVC pipes connected together with 3D-printed software-generated "Nodes", which are then entirely encased in Expoxy Resin and Fibreglass, Kevlar, Hemp, Flax or other high-strength cloth layers.
- Double wishbone suspension is expected to be fitted at the front, whilst the rear may be swing-arm, Double-wishbone or Macpherson. This revision uses swing-arms at the rear.
- Body panels are twin layers of Fire-resistant Non-woven Polyester with a hot-glued 4 layer latticework "Hobbycraft" 9x1mm bamboo frame inside (9x1mm is easily bendable) to create compound curves. Label-gun "barbs" pin the two polyester sheets at a regular 10mm spacing, and Soudal Fire-resistant Expandong foam injected into the gap.
Frame Concept
Blue pipes are 1m measure sticks. Note that the body takes whatever form we would like.
- Outer skin using the GABoats technique (Geodesic Aerolite Boats) - http://gaboats.com
- Inner frame using 3D-printed fibre-reinforced "nodes" connecting continuous-fibre-reinforced pipes on a Fibre_Reinforced_Pipe_3D_Printer or getting carbon-fibre, hemp-reinforced tubes (or even Bamboo), based on the Divergent 3D "Blade" car manufacturing concept https://www.youtube.com/watch?v=vPv7PwS50OE
- Epoxy-soaked cloth "wrapping" carried out on joints, if necessary, using the Calfee Design Bamboo bike technique. https://calfeedesign.com/what-is-in-calfee-diy-kits/
- Swappable Modular batteries using the Open_Source_Battery_Pack
CAD Source Code
- git clone http://lkcl.net/vehicle_3d/.git
Skeleton Frame Phase
BOM
estimated
- 300 metres bamboo canes between 8 to 13 mm diameter, or 300 metres PVC or other pipe or straight sticks up to 13mm. (structural strength is non-critical)
- 200 metres OD 21.5 mm ("Floplast") PVC waste pipe, ID 19.5 mm
- 500 metres 25mm width "Painter's" Masking tape
- 15 20g tubes of rubbery glue. do not use hot-glue unless upgrading the 3D-printed nodes to PolyCarb or PETG: PLA deforms at only 60C. do not use strong epoxy or superglue
- 3 tubes Araldite Epoxy
- 5 kg PLA for 3D printing of "Nodes"
Tools
- 3D printer with 0.8mm nozzle, set layer height of 0.6 mm and 0.2mm "support towers", full coverage. Nodes are complex.
- Usual pliers and files for removing 3D support
- Hacksaw and Mitre (90 degree angle cutting)
- Sharp pencil
- 1 metre metal ruler and tape measure
- A4 printer, scissors
- 25 metres string (for tensioning). garden twine is sufficient.
Assembly advice
Cutting accuracy on pipes to around +/- 0.15 to 0.2 mm is pretty crucial. The geodesic frame shape amplifies errors which causes cascading problems that require partial disassembly to correct (hence the rubbery glue and masking tape instead of strong rigid epoxy or cyanoacrylate).
Start from a flat triangulated base of parts then when going vertical locate 3 pipes onto one node and create tetrahedra. Once one tetrahedra is created find another right next to it and asssemble that. Do not attempt to assemble from the outside inwards (meet in the middle), work from one side to the other or from the middle to the outside: climbing *inside* the frame to glue-and-tape is very tricky.
The entire frame is extremely light (under 10 kg) at this stage: turn it upright or upside-down to make access easier, as needed.
Construction order:
- Bonnet
- front
- dashboard
- floor and floor support
- Driver seat box
- "Back" box (behind occupants)
- Roof
- Rear frame
- Bumper
- Doors
Construct in 4 subassemblies:
- Bonnet, front, dashboard and 1/4 of the floor (assemble whole floor, al9ng with floor support; brace - double-up the bamboo with epoxy - then separate at the footwell line)
- Driver seat-box, "Back" box on floor, then brace around the Driver seat-box and separate another 1/4 of the floor
- Roof and top section of the "Back box"
- Rear frame continuation of the remaining "Back box" and add bumper
Videos
Screenshots / Images
See Also
- Two Wheeled Velomobile
- Velomobile
- Summer_of_Extreme_Design-Build_and_Startup_Camp_Overview_of_Learning_Program

