Chris Reinhart Log: Difference between revisions
No edit summary |
|||
| Line 4: | Line 4: | ||
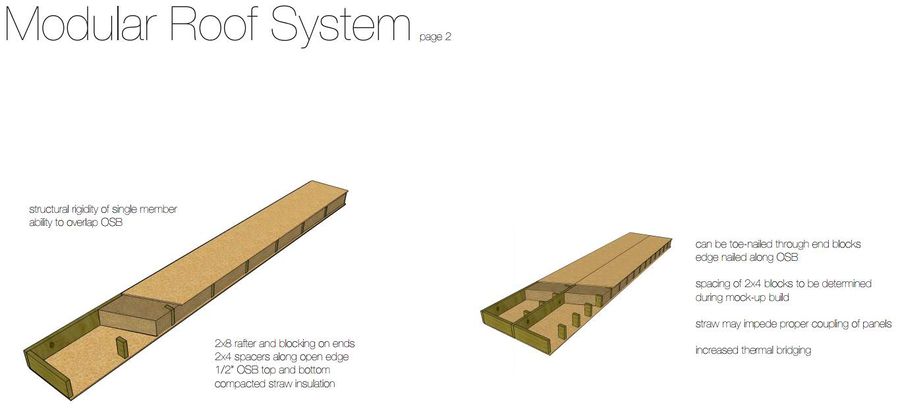
Over the past two days, Marcin and myself have refined numerous details of the Microhouse design. We have settled in on a roof panel module that we believe will be quick to assemble in the field by removing the tight tolerances necessary if panels might tightly with one another. In this system, panels will be spaced apart roughly 14" or 15", eliminating the need for precision. 2' wide sheets of plywood will be screwed into place from the bottom to contain insulation, and once insulated, 2' wide sheets of OSB will be screwed onto the top. | Over the past two days, Marcin and myself have refined numerous details of the Microhouse design. We have settled in on a roof panel module that we believe will be quick to assemble in the field by removing the tight tolerances necessary if panels might tightly with one another. In this system, panels will be spaced apart roughly 14" or 15", eliminating the need for precision. 2' wide sheets of plywood will be screwed into place from the bottom to contain insulation, and once insulated, 2' wide sheets of OSB will be screwed onto the top. | ||
[[File: | [[File:roof panel sketch.jpg|800px]] | ||
[[File:roof_panel_sketchup.jpg|800px]] | [[File:roof_panel_sketchup.jpg|800px]] | ||
| Line 17: | Line 17: | ||
[[File:microhouse_doorframe_measure.jpg|800px]] | [[File:microhouse_doorframe_measure.jpg|800px]] | ||
[[File:attaching_osb_microhouse_doorframe.jpg|800px]] | [[File:attaching_osb_microhouse_doorframe.jpg|800px]] | ||
=Thurs Aug 22, 2013= | =Thurs Aug 22, 2013= | ||
Revision as of 04:51, 2 September 2013
Sunday, September 1, 2013
Update on Prep Weekend for Microhouse Build
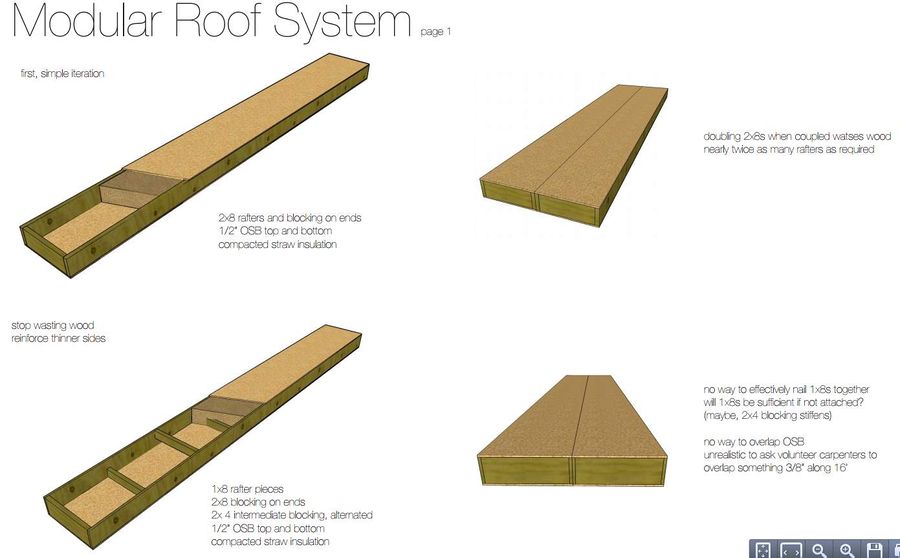
Over the past two days, Marcin and myself have refined numerous details of the Microhouse design. We have settled in on a roof panel module that we believe will be quick to assemble in the field by removing the tight tolerances necessary if panels might tightly with one another. In this system, panels will be spaced apart roughly 14" or 15", eliminating the need for precision. 2' wide sheets of plywood will be screwed into place from the bottom to contain insulation, and once insulated, 2' wide sheets of OSB will be screwed onto the top.
File:Roof panel sketch.jpg File:Roof panel sketchup.jpg
The idea of the modular components for the mechanical and electrical system has evolved into the module being one of the partition walls in the building itself. This wall will contain the electrical and plumbing connections of the sink, shower, toilet, stove, and electrical receptacles. The partition wall will also support the loft panels. Loft panels will be pre-wired for electrical connections, and will plug in to receptacles on the electrical module-wall.
Layout for the interior of the Microhouse was determined.
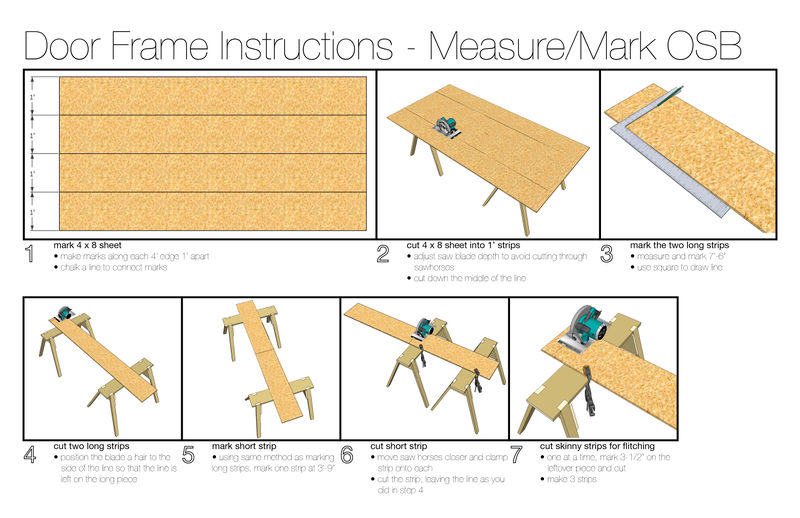
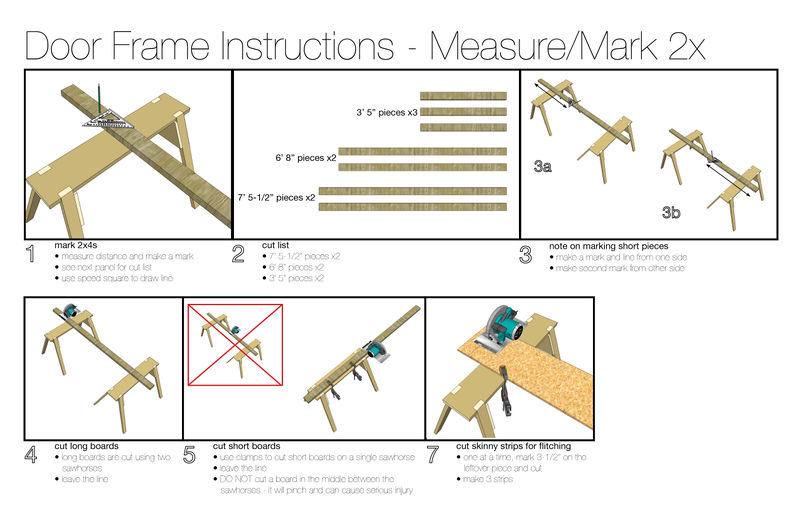
An intern at OSE, Lucas, and I built the rough door frame from the instructions I had created. We timed each step of the process, and also marked up the instruction sheet for the second iteration. All pictures can be found on trovebox under the tag "microhouse."
 File:Attaching osb microhouse doorframe.jpg
Thurs Aug 22, 2013
Bill of Materials
Sample Construction
File:Detailed model first pass.skp
Discussion: Materials necssary for build of microhouse windows and roof panels. Saturday & Sunday - 4 people total needed. 3 teams of 2 - the best amount of people. Goal: how fast can inexperienced people build the house?
- Constructed Wetland - alternative to septic. Peter Bane, Brian Art Ludwig ($150/hr) - all the greywater books.
Next steps: BOM for sample framing and roof sections: Monday; build procedure - by wednesday.
Make sure all blades are in good shape:
- Table saw -
- Circular saw
- chop saw
- sawhorses
- screw guns - Chris has 1
- 1 gun per team
- Star head drive -
- 2 groups work
- Ask John for Recommendations -
Spoke with both Walter Grondzik ($50/hr for up to 10 hours) and Ryan Zaricki ($40/hr - 4-5 hours for hydronics) ... both are interested in contributing to the design of the project from an engineering perspective. Ryan had several ideas for moving heat with hydronics from one module to another. He has worked on several such projects. Walter is willing to consult on any MEP issues and to review the passive heating/cooling strategies used in the design.
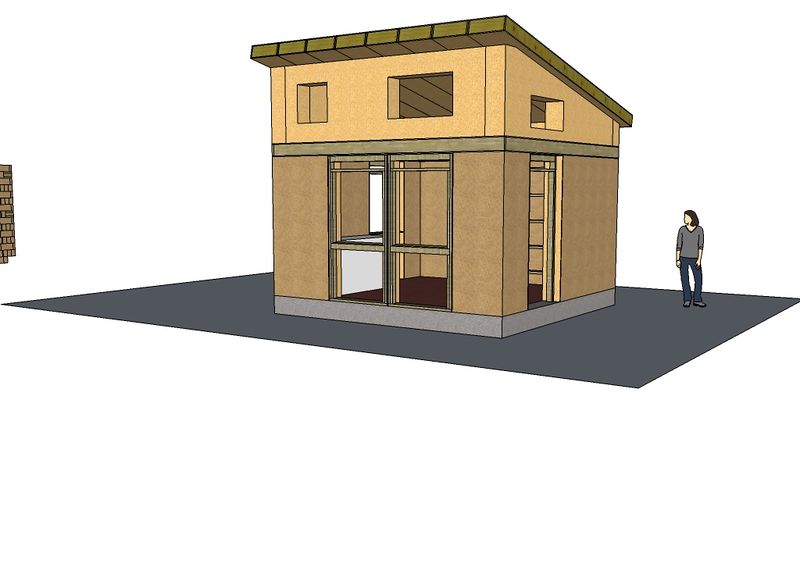
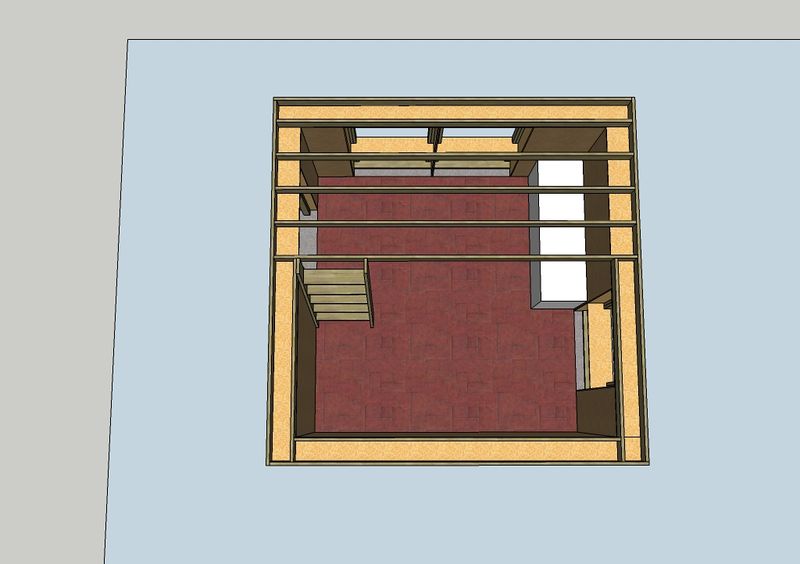
Perspective shows earthen walls, door and window frames, bond beam, and roof panels. My feeling is that with the loft, there is too much wood framing... the design no longer celebrates the earth blocks like it should... too much carpentry involved.
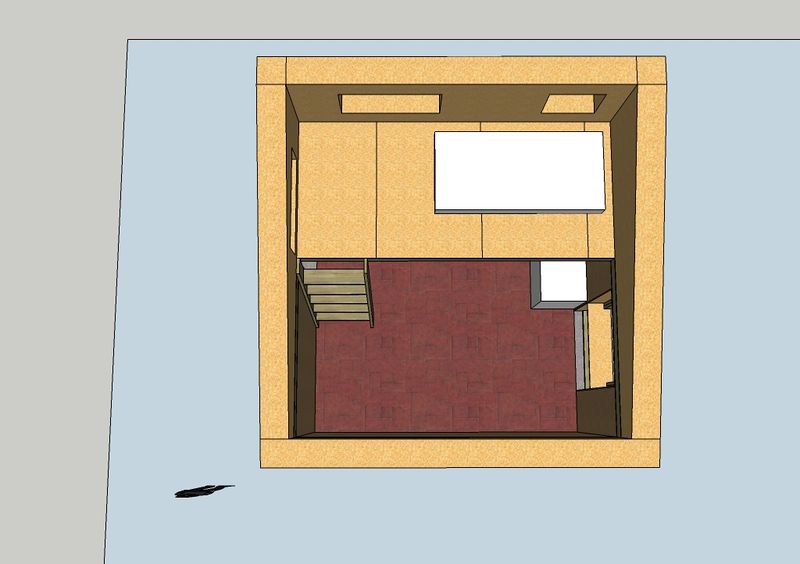
Overhead of sleeping loft
Loft removed to see first floor. Kitchen counter could wrap wall. Stove can be placed in back corner by ladder or on opposite side. Window frame on west side of building could be converted to a door to access future addition.
Fri Aug 16, 2013
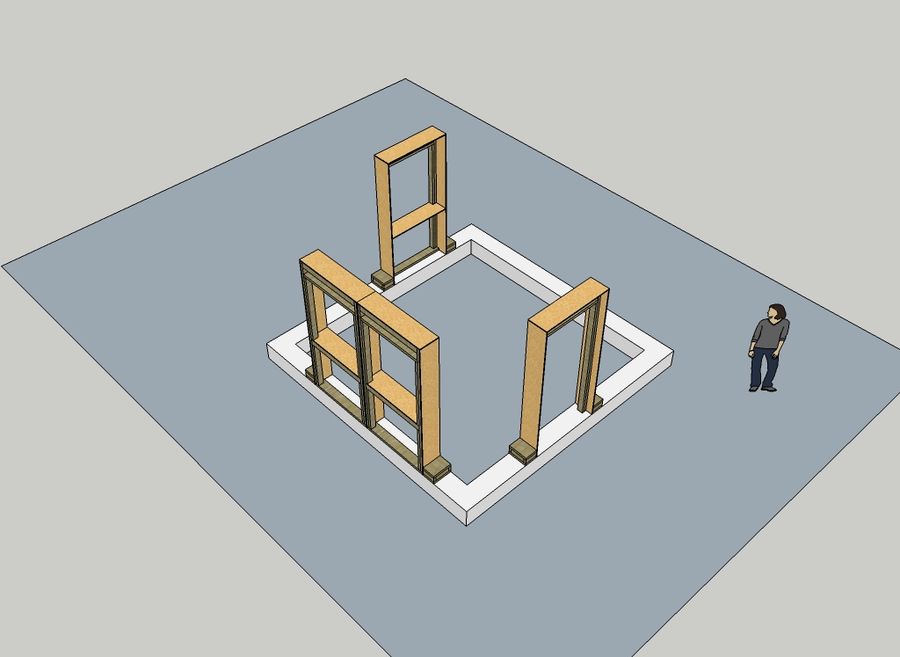
Foundation and Frames Set Up Before Build Day
This image begins to show the detail of what the foundation and framing set up will look like at the start of build day.
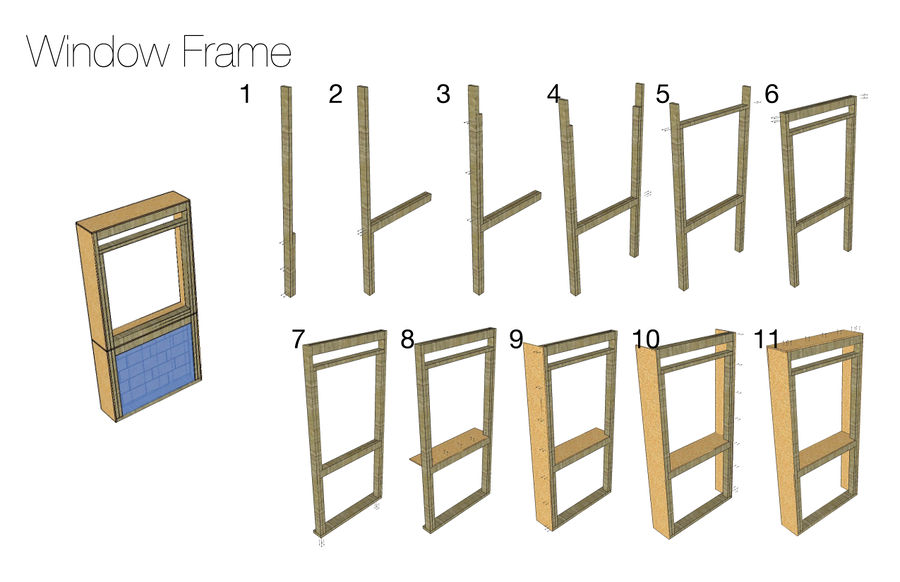
First Steps at Construction Diagrams
More detail is needed, but this sheet shows the steps in construction for a window frame. A cut sheet needs to be added. Also, more detail on the nailing is necessary, even though all nails are shown.
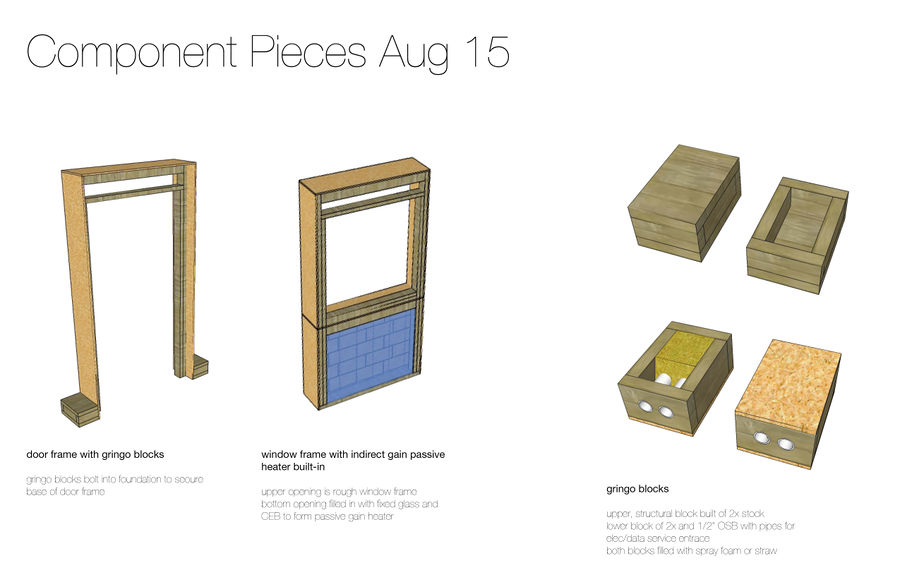
Wood Components
Shows detail of window and door frame, as well as a gringo block for attaching frames and a block for service entrance of data and electricity.
Wed Aug 14, 2013
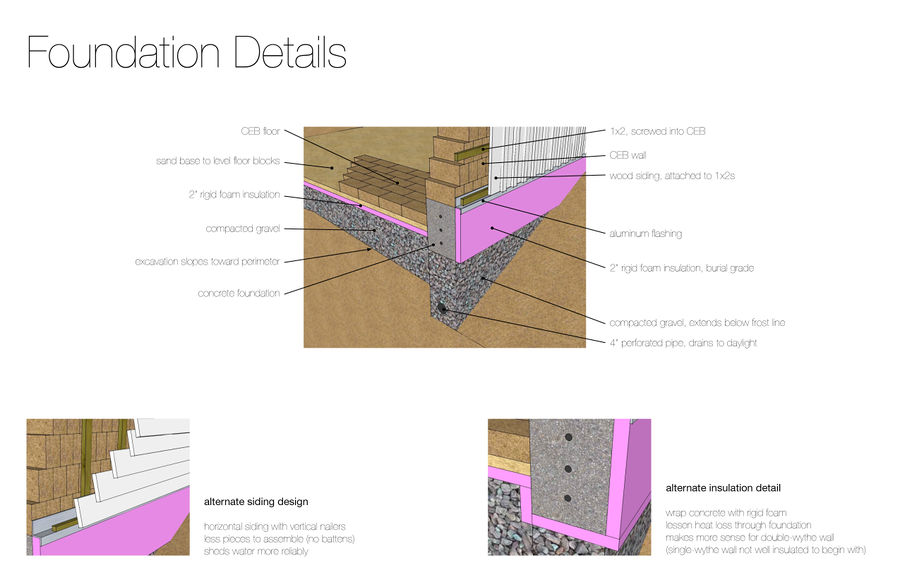
Foundation Details
Drawing of foundation details without dimensions - final dimensions to be determined.
Wed Aug 7, 2013
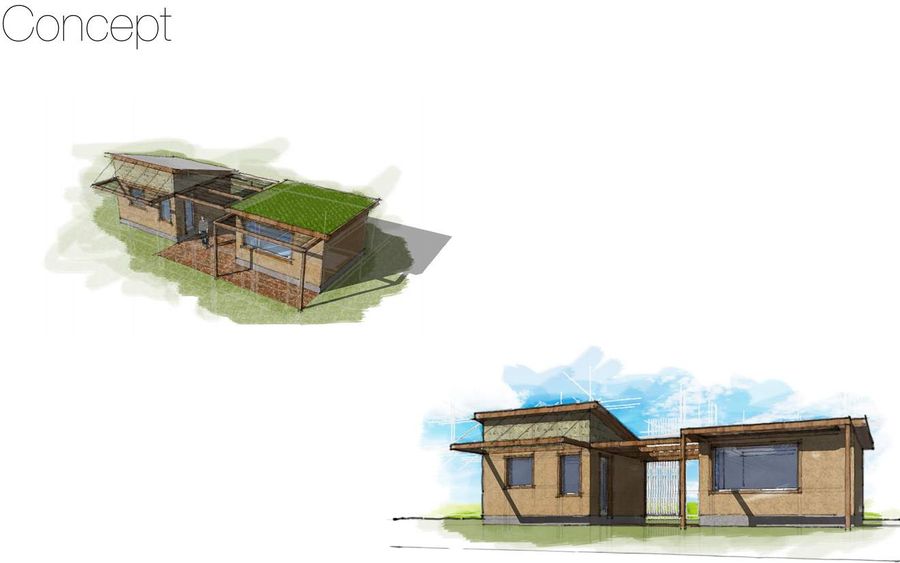
Concept drawing thoughts
reverse shed roof to allow for easier mounting of solar panels
look at option of upper windows for ventilation
add landscaping rain barrell viney plants
Mechanical and plumbing modules - Mechanical and Electrical Equipment for Buildings -
File:Direct Solar Gain.pdf
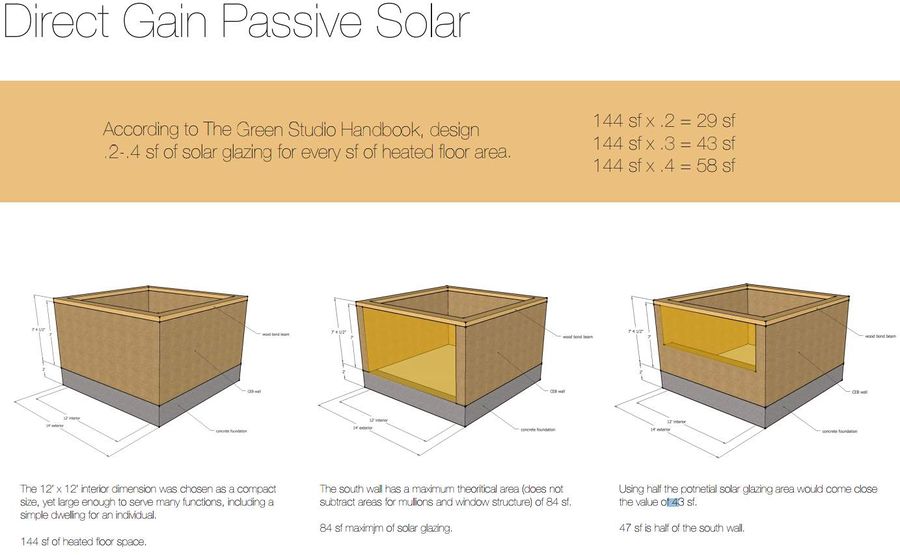
Passive Solar - Direct Gain
Chosen as the best passive heating strategy because of the building size. Future designs should explore indirect gain systems, as well. The page of calculations is a starting point for determining apertures.
Notes, in addition to what is on drawings pages (should be added to drawing pages) -Aperatures must be within 15 degrees of true south (north, in southern hemisphere) for the building to receive 90% of optimal winter heat gains (Green Studio Handbook 107)
also note that the Green Studio Handbook states… “The first, and most important step in the design of a passive solar heating system is to minimize the rate of heat loss through non-south-facing envelope components (including infiltration losses).” (109)
The single-wythe version of the CEB building will have the potential for large heat losses. Although thermal mass can help, uninsulated earth walls, when they get cold, they take some time to warm up. My experience in the earthen section of my home is that if I am at home throughout the day or at least in the mornings and the evenings, the home will stay cosy. If gone for a couple days in the winter, it takes a half a day or better to make the home feel good again.
The double-whythe section offers greater potential to use the solar gain by being better insulated.
Roof Panels
Despite an enormous amount of information on prefabrication on the internet and at the library, it is clear that we are not working in the mainstream here. Every prefabbed roof panel I could find was a single, lifted-into-place-with-a-crane-type. We want something that four people can comfortably lift to a height of 8+ ft. Ideally, we want this technology replicable on two-story and greater buildings.
My explorations were based on the idea that four people could move a panel with a weight of about 200 pounds. The weight for the first iteration of the roof module is about 180 pounds without straw infill. (add weight calculations to drawings – also, final documents should include both English and metric units).
I think that the roof panel design can be improved as the details are explored. I think encasing the open side of the panel so that the straw cannot impede the panels coupling together would be slick. Something like luan plywood or masonite. Ideally, this thin piece is caulked into place, and the panels are caulked together when assembled.
The roof will have more linear feet of potential crack than any other component (assuming that the stucco is impermeable to moving air).
I would like to add to the schedule of events for the Labor Day visit that we build a full-scale test of a roof panel and track the process closely. It also makes sense to prebuild a jig for assembling the roof panels.
Construction Process
Numbers listed in contract add up to 28.
I think the mechanical unit might be best conceived as two units – one for plumbing, one for electrical – the idea of having critical connections of water and electricity and gas all next to each other is uncomfortable, indeed. This would break the team for the mechanical unit into two teams of 2.
What type of stucco is being used? Depending on the answer to that question, I think the stucco team of 4 could be smaller earlier in the day. We could go with 10 for bricks – 3 sliding and 5 laying. This could be one way of re-arranging if we are trying or needing to stay at exactly two dozen volunteers. If not, I think your numbers for adding up to 28 are comfortable.
House Layout
The two modules, separated by a courtyard, will create a wonderful outdoor space to be used for eating (cooking even, if desired), for relaxing, and for entertaining. However, two buildings separated require two separate MEP systems. Is it possible to arrange the building program so that functions are separated that have similar MEP needs? Could one space function without plumbing and gas?
One module with electricity, data, plumbing and gas:
- Kitchen
- Shower
- Toilet
- Dining
One module with electricity and data only:
- Bedroom (sleeping loft?)
- Living space
- Work Space
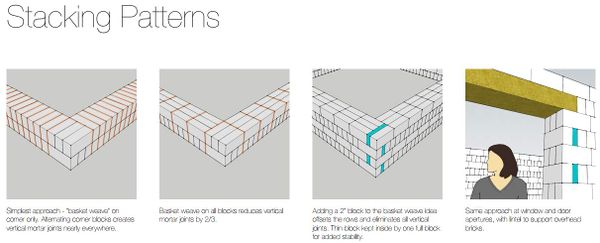
Brick Stacking Patterns
Time Log
Thu Aug 1, 2013
- See Microhouse Build Planning and Chris Reinhart Contract
- Initial conversation on design with Marcin
- Planning first cut of design on Wed, Aug 7
- Water Glass for stone sealing or - [1]
- Stove - [[2]]
- Factor e Farm site plan - Factor e Farm Site Plan
- Beginning of brick courses - Brick Stacking Patterns
- Soil map - [3]
Sketchup File - File:Microhousev1.skp
Image of above: File:Mhv1.jpg
