D3D Ohio v18.02: Difference between revisions
No edit summary |
No edit summary |
||
| Line 97: | Line 97: | ||
=Development Log= | =Development Log= | ||
==2/26/2019== | |||
Editing firmware. here, I'll capture where changes are within files (they are hard to navigate) | |||
This should also help others who have to reconfig marlin. | |||
I think it is a GREAT and critical practice for these files to be read in entirety and understood though. good comments in there. | |||
===CONFIGURATION.H=== | |||
====BED LEVELING==== | |||
====PROBING GRID==== | |||
==CONFIGURATION_ADV.H=== | |||
From Sara's manual @https://docs.google.com/presentation/d/1Jng33ox5_ZXnTE244ZYxwuZSTqdk4DktIJxZbDOjls8/edit#slide=id.g42f7455050_1_0 | |||
If you want to make changes in Marlin - generally you will only modify Marlin through two files: | |||
configuration.h | |||
Configure Marlin for your specific 3D Printer design | |||
Set probing pattern / probing area | |||
Just read it. Has good comments. | |||
configuration_adv.h | |||
Advanced configuration specific to your 3D Printer design | |||
In our case, the second extruder motor was converted to Y-Right axis | |||
Baby stepping activated to enable real-time first layer adjustment | |||
You can additionally override certain settings defined by Marlin in the start/end GCODE in Cura. | |||
See configuration.h file for: | |||
steps/motor | |||
Activate lcd screen | |||
Set probing pattern | |||
Sets grid points for varying bed sizes | |||
Currently using grid that’s 2x2 for 8in bed | |||
For big bed: change from 200inches to 1000inches | |||
Bed size: limits where it can travel | |||
OSE Cura: | |||
Expert Settings vs. “Quick Print” Settings | |||
.ini is where you change the temperature, nozzle size, and all printing parameters | |||
Set bed size in Cura in Machine Settings | |||
LCD Screen | |||
Z-offset | |||
Go to Control-> Motion -> Z Probe offset to change the z offset | |||
You can modify the Z offset on the fly with Tune -> Z Babystepping | |||
Sample motion: you can move x y and z axes | |||
Prepare, auto-homing, moving axes | |||
Disable Steppers | |||
Lets you move motors around | |||
M85 through he CURA command line does the same thing | |||
EEPROM | |||
The memory on the Arduino | |||
You can save and load settings to EEPROM via the LCD screen | |||
==10/31/2018== | ==10/31/2018== | ||
-more cable assyms for main body. | -more cable assyms for main body. | ||
Revision as of 00:38, 27 February 2019
Build
New build link: https://docs.google.com/presentation/d/1pHYTWzezWWFUROGH39EBYXs0np-FJfRLAAreQBTMF2g/edit?usp=sharing
[**********NOTE**************] the below slide will be removed when the above link is filled with data.
Extruder teardown and build
https://docs.google.com/presentation/d/1KIu1cxAdYsfQuMsC22vkaRgfDtb8w9GjL_zW0v-OKbw/edit?usp=sharing
D3D extruder build
Photos of build: https://photos.app.goo.gl/P3TpbyrDfRtszzoX6
Issues and notes:
- Needed to file down 3d printed rod for bearing idler.
- drilled out several areas.
Tools found to be helpful:
- Picks(dental size)
- drill and bit to finish holes.
- punch, hammer and vice to lightly set in square nuts (my holes were a bit small)
- hobby knife set for finishing holes. a plain razor blade is also good. WEAR PROTECTIVE GLOVES AND ALWAYS CUT AWAY FROM SELF
-ADD HERE 1. List of steps, and parts needed per step. 2. Starting list of required, and helpful tools 3. with pictures, grab shots of caliper measurements often and whenever appropriate.
Basics
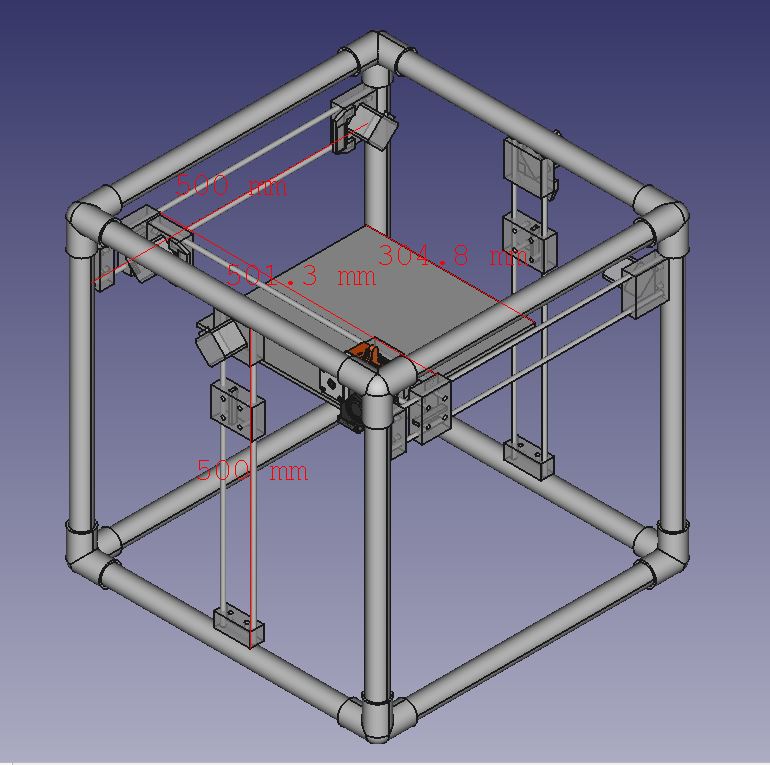
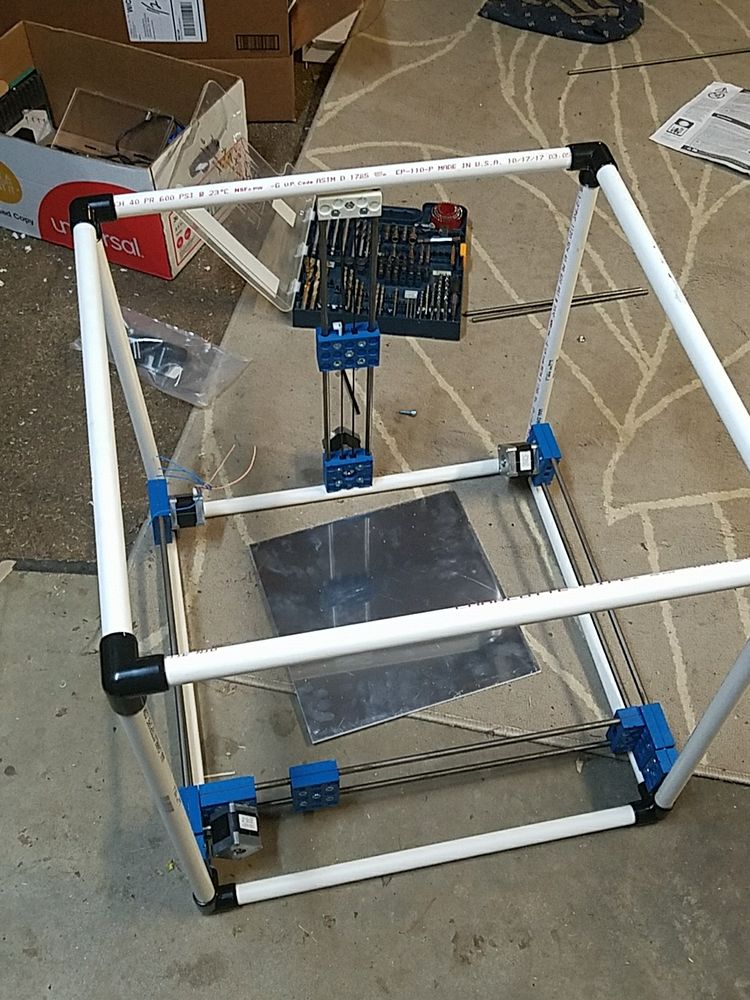
- A variation of the D3D 3D Plastic FDM Printer that has a 12 inch print bed, Made with a PVC frame
http://opensourceecology.org/wiki/D3D_Extruder
CAD
Most recent Render: http://opensourceecology.org/wiki/File:D3D_OHIO_18.01_V0.3_WIP.fcstd
BOM
- Sensor - 8 mm sensing - 18 mm diameter - [1]
Users Prusa I3 Extuder module Prusa I3 MK2 here. the replication of this module used in the D3D ohio v18.02 is here: https://wiki.opensourceecology.org/wiki/D3D_Extruder_v1807 https://wiki.opensourceecology.org/wiki/D3D_Extruder
Modeling
The intention of this section is to show the most up-to-date CAD module visually as it is developed. Versus the development log, this will attempt to show the "best" work or "Stable" versions
V1.0.0 Latest version uploaded.
-Uses short idler. 500mm steel rods. allows for an extra inch on x and y axis.
V0.3 DONE - This will be a rendering with 1" PVC tube and corners, 12" bed and a http://opensourceecology.org/wiki/File:Prusa_i3_mk2_extruder_adapted.fcstd extruder changed for what is currently present in V0.2
This file has been uploaded as is, currently we just have some part movement and a 12" bed
FILE V1.0
12" bed. check calcs for measurements. File:D3D OHIO 18.01 V0.3 WIP.fcstd
Video
Packing
Development
[WIP NEEDS DONE}
Development Log
2/26/2019
Editing firmware. here, I'll capture where changes are within files (they are hard to navigate) This should also help others who have to reconfig marlin. I think it is a GREAT and critical practice for these files to be read in entirety and understood though. good comments in there.
CONFIGURATION.H
BED LEVELING
PROBING GRID
CONFIGURATION_ADV.H=
From Sara's manual @https://docs.google.com/presentation/d/1Jng33ox5_ZXnTE244ZYxwuZSTqdk4DktIJxZbDOjls8/edit#slide=id.g42f7455050_1_0 If you want to make changes in Marlin - generally you will only modify Marlin through two files: configuration.h Configure Marlin for your specific 3D Printer design Set probing pattern / probing area Just read it. Has good comments. configuration_adv.h Advanced configuration specific to your 3D Printer design In our case, the second extruder motor was converted to Y-Right axis Baby stepping activated to enable real-time first layer adjustment You can additionally override certain settings defined by Marlin in the start/end GCODE in Cura. See configuration.h file for: steps/motor Activate lcd screen Set probing pattern Sets grid points for varying bed sizes
Currently using grid that’s 2x2 for 8in bed
For big bed: change from 200inches to 1000inches
Bed size: limits where it can travel
OSE Cura:
Expert Settings vs. “Quick Print” Settings
.ini is where you change the temperature, nozzle size, and all printing parameters
Set bed size in Cura in Machine Settings
LCD Screen
Z-offset
Go to Control-> Motion -> Z Probe offset to change the z offset
You can modify the Z offset on the fly with Tune -> Z Babystepping
Sample motion: you can move x y and z axes
Prepare, auto-homing, moving axes
Disable Steppers
Lets you move motors around
M85 through he CURA command line does the same thing
EEPROM
The memory on the Arduino
You can save and load settings to EEPROM via the LCD screen
10/31/2018
-more cable assyms for main body. -wire for Y Axis are merged together, as only one plug on the control board.
tested x, y and z axis by using LCD controller, can move all axis by using the prepare-->Move axis feature.
looking to wire the rest of the endstops, leveling sensor, heated bed thermistor heating element and fans.
referencing this for leveling sensor setup. https://www.instructables.com/id/Enable-Auto-Leveling-for-your-3D-Printer-Marlin-Fi/
9/8/2018 - 9/29/2018
9/8 to 9/29 All axis mounted to printer.
9/29
Making cable assymblies for motors. I have 217k 40281 motors by Minebea motor company. the connectors to the motors are not terminated.
the motors ordered have 6 wires. blue, orange, blue, blue, orange, blue.
noting that on the stepper driver, we have 4 contact points...
1a 1b 2a 2b
So, making my cable assyms I'll have to check a data sheet.
https://www.eminebea.com/en/product/rotary/steppingmotor/hybrid/standard/17pm-k.shtml is the wiring diagram. looks like 17PM-k402-P4V is a better identifier to look this guy up. Always try all numbers when looking for data sheets! PHASE A Abar COM B Bbar COM PIN NO. 4 5 6 3 2 1
Refrencing the CAD picture on the DS (Data Sheet) Pins are identified with the shaft pointing towards you, right to left 6 5 4 3 2 1
I'm uncertain with these unipolar motors if I'm going to have to accomidate the common pin...
so, the orange wires are each coil's other side.
9/8/2018
D3D drilling rig for 1" PVC. File here: printing this today to use tommrow? [File:1Inch PVC D3D HoleJig2013.stl]
8/4/2018
-worked on drilling and mountings for D3D PVC. testing cuts and cutting methods with .5" scrap them moving to 1" pipes. https://photos.app.goo.gl/Km166hmZpXR9EKHQ9
-updated calcs with screw sizes found and other details. https://photos.app.goo.gl/PjMYwAJp2ibobuVW6
7/17/2018 to 7/29/2018
- All parts for D3D extruder have been ordered and arrived.
- Recieved a Prusa I3 that WORKS and can now PRINT.
https://photos.app.goo.gl/m48aZE4RAawdjJKU7
- took printer to a company hackathon and demonstrated the Universal axis. Measured and ordered screws that will work for mounting the axis to .5" and 1" PVC pipes
6/01/2018 to 7/16/2018
Attempted to get mark 8 extruder functional this failed. during this time, ordered extuder parts from Steven (OSE).
The arrived parts did not fit my specific J-head hot end.
Was refered to this BOM https://docs.google.com/spreadsheets/d/1WNRJfb56ilHlIcdcz5cS92sy0QnUK5MiNVzNW1Jf7Lc/edit#gid=0
and this part https://www.ebay.com/itm/DUAL-E3D-V6-J-head-Direct-Hotend-Kit-1-75-12V-All-Metal-Throats-Hot-End-USA-/292208050774?hash=item4408f50256:g:MkEAAOSwKJRZicAS which provided a secure fit once purchased.
Currently waiting on family fianicial situation to improve with a recent layoff, then Will grab the rest of the componets needed (MISC screws and other parts) may also get a ali-express order of the parts as they are affordable, but take longer to get here.
5/27/2018 to 6/01/2018
Hiatus due to day job - commission a sewer lift station
5/27/2018
Summary:
- Finish belt routing
- more electronics work
- Axis mounting on frame
- Research on how rods are used to hold up the z axis?
5/20/2018
Summary: Routed the tension belts for uAxis's... started setting up electronics
Some issues and questions:
- How do I do the heated bed? Sil. Pad under alum, then plastic printing sheet attached to alum?
- Found some instruction here: http://opensourceecology.org/wiki/D3D_PVC_pipe_8in_bed and here:
- Issues today getting a print from old printer with newest ordered J-Head and Mark-8 extruder from Geeetech... jammed and removing jam with acetone.
-Where can I just buy a working extruder for now? I need to print or grab a printed version of our adopted extruder.
Ideas and innovations Had and idea for a magnetic adaptor for frame mounting Could I make a device that is PVC printed that allows the D3D frame to grab on to a PVC fitting with magnets?
- Would be Two clamshells, perhaps the interior features would be jagged, or sprayed with spray rubber.
- Perm. magnets at either end for grip.
- One of the clam-shells would have a place for a screw to pass compleatly though
- would make the frame a small bit bigger. would be nice to have this Grab onto the PVC versus drilling though it
5/8/2018
To get this up to date, the CAD is rendered.
Today, I am assymbuling the printer. I have 4 of the Universal Axis Units built, but only have the timing belt in one of them.
GOAL: From today, I am going to try and cut the PVC pipes.
11:30 From the D3D frame gen, I have a pipe length of precisely 493.546mm that's 19.43094488"... so, I'll rationalize this down to 19 1/25" because then, you can push the pipe in so it totally snugly grabs around the corner fitting. I'll see how this cut works.
all cuts took a half hour. I like this fit. ! Pictures as soon as I get my file server up again... Update 5/20 picture of build at this time:
3/2/2018
Found a Basis for a render http://opensourceecology.org/wiki/File:Medium_Size_Version_12_in.FCStd
I have a great deal to learn in Freecad on more adv. assym work. Such as how There are parameters for assymblies, and there is a linked parameter for rod lenght between the Right and left Y universal axis so you can change lenght in one spot. super cool.
See Also
- D3D
- 3d Printing Techniques
- Open Source Digital Fabrication Construction Set
- D3D 1612 Product Manual
- TakacsLog
Useful Links
- Here is a note on the simplified model - https://www.youtube.com/watch?time_continue=38&v=Epit8c9zp8Q
- here are the simplified models we will build this off of past v0.3:http://opensourceecology.org/wiki/D3D_CNC_Circuit_Mill
- http://opensourceecology.org/wiki/3D_Printer_Genealogy
- https://www.youtube.com/watch?v=a7XAZhXt6Hk&feature=youtu.be
- D3D v18.02 BOM
- http://opensourceecology.org/wiki/D3D_Part_Library#Assembly_Index - This is all of our D3D assy. modules so far.
- http://opensourceecology.org/wiki/File:Prusa_i3_mk2_extruder_adapted.fcstd Extruder we will use
- http://opensourceecology.org/wiki/D3D_Instructional_videos_for_April,_29th,2017_Workshop << helpful instructions for temporary ref.
- http://opensourceecology.org/wiki/D3D_PVC_pipe_8in_bed

