Generating G Code for the D3D Universal Plotter with Open Source Software
The purpose of this page is to document several specific workflows of generating GCode for the D3D Universal Plotter.
Warning: This wiki is a work in progress and some of the instructions haven't been tested.
Before you start
- These instructions assume a D3D Max build Volume is 6x6x6 inches (150x150x150 mm). You can adapt the instructions according to your build volume
- Recommend using OSE Linux 2 or higher as it comes preinstalled with Inkscape software and gcodetools and gcodeplot plugins
Working with images in Inkscape
Create a template
Follow these instructions to create a file you can use to start a plotter project.
- Open Inkscape.
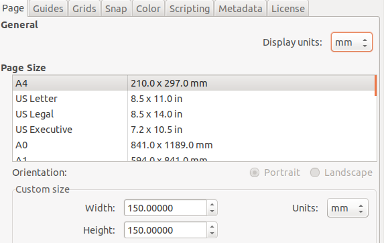
- Go to File > Document Properties. It opens on the Page tab.
- For Custom size section, enter "150" into width and height fields, then press enter. Make sure the units are mm.
- Go to the metadata tab. Fill out information that can help you work with your file in the future.
- Go to the license tab. For OSE work, use CC Attribution Share Alike.
- Exit the screen.
- Save the file, name it "General_Plotter_Template.svg".
- Use the terminal to move it into the Templates folder.
- Open the terminal in the folder with your file use
sudo mv General_Plotter_Template.svg /usr/share/inkscape/templates
- Open the terminal in the folder with your file use
Now you can use File > New from template to start a new project.
Use Inkscape to turn PNG to SVG, and from SVG generate GCode
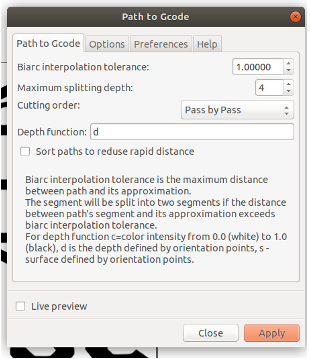
See also Using Inkscape to Generate Gcode, Jessica Log According to a thread in the inkscape forum, issue of plotter repeating every curve twice is solved by using Pass by Pass option in the GCode panel.
PNG/JPEG to SVG
Simple line art
- Select PNG or JPEG
- Go to Path > Trace Bitmap
- Turn on Live Preview using the checkbox
- Adjust Brightness cutoff Threshold: until the image looks good to you
- Click OK
- Click and drag the image away- you'll see the JPEG. Delete the JPEG and bring back your trace
SVG to GCode
- Select all and go to Path > Object to Path
- Select all and go to Object > Ungroup. You may need to select all and ungroup multiple times.
- Save as 3-axis gcode plotter (*.gcode)
- After saving your .gcode, open it in nc-viewer
- Add the following start code to the top of the file
G00 S1; endstops
G00 E0; no extrusion
G01 S1; endstops
G01 E0; no extrusion
G21; millimeters
G91 G0 F2100.0 Z4.000; pen park !!Zsafe
G90; absolute
G28 X; home
G28 Y; home
G28 Z; home
G29; autolevel - needs to be over +20 x
G90; absolute
SVG into DXF
- Select everything and go to Object > Ungroup
- With everything still selected, go to Path > Break Apart You should see boxy artifacts
- Save as DXF
- Uncheck boxes at the Desktop Cutting Plotter prompt and click OK
How to fill closed outlines with hatching
There are a couple of plugins that help with hatching.
See KM-Laser plugin- https://github.com/KnoxMakers/KM-Laser
- Open plotter template
- Import bitmap image
- Use Trace Bitmap
- Select all clear fill, add stroke
- Go to Extensions > KM LASER > GENERATE: HATCH FILL
- Save as gcode.
Axidraw plugin- https://github.com/evil-mad/AxiDraw/ WARNING: If you install Axidraw plugins DO NOT replace hershey.py and the hershey svg files. Axidraw's hershey text isn't working, and it will break the Render > Hershey Text extension pre-installed in Inkscape.
- Open plotter template
- Import bitmap image
- Use Trace Bitmap
- Select all clearfill, add stroke
- Go to Extensions > AxiDraw Utilities > Hatchfill
- Go to Extensions > AxiDraw Utilities > Plot Optimization
- Save as gcode
How to render a bitmap image using tiled SVG Clones.
Render Bitmap Images using Tiled SVG Clones
- Open your general plotter template.
- Import a bitmap file.
- Add a layer above the one with your bitmap
- Use the circle tool to make a small circle, close to your drawing in its upper-right.
- Set the stroke and fill of the circle to undefined.
- Select the circle and go to Edit > Clone > Create Tiled Clones
- Go to the Trace tab and select Trace the drawing . . .
- Check all the boxes for the 3rd field
- Set the width and height fields to the dimensions of your drawing.
- Click Create.
- Save your file as SVG. This helps in case you mess up the next steps and need to start over
- You have your circles. Use the instructions for SVG to GCode to complete.
Old method
- Open your general plotter template.
- Use guides to bound the area where you want to add the address. Hint: You may need to temporarily change your units to inches in Document Properties, and zoom into 100%
- You can save this file as an envelope template, if you want.
- Use the Text tool to enter the address in the bounds.
- Follow instructions here: https://www.lifewire.com/inkscape-to-make-templates-cutting-machines-1701892
- Save your file as SVG. This helps in case you mess up the next steps and need to start over
- Use the instructions for SVG to GCode to complete.
How to create contour lines
- threshold image
- erode image
- line trace
- erode again
- repeat
Working with text in Inkscape
Install Fonts
See OSE_Fonts#How_to_Install_in_OSE_Linux
Install OSE Fonts, or for more fonts see Creative Commons and Open licenced fonts - [1] , [2] , [3] , [4]
How to create custom fonts
See [5]
How to generate stroke text
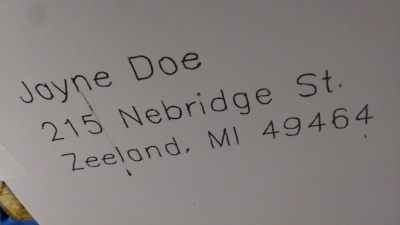
Stroke text is text that mimics handwriting. This is good for small text such as addressing a letter, or the inside of a greeting card.
- Go to Render > Hershey Text
- Insert your text into the field. You'll enter it one line at a time.
How to generate outline text
Outline text is text that is graphical in nature. This is good for big decorative text, or fancy fonts. This requires having an extension that provides hatchfill. AxiDraw and KM Laser are two extension sets which include hatchfill.
- Click and open the text tool.
- Type your desired text and make it the desired size and other features. You may want to save your file at this point, in case you want to make small edits to the text.
- Select the text and go to Path > Object to Path.
- Go to Object > Fill and stroke.
- Remove the fill. Add stroke.
- Select hatchfill from either AxiDraw Utilities or KM Laser.
- Edit the settings according to your preference.
Inkscape Applied Examples
How to address regular mailing envelopes
- Most envelopes will probably be longer than the plotter bed, but since you only need to print a portion of the area, it's ok.
- Before you get started, either look up common dimensions for an address window on an envelope or determine for your self the area on the envelope you want to print. In US, refer to USPS guidelines: https://pe.usps.com/text/dmm300/202.htm A Common #10 envelope is 4 1/8 inches high by 9 1/2 inches long.
- Assume that when you print, you'll align the bottom left of the envelope with the bottom left of the plotter bed.
- Open your general plotter template.
- Use guides to bound the area where you want to add the address. Hint: You may need to temporarily change your units to inches in Document Properties, and zoom into 100%
- You can save this file as an envelope template, if you want.
- Go to Extensions > Render > Hershey text...
- Enter the first line of the address and click Apply.
- Place your text image where you want it
- Repeat until complete.
- Save as gcode.
See also Working with Text, Stroke Text instructions above.
How to create a greeting card
Instructions for making an OSE themed greeting card and envelope. Check out OSE Graphic Guidelines to use the latest. You'll learn how to work and layout text and images that can be plotted.
Common greeting card sizes (W x H):
- 3.5 x 5 (postcard-like - doesn't fold)
- 13cmx9.5cm (opens up to 19cm)(fold down)
- 3.75cm x 5cm (opens up to 7.5cm) (folds open)
Make the card
- Open your general plotter template.
- Use the rectangle tool (F4) to create a rectangle that is the same size as your desired card, approximately where you want to print on the bed.
- Make sure your square is selected, then press shift + G, or go to Objects > Object to Guides. You can save this file as a template to use for future greeting cards
- Go to File > Import to fetch an image to use.
- Move your image where you want and add your text (See Outline Text or Stroke Text Instructions).
- Save your file as .SVG Just in case you mess up the next steps and need to start over
- Use the instructions in SVG to GCode to complete.
Use Processing to create SVGs
Create a spirograph
- Download zip from https://github.com/rspt/processing-spirograph
- Extract, click the .pde file
- Edit the size to about 400 x 500 px, edit the stroke to about 3px.
- Run
- Move the mouse around to get different spirographs
- Click "s" to export to pdf (with svg)
- Import into Inkscape, Ungroup all (several times), convert object to path, make sure document properties have the right size, save as gcode
Create with SquiggleDraw
- Install Processing.
- Add controlP5 to your Sketchbook library.
- Download the SquiggleDraw zip from the repo and extract it where you want.
- Add images to SquiggleDraw-master/SquiggleDraw/data The images need easy, simple names you can remember. Don't use images that are too big- resize them first.
- Go to SquiggleDraw-master/SquiggleDraw and click SquiggleDraw.pde.
- Find the bit of code that says
String imageName ='Rachel-Carson.jpg'
and change it to the file name of the image you want to squiggledraw. - Click the run button.
- Adjust settings as desired.
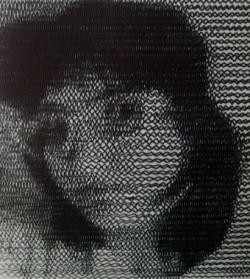
Sample actual print on D3D Universal 2:
Create a stippled file using StippleGen
OSE Linux 2 already includes Processing. See StippleGen for instructions on how to download and use Stipple Gen.
Example Stipplegen plotted
If there are details that you especially want captured by the stippling process, I recommend using the Burn and Dodge tools in the GIMP to create a sort of radical contour. That's how I made this grandfather's glasses appear when they otherwise woudn't have, I used the burn tool to darken the glasses. I also used the burn tool to emphasize the smile on the girl. You can also experiment using the levels tool, contrast/saturation and other photo editing techniques.
Other methods
DXF into GCode (with python)
See DXF_to_G-code_Conversion_Tutorial
Use Gimp to create stippling
https://wiki.evilmadscientist.com/Producing_a_stippled_image_with_Gimp
Create a signature
You can use this tool, which works in your browser: https://willowsystems.github.io/jSignature/#/demo/
