Using Inkscape to Generate Gcode
Gcode Plot
- Video 1 - [1]
- GcodePlot extension for inkscape. Inkscape post - [2]. Github - [3]. Instructable - [4]
- Pen holder 3D design - [5]. Simplest way - is a flat piece of plastic. Support should be 2-point for parallelogramming (goes straight down) or 4 point for straight up-down - though 2-point parallelogramming should likewise produce straight up-down. See D3D Universal#Plotter pen holder design.
GcodePlot Extension Install
- Download .zip file from Github [6]
- Save to an easy to access location i.e. home/downloads/
- unzip the file in the above location i.e. home/downloads/gcodeplot-master
- Navigate to the directory where the file is unzipped (above example is "home" and right click downloads -> open in terminal.
- Terminal should show "username:~/Downloads$"
- Type the following command in the terminal:
sudo cp -rv gcodeplot-master/* /usr/share/inkscape/extensions/Press enter.- Basic explanation of above code: "sudo" = Super User Do, "cp"=copy command "-rv"=Options flags for the copy(r=recursive v-verbose(show output on screen)), "gcodeplot-master/*"=copy all files within gcodeplot-master, "/usr/share/inkscape/extensions/"=copy the files to this location. (More info easily found by Googling "Linux cp command" or typing "cp --help" in the console)
- Terminal will request sudo password (this is the same password you use to log into OSE linux) - Character entry is not shown, so very carefully enter your password and hit enter.
- You will see several lines appear, indicating that the files have been copied
- The last few lines should look like the following:
'gcodeplot-master/svgpath/path.py' -> '/usr/share/inkscape/extensions/svgpath/path.py'
'gcodeplot-master/svgpath/shader.py' -> '/usr/share/inkscape/extensions/svgpath/shader.py'
'gcodeplot-master/TODO' -> '/usr/share/inkscape/extensions/TODO'
- Close Inkscape if open
- Open Inkscape, go to file->Save As, then verify in dropdown filetype selector that "3-axis gcode plotter (*.gcode)" is an option.
- Installation now complete!
Instructions
From Instructable, in pertinent part, after installing extension:
- Start Inkscape.
- Load the SVG file you want to draw or cut into Inskcape. The lower-left corner of the page in Inkscape corresponds to the minimum X and Y coordinates you measured in the previous step. Make sure your images fit into the print area.
- Convert the drawing to a path: Use ctrl-A to select everything, then Path > Object to Path.
- Save to gcode:
- File > Save As
- Select: 3-axis gcode plotter...
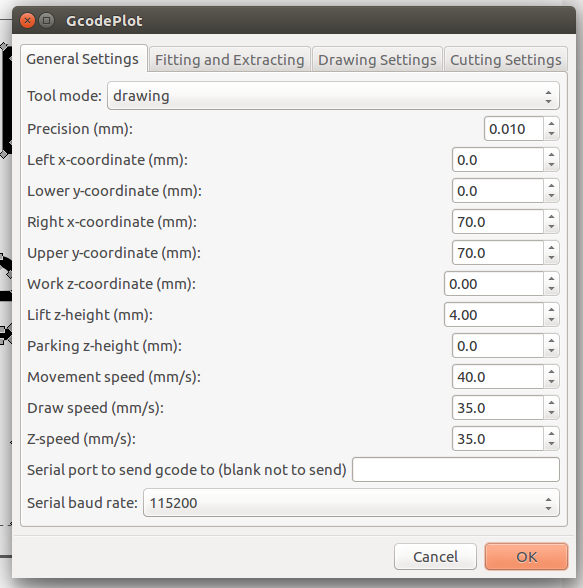
- In the dialog that shows up, make the area SAME in document size as the X and Y in the output settings by doing this: Go to the Fitting and Extracting tab in dialog and select Left for horizontal and vertical alignment.
Exercise
- Get your hands on SVG files. Since there are more PNG than SVG available in the wild - convert PNG to SVG first with Inkscape - [7]
- Take a file such as
 . But would need to convert it to vectors. Power user material.
 - So start with a vector file - File:Axis Idler LAI SVGs.zip
- Yes! Convert Object to Path in Path menu in inskscape
- Export gcode.
- How do you know g-code is valid?
Use OpenSCAM - see [8]. To install a deb package, use a tool called gdebi. OpenSCAM installs under the name CAMotics. Didn't work on Ubuntu 16.04.- Use https://ncviewer.com/ instead
MJ Notes
- Installed GcodePlot for Inkscape.
- Drew in inkscape. Set coordinates the same in Save As Gcode and in Document/Settings for the document
- Viewed the file in https://ncviewer.com/. Line I drew showed up, but not the text.
Inkscape Notes
- Work in File -> doc properties
- In inskscape, make sure you have a correct image size
- Work in mm'
- Using a vector file, grab a corner to resize it correctly in mm
- In path menu - select Trace Bitmap
- Save SVG
- Then it's ready for the Inkscape plugin called Gcode Tools
- https://www.lifewire.com/inkscape-to-make-templates-cutting-machines-1701892 - turning letters into gcode with gcodetools - works for us
- Add G29 and eliminate pen park in preprocessing for printing
Gcodeplot Settings
- Set z working height to 0
- Make sure you are within 150 by 150 mm boundaries
- Make sure you add your tool offset, if applicable, in the Cutting Settings tab
- Copy start gcode. from d3d universal on homing and leveling
- See Jessica Log
- From Don Log:
Inkscape has many setting to review when exporting (save as) to gcode. The notable ones as follows:
- Precision setting should be set to 0.010 to correspond to the 10 microns of accuracy that the D3D printer is designed to achieve. - The left/right & upper/lower coordinate settings are very relevant to how the plotter arranges itself on the print bed. - Speed settings could be increased as high as 150 mm/s. NOTE: these speeds over-ride the speed settings which can manually be set on the marlin controller.
Sample Files
- Don - Known good plotter file File:D3dUtextPlot.gcode.zip
- Jessica - File:OESd4dStickpath4.zip -
View in the browser with NC Viewer or OSE Linux 2 users can view the sample files using CAMotics, a software application included in the distribution.
Support
- It appears that the GcodePlot extension is not supported. See thread with some troubleshooting on proper install - [9]
- Russion support forum with some usage instructions - [10]
- Video - how to generate gcode in inkscape - [11]
Other Ways to Work With Inkscape SVG Files
- Export to DXF in Inkscape - [12]
- Generating_G_Code_for_the_D3D_Universal_Plotter_with_Open_Source_Software
See Also
Materials on using Inkscape with OpenSCAD: https://en.wikibooks.org/wiki/OpenSCAD_User_Manual/Using_the_2D_Subsystem#Getting_Inkscape_to_work
