Chris Caswell Log: Difference between revisions
ChrisCaswell (talk | contribs) (→Camera) |
|||
| (42 intermediate revisions by 2 users not shown) | |||
| Line 5: | Line 5: | ||
= | = Mar 23 - Mar 29 = | ||
COVID Response | |||
<gallery perrow=5> | |||
File:doorhook.PNG|Short useful print, "door hook" for opening public doors or around the office. | |||
File:N95 Mask.PNG|N95 mask, made for combo of 3DP & vacuum form, hopefully a design that can scale | |||
</gallery> | |||
= Mar 14 - Mar 20 = | |||
STEAM CAMP | |||
<gallery perrow=5> | |||
File:d3d_mar20_1.PNG|Day 1 D3D build | |||
File:d3d_mar20_2.PNG|We needed to do some quick drill pressing, but we don't have a drill press at the shop | |||
File:d3d_mar20_3.PNG|Luckily Scott has one in his mobile workshop! | |||
</gallery> | |||
= Mar 9 - Mar 13 = | |||
<gallery perrow=5> | |||
File:Outer_shell.PNG|WIP of outer shell design. Other side was exported without the USB cutaway and mirrored|[[File:Outer Shell Left.fcstd]] | |||
File:spiral_bearing_better.PNG|Printed Spiral linear bearings working on the D3D. Increasing the extrusion width made for a more solid bearing for the z axis | |||
</gallery> | |||
= Mar 2 - Mar 8 = | |||
<gallery perrow=5> | |||
File:BoardRiser1.png|translating blender sketch into FreeCAD (files on [[Part_Library_for_the_Raspberry_Pi_Tablet]]). | |||
File:Tpubelt.PNG|offshoot from another project here at the shop - 3d printed timing belt, working on the geometry and then will try the varieties of TPU we have here. openscad: [[File:timing_belts.zip]] | |||
File:tpubelt_render.PNG|tpu timing belt | |||
</gallery> | |||
= Feb 24 - Mar 1 = | |||
<gallery perrow=5> | <gallery perrow=5> | ||
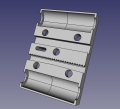
File: | File:pitabdev_1.png|Internal board org printed as separate pieces, with shell that slides on from the sides | ||
File:pitabdev_2.png|Front and back | |||
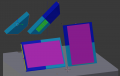
File:pitabdev_3.png|Printed in parts that will fit readily on 6"^3 | |||
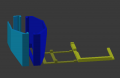
File:pitabdev_4.png|Vaulted back for interior space and to balance well on a surface in portrait or landscape | |||
File: | |||
File: | |||
File: | |||
</gallery> | </gallery> | ||
= RPi Software = | * Eco filament experiments: recycled PP & PET from Robries (Surabaya) -> wallet. It will extrude on D3D but bed adhesion issues; heat bed and chamber will be needed, although with perf plate I believe thin wall geometries will be OK. | ||
= Feb 10 - Feb 16 2020 --- STEAM camp 1 = | |||
* Seed for [[Useful_3D_Prints#D3D_Universal_Calibration_Prints]] | |||
* prepping for Arduino curric - hello world code (potentiometer -> flashing light & tone generator) | |||
* Printing Jeremy's work in progress for pitab on 1.2mm nozzle | |||
= Jan 25 - Feb 2 2020 --- STEAM camp 1 = | |||
== Next time == | |||
* Better asynchronous communication and coordination, especially for the remote folks, for the collaborative presence to be felt | |||
* Ideally something embedded in the Wiki, so it will stay on the same platform | |||
* Embedded IRC? | |||
* Meeting time to middle of the day | |||
* Curriculum content (lecture section) better to have posted as video link rather than live stream | |||
* Need project manager role, someone to focus on coordinating documentation, managing remote folks, checking in on anyone falling behind | |||
* Printer @1.2mm -> Plotter -> CNC mill toward circuit -> 0.6mm finer prints (printer will get more and more tuned in as the camp goes on) | |||
* Printing from Useful Print library, which will both produce useful goods showing the value, good calibration prints for the machine, and a good development queue for FreeCAD lessons and practice. | |||
* PiTab case needs to get to a steady, stable state; simple no frills enclosure. Ideally it will have nut catches or some other attachment point, so next STEAM camp can iterate on some external modules. | |||
== RPi Software == | |||
Based on the NOOBS install: https://www.raspberrypi.org/downloads/noobs/ | |||
Used the offline installer package on a FAT formatted 32gb micro SD | |||
= Cura = | == Cura == | ||
I had issues trying to run Cura on the Raspbian, it kept crashing. It seems like someone has compiled a version and posted it in the ultimaker forums that will run on the RPi processor: | I had issues trying to run Cura on the Raspbian, it kept crashing. It seems like someone has compiled a version and posted it in the ultimaker forums that will run on the RPi processor: | ||
| Line 43: | Line 93: | ||
> ./Cura-mb-master-armhf-20191209.AppImage | > ./Cura-mb-master-armhf-20191209.AppImage | ||
= Camera = | == Camera == | ||
From https://projects.raspberrypi.org/en/projects/getting-started-with-picamera/3 | From https://projects.raspberrypi.org/en/projects/getting-started-with-picamera/3 | ||
| Line 52: | Line 102: | ||
This will activate the camera module and show a view finder, until you hit "Enter" and it saves a picture to the specified location. | This will activate the camera module and show a view finder, until you hit "Enter" and it saves a picture to the specified location. | ||
= Photo updates, newest first = | |||
<gallery perrow=5> | |||
File:florencekeyboard.png|'''best keyboard yet for raspbian''' -- sudo apt-get install florence | |||
File:arduinocircuitplot.png|'''plotting of the arduino circuit from [[Pieter log]]''' -- following along with Belgium | |||
File:pathtoolbenchexp.png|'''Experimenting with CAM path toolbench in FreeCAD for routing''' | |||
File:plotterprogress.png|'''Manually adding the gcode command for "auto level" G29 in the gcode created by inkscape''' | |||
File:gcodevis.png|'''Good gcode visualizer: https://ncviewer.com/''' - seems to struggle with big 3d print gcodes, but very quick and easy with the plotting and routing experiments, runs in the browser and just drag and drop gcode file | |||
File:Selfie1.jpg|'''Selfies taken with the rPi camera module!''' | |||
File:Selfie2.jpg|'''Second selfie''' | |||
File:Curaonrpi.png|'''Found a version of Cura that runs on ARMHF processor details below''' | |||
File:Rpisuccess.png|'''Loading up NOOBS Raspbian, offline install''' | |||
File:Routersuccess.png|'''some proof of concept routing''' - I wasn't able to power the motor from RAMPS without it drawing too much current and shutting off. Powered instead by an external power supply. For gcode I just used the same inkscape toolpath for a proof of concept | |||
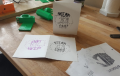
File:Plottersuccess.png|'''successful plotting!''' - currently it's plotting a mirror image... interesting | |||
File:RouterToolhead.png|'''Router Toolhead for D3D, for 555 motor''' -[[File:RouterToolhead.FCStd]] - Fit is close on our D3D with standard settings - not sure if the motor needs to be more secure | |||
File:D3DWattage.png|'''D3D using 54 watts while printing''' - peaks around 81 watts when first heating up | |||
File:ScrewDriver.png|'''Xiong's Screw Driver''' - [[File:ScrewDriver.FCStd]] - [[File:ScrewDriver.stl]] - fits standard 1/4" screwdriver bits | |||
File:SpiralLinearBearing.PNG|'''Spiral linear bearing - uploaded openscad code, stl is too big. unzip and compile''' -[[File:SpiralLinearBearing.zip]] - One full set has been printed and is installed on a D3D here to be tested | |||
</gallery> | |||
=Thur Dec 9 - 13, 2019= | =Thur Dec 9 - 13, 2019= | ||
| Line 78: | Line 148: | ||
</gallery> | </gallery> | ||
* OSE wallet [[File:ose_wallet.zip]] | * OSE wallet [[File:ose_wallet.zip]] | ||
* OpenSCAD-ready vector version of the logo - get File:ose_logo_for_openscad.svg | |||
*Iframe of svg, since SVG is not appearing: | |||
<html><iframe src="https://wiki.opensourceecology.org/images/a/af/Ose_logo_for_openscad.svg" width=50% height=100%> </iframe></html> | |||
=Mon Nov 18, 2019= | =Mon Nov 18, 2019= | ||
Latest revision as of 20:01, 2 April 2020
Time Log
Mar 23 - Mar 29
COVID Response
- Doorhook.PNG
Short useful print, "door hook" for opening public doors or around the office.
- N95 Mask.PNG
N95 mask, made for combo of 3DP & vacuum form, hopefully a design that can scale
Mar 14 - Mar 20
STEAM CAMP
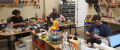
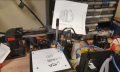
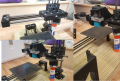
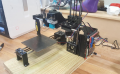
Day 1 D3D build

We needed to do some quick drill pressing, but we don't have a drill press at the shop
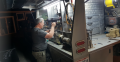
Luckily Scott has one in his mobile workshop!


Mar 9 - Mar 13
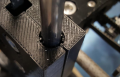
Printed Spiral linear bearings working on the D3D. Increasing the extrusion width made for a more solid bearing for the z axis


Mar 2 - Mar 8

translating blender sketch into FreeCAD (files on Part_Library_for_the_Raspberry_Pi_Tablet).

offshoot from another project here at the shop - 3d printed timing belt, working on the geometry and then will try the varieties of TPU we have here. openscad: File:Timing belts.zip
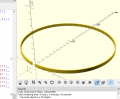
tpu timing belt


Feb 24 - Mar 1
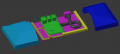
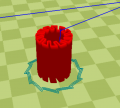
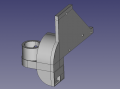
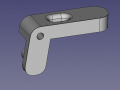
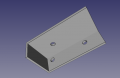
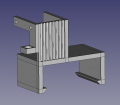
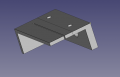
Internal board org printed as separate pieces, with shell that slides on from the sides
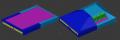
Front and back
Printed in parts that will fit readily on 6"^3
Vaulted back for interior space and to balance well on a surface in portrait or landscape


- Eco filament experiments: recycled PP & PET from Robries (Surabaya) -> wallet. It will extrude on D3D but bed adhesion issues; heat bed and chamber will be needed, although with perf plate I believe thin wall geometries will be OK.
Feb 10 - Feb 16 2020 --- STEAM camp 1
- Seed for Useful_3D_Prints#D3D_Universal_Calibration_Prints
- prepping for Arduino curric - hello world code (potentiometer -> flashing light & tone generator)
- Printing Jeremy's work in progress for pitab on 1.2mm nozzle
Jan 25 - Feb 2 2020 --- STEAM camp 1
Next time
- Better asynchronous communication and coordination, especially for the remote folks, for the collaborative presence to be felt
- Ideally something embedded in the Wiki, so it will stay on the same platform
- Embedded IRC?
- Meeting time to middle of the day
- Curriculum content (lecture section) better to have posted as video link rather than live stream
- Need project manager role, someone to focus on coordinating documentation, managing remote folks, checking in on anyone falling behind
- Printer @1.2mm -> Plotter -> CNC mill toward circuit -> 0.6mm finer prints (printer will get more and more tuned in as the camp goes on)
- Printing from Useful Print library, which will both produce useful goods showing the value, good calibration prints for the machine, and a good development queue for FreeCAD lessons and practice.
- PiTab case needs to get to a steady, stable state; simple no frills enclosure. Ideally it will have nut catches or some other attachment point, so next STEAM camp can iterate on some external modules.
RPi Software
Based on the NOOBS install: https://www.raspberrypi.org/downloads/noobs/
Used the offline installer package on a FAT formatted 32gb micro SD
Cura
I had issues trying to run Cura on the Raspbian, it kept crashing. It seems like someone has compiled a version and posted it in the ultimaker forums that will run on the RPi processor: https://community.ultimaker.com/topic/28746-experimental-cura-build-for-raspberry-pi-4-now-available/
Downloads: https://www.dropbox.com/sh/s43vqzmi4d2bqe2/AAADdYdSu9iwcKa0Knqgurm4a?dl=0
Install procedure:
Once the appimage file is downloaded (I used Cura-mb-master-armhf-20191209.AppImage), make the file executable
> chmod +x Cura-mb-master-armhf-20191209.AppImage
Then you just need to run the app image file:
> ./Cura-mb-master-armhf-20191209.AppImage
Camera
From https://projects.raspberrypi.org/en/projects/getting-started-with-picamera/3
Once it's plugged in, Camera just needs to be toggled on in the config -> "interfaces"
Once restarted, you can take a picture like this:
> raspistill -o Desktop/image.jpg
This will activate the camera module and show a view finder, until you hit "Enter" and it saves a picture to the specified location.
Photo updates, newest first
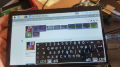
best keyboard yet for raspbian -- sudo apt-get install florence

plotting of the arduino circuit from Pieter log -- following along with Belgium
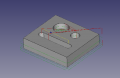
Experimenting with CAM path toolbench in FreeCAD for routing
Manually adding the gcode command for "auto level" G29 in the gcode created by inkscape
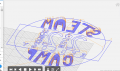
Good gcode visualizer: https://ncviewer.com/ - seems to struggle with big 3d print gcodes, but very quick and easy with the plotting and routing experiments, runs in the browser and just drag and drop gcode file

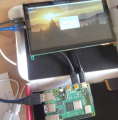
Selfies taken with the rPi camera module!
Second selfie
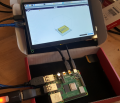
Found a version of Cura that runs on ARMHF processor details below
Loading up NOOBS Raspbian, offline install
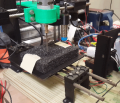
some proof of concept routing - I wasn't able to power the motor from RAMPS without it drawing too much current and shutting off. Powered instead by an external power supply. For gcode I just used the same inkscape toolpath for a proof of concept
successful plotting! - currently it's plotting a mirror image... interesting
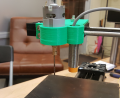
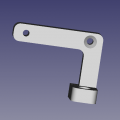
Router Toolhead for D3D, for 555 motor -File:RouterToolhead.FCStd - Fit is close on our D3D with standard settings - not sure if the motor needs to be more secure
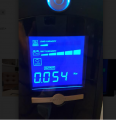
D3D using 54 watts while printing - peaks around 81 watts when first heating up
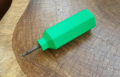
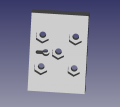
Xiong's Screw Driver - File:ScrewDriver.FCStd - File:ScrewDriver.stl - fits standard 1/4" screwdriver bits
Spiral linear bearing - uploaded openscad code, stl is too big. unzip and compile -File:SpiralLinearBearing.zip - One full set has been printed and is installed on a D3D here to be tested


Thur Dec 9 - 13, 2019
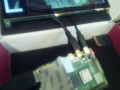
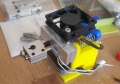
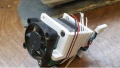
I'm working on replicating the D3D Simple build we worked on in November, recreating it here alongside Marcin's recent changes.
Trying a different arrangement, for the extruder cables to reach the board


Thur Nov 21, 2019
![]() Hint: How to sharpen to a fine point? -MJ
Hint: How to sharpen to a fine point? -MJ
I have used a belt sander to keep a good sharp bevel
Mon Nov 19, 2019

- OSE wallet File:Ose wallet.zip
- OpenSCAD-ready vector version of the logo - get File:ose_logo_for_openscad.svg
- Iframe of svg, since SVG is not appearing:
Mon Nov 18, 2019
- Top cover for power meter box - File:GasCover.stl
Nov 14
- CC simple extruder.png
Simple Extruder work in progress https://github.com/3DCentral/OSE/blob/master/SimpleExtruder.FCStd
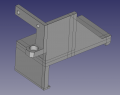
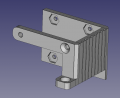
Extruder motor bracket - FreeCAD -File:ExtruderMotorBracket.FCStd
Extruder Active Cooling and Sensor Mount File:ExtruderActiveCoolingAndSensor.FCStd
Spring tensioner - FreeCAD -File:SpringTensioner.FCStd
Jig to cut the heat sink - FreeCAD -File:HeaterBlockJig.FCStd


Nov 1 - Nov 7
Work on Simple Extruder -- Cut/drill/tapped aluminum heat sink block. FreeCADed a jig for alignment (also WIP) - I think the same could be done with heater block.
I bought packs of all the hardware for the universal axis build hoping that I could use the same screws for this - but I am not sure this will be possible.
Spring tensioner needs still most work, the bearing from that is pictured is obviously not going to work...
I have come around to horizontal tool mount; I do feel like it will be more compact and stable. I think could be as simple as 3 holes and wing nuts.. focusing on full functioning of simple extruder first.
Edit: Nov 8 -- updated version of spring tensioner and extruder motor bracket
Simple Extruder work in progress
Extruder motor bracket - FreeCAD -File:ExtruderMotorBracket.FCStd
Spring tensioner - FreeCAD -File:SpringTensioner.FCStd
Jig to cut the heat sink - FreeCAD -File:HeaterBlockJig.FCStd

Jig to cut the heat sink
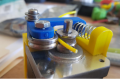
Hardware choices - grooved bearing, grooved hobbed bolt
Volcano heater block


Oct 25 - Oct 31
After pulling many a hair out trying to make modifications to existing carriage file (every version I could find), have given up and began to just re-CAD from scratch. As proof of concept, made universal tool mount mods to carriage in Blender, but as a back-up I'm doing a super simplified mechanism as well in FreeCAD.
For Simple Extruder, I also started from scratch to build a replacement for the extruder spring base bracket that will also include wire org for the quick attach wiring, and a place for the toolhead mount. This should work for vertical or horizontal mounting, whatever we decide. . Also got trip details planned and tickets purchased for Nov 8 - 23
Simple Extruder Spring Base Bracket, Wire org and toolhead mount - FreeCAD -File:ExtruderMotorBracket.FCStd
Simple Extruder - extruder mount, wire org bringing to the point of quick disconnect

Simple Mount Option - size:nullkb - FreeCAD -File:SimpleMount cc312019.FCStd

Quick swap mount - STL-File:Cc dev uta mount 31OCT2019.stl


Oct 20 - Oct 24
Working on Simple Extruder and Universal Toolhead Mount. Note also that D3D_Simple#Part_Library has more.
Simple Extruder Spring Base Bracket - size:nullkb - FreeCAD -File:Simpleextruderspringbasebracket chriscommit.fcstd
Universal Toolhead Attachment - size:nullkb - FreeCAD -code
Working through FreeCAD - Export issue - even trying to compile from the base files I pulled from this - Universal_CNC_Axis#Universal_Axis_-_Working_Document. FreeCAD file - File:D3D Universal Carriage v1910.fcstd


Tue Oct 9, 2019
Sat Sep 14, 2019
First Conversation with Marcin
- Runs 3D Central - http://www.3dcentralva.com/
- He and Bro doing it.
- https://certification.oshwa.org/us000038.html
- https://www.thingiverse.com/thing:674179
- https://opensource.com/article/19/6/hardware-music
- https://www.thingiverse.com/thing:242087 - the source with parts
- Everything about new skills, fundamental change in economy - supply chain, production. Local production.
- Microfactory concept - manufacturing locally. Technologically - close - socially - far.
- "Waste and drag of intellectual property. And Competitive Waste"
- 3D Brooklyn -
- E-nable - build a hand - http://enablingthefuture.org/upper-limb-prosthetics/
- https://www.youtube.com/channel/UCxkd2FJltPA2vwofdKxn-cw
- OS culture - 10
- Printed Solid - another guy in Delaware - Matt Gorton - quit Printed Solid.
- Hackerspace down the street -
- Technical and social, but also economic -
- Environmental - climate change - from inefficient production.
About
- Founder of 3D Central - http://www.3dcentralva.com/
- Currently working on developing the STEAM_Camp_Team