Universal Controller: Difference between revisions
No edit summary |
|||
| Line 1: | Line 1: | ||
{{Hint|The Universal Controller is a LCD-screen equipped controller that is capable of controlling 3D printers, CNC machines, welders, filament makers, automated machines, or any other applications where a microcontroller runs different actuators, sensors, or power elements. It is a platform consisting of RAMPS, LCD screen, power supply, power outlet, and power handling SSRs, and can be connected to external stepper drivers, solenoid valves, or other power elements. Equipped with an Arduino Mega, it can be used to control just about anything that requires a 100 kHz or lower control signal. See 2019 work on this at [[OSE Design Manual - Universal Machine Controller]]}} | {{Hint|The Universal Controller is a LCD-screen equipped controller that is capable of controlling 3D printers, CNC machines, welders, filament makers, automated machines, or any other applications where a microcontroller runs different actuators, sensors, or power elements. It is a platform consisting of RAMPS, LCD screen, power supply, power outlet, and power handling SSRs, and can be connected to external stepper drivers, solenoid valves, or other power elements. Equipped with an Arduino Mega, it can be used to control just about anything that requires a 100 kHz or lower control signal. See 2019 work on this at [[OSE Design Manual - Universal Machine Controller]]}} | ||
=How to Build= | =How to Build= | ||
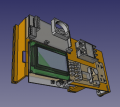
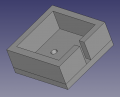
The Universal Controller consists of a 3D printed mounting panel, which holds all the components. This panel is printed with a 90 degree bend, and is straightened with a heat gun as shown in | The Universal Controller consists of a 3D printed mounting panel, which holds all the components. This panel is printed with a 90 degree bend, and is straightened with a heat gun as shown in [[4D Printing]]. The main components for the D3D Pro 3D printer are 5: | ||
#GFCI - safety device, which shuts off the circuit if any short is detected. | |||
#24V power supply - provides power to stepper motors and electronics | |||
#RAMPS control board - the brain of the controller | |||
#LCD display - allows for controlling the machine with an SD card, without using a wire computer connection | |||
#Solid State Relay - switches power to the heatbed. | |||
Then, a 5V wall wort powers the RAMPS control board. A plug connected to the GFCI feeds the heat bed and power supply. | |||
See below for all the connection details. | |||
=With External Stepper Drivers= | =With External Stepper Drivers= | ||
Revision as of 22:06, 21 November 2020
![]() Hint: The Universal Controller is a LCD-screen equipped controller that is capable of controlling 3D printers, CNC machines, welders, filament makers, automated machines, or any other applications where a microcontroller runs different actuators, sensors, or power elements. It is a platform consisting of RAMPS, LCD screen, power supply, power outlet, and power handling SSRs, and can be connected to external stepper drivers, solenoid valves, or other power elements. Equipped with an Arduino Mega, it can be used to control just about anything that requires a 100 kHz or lower control signal. See 2019 work on this at OSE Design Manual - Universal Machine Controller
Hint: The Universal Controller is a LCD-screen equipped controller that is capable of controlling 3D printers, CNC machines, welders, filament makers, automated machines, or any other applications where a microcontroller runs different actuators, sensors, or power elements. It is a platform consisting of RAMPS, LCD screen, power supply, power outlet, and power handling SSRs, and can be connected to external stepper drivers, solenoid valves, or other power elements. Equipped with an Arduino Mega, it can be used to control just about anything that requires a 100 kHz or lower control signal. See 2019 work on this at OSE Design Manual - Universal Machine Controller
How to Build
The Universal Controller consists of a 3D printed mounting panel, which holds all the components. This panel is printed with a 90 degree bend, and is straightened with a heat gun as shown in 4D Printing. The main components for the D3D Pro 3D printer are 5:
- GFCI - safety device, which shuts off the circuit if any short is detected.
- 24V power supply - provides power to stepper motors and electronics
- RAMPS control board - the brain of the controller
- LCD display - allows for controlling the machine with an SD card, without using a wire computer connection
- Solid State Relay - switches power to the heatbed.
Then, a 5V wall wort powers the RAMPS control board. A plug connected to the GFCI feeds the heat bed and power supply.
See below for all the connection details.
With External Stepper Drivers

As used in the CNC Torch Table v19.10:
Uses
- D3D_v20.04.27 and older printer models
- CNC Torch Table v19.10
- Intended for use in the CEB Press, with weatherproof enclosure.
Working Doc
CAD
See D3D v19.06 for complete machine.
See more at 3D Printer Control Panel


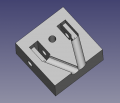
Control Panel - FreeCAD -File:Controlpanel v1904.fcstd. Bent panel STL - File:Bentpanel v1904.stl
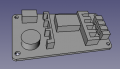
D3D v19.04 Power Supply - FreeCAD -File:Powersupply v1904.fcstd
![RAMPS 1.4 - FreeCAD -File:RAMPS14 v1904.fcstd. Full detailed file - 4MB - [1]](/images/thumb/a/a5/RAMPS14_v1904.png/120px-RAMPS14_v1904.png)
RAMPS 1.4 - FreeCAD -File:RAMPS14 v1904.fcstd. Full detailed file - 4MB - [1]
![Stepper driver - FreeCAD -File:Stepperdriver v1904.fcstd. File for detailed LCD controller and endstop can be found at [2]](/images/thumb/a/a8/Stepperdriver_v1904.png/120px-Stepperdriver_v1904.png)
Stepper driver - FreeCAD -File:Stepperdriver v1904.fcstd. File for detailed LCD controller and endstop can be found at [2]
![Solid state relay - FreeCAD -File:Ssr v1904.fcstd. Source: [3]. See Fotek SSR. Dimensions verified with Amazon source.](/images/thumb/b/ba/Ssr_v1904.png/120px-Ssr_v1904.png)
Solid state relay - FreeCAD -File:Ssr v1904.fcstd. Source: [3]. See Fotek SSR. Dimensions verified with Amazon source.
![Reprap Discount Smart Controller - FreeCAD -File:Smartcontroller v1904.fcstd. Source: [4].](/images/thumb/f/fe/Smartcontroller_v1904.png/120px-Smartcontroller_v1904.png)
Reprap Discount Smart Controller - FreeCAD -File:Smartcontroller v1904.fcstd. Source: [4].
![Ground Fault Connection Interrupt (GFCI) outlet - FreeCAD -File:Gfci v1904.fcstd. CAD source at McMaster Carr: [5]. May not represent actual GFCI.](/images/thumb/5/50/Gfci_v1904.png/117px-Gfci_v1904.png)
Ground Fault Connection Interrupt (GFCI) outlet - FreeCAD -File:Gfci v1904.fcstd. CAD source at McMaster Carr: [5]. May not represent actual GFCI.
Wire box cover. - FreeCAD -File:Wireboxcover v1904.fcstd.
Power cord wire clamp - FreeCAD -File:Heatbed wirelock.fcstd.
Inner part of D3D Electric Plug - FreeCAD File:D3DPlugInner.fcstd. STL - File:D3DPlugInner.stl
Outer cover of D3D Electric Plug - FreeCAD File:D3DPlugCover.fcstd. STL file is scaled to 105% already - File:D3DPlugCover.stl
BOM
Video - from June 2019 STEAM Camp
- Connect Power Cord to the GFCI on the Control Panel - [6]
Converting RAMPS to 24V
Build
See 4D Printing:
From 2019 STEAM Camp - Video by Adrian Sinclair
https://drive.google.com/drive/folders/1ZRZDaOsyJex-eOKjf2QqtyDj6Gbs97yg?usp=sharing
October 2019
July 2019
June 2019