CNC Torch Table 2/Research Development: Difference between revisions
Samthetechie (talk | contribs) (taken content / overflow from old R&D page and also moved Dan's Status to the discussion page!) |
|||
| (40 intermediate revisions by one other user not shown) | |||
| Line 1: | Line 1: | ||
{{GVCS Header}} | {{GVCS Header}} | ||
=Prototype 2= | |||
= | ==Videos== | ||
This link goes to a youtube playlist on the OSE CNC Torch Table: | |||
http://www.youtube.com/watch?v=LbqqGMtm6BY&list=PL2C1A547A8A20653F | |||
This link goes to videos on the assembly instructions (in progress) | |||
http://www.youtube.com/watch?v=VzjvJEHHRcI&list=PLCBC578BE5586F1D1 | |||
==Frame and Mechanical Assembly== | |||
[http://opensourceecology.org/w/images/7/79/CNC_Torch_Table_-_Sketchup_Model.zip Sketchup model] | |||
[http://opensourceecology.org/w/images/d/d1/Creation_Flame_CNC_Torch_Table_Drawings.zip Dxf files (incomplete)] | |||
[solidworks assembly] | |||
==Electronics== | |||
===Arduino instructions=== | |||
[http://arduino.cc/en/Main/ArduinoBoardLeonardo Arduino Leonardo] | |||
[http://arduino.cc/en/Main/ArduinoBoardUno Arduino Uno] | |||
===Stepper Motors=== | |||
Power supply: Maybe one or two recycled computer supplies can be used drive it. If 24V is needed, connect output in serial. On some PSU | |||
it is easy to adjust output voltage a bit. --[[User:Jth|Jth]] 19:07, 25 July 2012 (CEST) | |||
==Developement Board | <gallery perrow=6> | ||
<html><iframe width=80% height=' | |||
File: steppernug1labeled.svg|Steppernug v1.1 | |||
File: voltreg.png|12V and 5V Voltage Regulator | |||
File: cnctorchtable.svg|CNC 3-Stepper Electronics | |||
</gallery> | |||
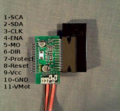
The CNC Torch Table uses the heavy duty [[Electronics Case]] with the reliable [[Arduino Uno]] microcontroller that controls open-source stepper drivers called [[Steppernug]]s | |||
External wiring is easy with the use of [[Terminal Block]]s | |||
Fans can be powered with the voltage regulator. | |||
==Mechanical== | |||
[[CNC Table Z Axis]] | |||
[[CNC Table Y Axis]] | |||
[[CNC Table X Axis]] | |||
[[CNC Table Base Frame]] (including legs and holding flats) | |||
Fasteners from [[BoltDepot]] | |||
Metric hex nuts, Stainless steel 18-8, 5mm x 0.8mm --- x12 | |||
Metric socket cap, Stainless steel 18-8, 5mm x 0.8mm x 10mm --- x4 z-axis motor mounting | |||
Metric socket cap, Stainless steel 18-8, 5mm x 0.8mm x 16mm --- x12 x and y-axis motor mounting | |||
==See Also== | |||
Dave (not part of OSE) built a nice cnc torch table which he showed off at NYC Maker Faire 2013. Partial plans are available at https://solar1.net/drupal/plasma_cnc and Dave offered to answer any questions we have. | |||
=End Effector= | |||
This is the plasma cutter that the CNC Torch Table will be designed to work with. In the event that this cutter is no longer available here are the important specifications: | |||
Adjustable Post Flow (power plasma only) control up to 60 seconds to improve consumable and torch life. Front air pressure adjustment makes adjusting pressure easy and painless. (PowerPlasma only) | |||
Front air pressure gauge allows quick verification of air pressure. Over Current and Air Pressure light indicators keep you updated on your units operating condition. Suitable for use with 11,000 W "clean power" generators | |||
60AMP 120/220Volt 50/60HZ Plasma Cutter. Cuts 3/8-Inch to 1-1/4-Inch | |||
<gallery perrow=6> | |||
File: everpplasma60.jpg|[http://www.amazon.com/Everlast-PowerPlasma-Plasma-Cutter-Cutting/dp/B0081BEWUY/ Everlast PowerPlasma 60 from Amazon] | |||
</gallery> | |||
=Status= | |||
==CNC Torch Table Prototype II'''== | |||
Design is finished. Stepper motor controller is under way. | |||
*[http://opensourceecology.org/w/images/7/79/CNC_Torch_Table_-_Sketchup_Model.zip Sketchup Model] | |||
*[http://opensourceecology.org/w/images/3/31/Torch_Table_Solidworks_2010.zip Solidworks model - In progress] | |||
*First Run of Prototype II: | |||
<html><iframe width="300" height="169" src="https://www.youtube.com/embed//uvXkV08EutI?list=PL203534A13731D4FF&hl=en_US" frameborder="0" allowfullscreen></iframe></html> | |||
The first cut was done by "jogging" a single axis. This essentially verified the ability to control the torch (end effector) with a computer interface. | |||
*need to test jogging on both the Y and X axis, Z is low priority for now because we can manually adjust the Z height for each cut. | |||
*need to make a strait cut without Jogging, this would demonstrait an ability to control the end effector with more automation. | |||
*need a more simplified list of instructions for software installation. | |||
I would like to begin a '''manufacturing procedure''' for the Torch Table. This should utilize parralel fabrication, and have a complete list of skills needed. | |||
*To fully complete Prototype II I would like to see the following | |||
**manufacturing instructions | |||
**parts list | |||
**software tutorials | |||
**user manual | |||
***how to cut a strait line using the arduino. | |||
***how to cut a X inch diameter circle. | |||
***how to cut an arc. | |||
If we can finalize a Prototype that can do these 3 things we will have both '''another useful machine at Factor e Farm''' and '''somthing people will want to replicate and improve'''. Then we can start working on other vital machines, and after people have had time to replicate the torch table and generate feedback, we can start prototype III. | |||
*Results: the mechanical structure is robust and lends itself to torch and CNC wood milling operations. Gantry design by [[Ben Horton]]. The innovation here is the Arduino-based stepper motor controller, [[Steppernug]] - which can be milled on a CNC circuit mill. This system is a replacement for a proprietary version equivalent to the Gecko G540 in terms of current-handling ability. | |||
*[[CNC_Torch Table Control Overview|Computer Control Overview]] | |||
[[File:SteppernugInterfaceImage.png|300px|border]] [[File:DriverBoard.jpg|300px|border]] | |||
[[File:SteppernugAssy.jpg|300px|border]] | |||
=Cutting Torch= | |||
[http://www.fabricatingandmetalworking.com/2012/07/complementary-cutting-evaluating-automated-plasma-oxy-fuel-processes/ plasma vs oxyfuel comparison] | |||
* Oxyacetylene, oxypropane, oxy-biogas. Oxygen: commercial bottled gas or on-site oxygen generator (purchase [http://www.sundanceglass.com/oxygen-concentrator.htm],[http://www.oxygenplusmedical.com/industrial_oxygen_concentrators.htm]) (build [http://cr4.globalspec.com/blogentry/20384/To-Build-an-Oxygen-Concentrator-or-Not]). Steel only. Best on thick (1 inch +) steel. | |||
* [[Plasma_Cutter|Plasma torch]]. Cuts aluminum, stainless, others in addition to steel. PP60 [[Everlast_Plasma_Cutter]] (alternate [[Everlast_PowerPro_256]]). Plasma gas: [http://www.centricut.com/New_Lessons/lessons_9.html air or oxygen]. Starting method: [http://www.pirate4x4.com/forum/shop-tools/955085-how-important-pilot-arc-new-plasma-user.html#post12505736 pilot arc (HF, blowback), scratch start] | |||
=Developement Board= | |||
<html><iframe width=80% height='400' frameborder='0' src='https://docs.google.com/spreadsheet/pub?key=0Av4ZjQn4DHJHdDBNVmlFTmZ5S3YxckY3ZkxZc01ISHc&output=html&widget=true'></iframe></html> | |||
[https://docs.google.com/spreadsheet/ccc?key=0Av4ZjQn4DHJHdDBNVmlFTmZ5S3YxckY3ZkxZc01ISHc#gid=2 edit] | [https://docs.google.com/spreadsheet/ccc?key=0Av4ZjQn4DHJHdDBNVmlFTmZ5S3YxckY3ZkxZc01ISHc#gid=2 edit] | ||
=Resources= | |||
* Issue Tracker- https://github.com/OSE/CNC-Torch-Table-OSE/issues | |||
* 3d models | |||
** Github (solidworks 3d models and issues) - https://github.com/OSE/CNC-Torch-Table-OSE. '''Use this for new development''' | |||
** This was originally developed at an [https://github.com/Fractal618/CNC-Torch-Table-OSE old repo] and we forked it into the OSE org. '''Do not use the old repo.''' | |||
** [http://opensourceecology.org/w/images/7/79/CNC_Torch_Table_-_Sketchup_Model.zip] - Sketchup files - I don't know if there are conversions of the solidworks files in github or something else. | |||
* 2d drawings- [http://opensourceecology.org/w/images/d/d1/Creation_Flame_CNC_Torch_Table_Drawings.zip] - DXFs of motor mounts | |||
=Design= | =Design= | ||
[[Image:Table_Frame.JPG|none|360px|Torch Table Prototype II Design.]] | [[Image:Table_Frame.JPG|none|360px|Torch Table Prototype II Design.]] | ||
Lots of information about the control system in [[CNC Torch Table 2/Control Overview]]. | |||
Additional discussion at [[TorchTableModularTooling]] | Additional discussion at [[TorchTableModularTooling]] | ||
=Additional Notes= | =Additional Notes= | ||
*As a large x-y-z coordinate table, the Torch Table has potential applications with other tooling besides a cutting torch. One limitation is that the drive system is not powerful enough or stiff enough to support heavy cutting-tool forces. | *As a large x-y-z coordinate table, the Torch Table has potential applications with other tooling besides a cutting torch. One limitation is that the drive system is not powerful enough or stiff enough to support heavy cutting-tool forces. | ||
Latest revision as of 03:06, 5 December 2013
| CNC Torch Table 2 | ||
|---|---|---|
| Home | Research & Development | Bill of Materials | Manufacturing Instructions | User's Manual | User Reviews | 
| |
Prototype 2
Videos
This link goes to a youtube playlist on the OSE CNC Torch Table: http://www.youtube.com/watch?v=LbqqGMtm6BY&list=PL2C1A547A8A20653F
This link goes to videos on the assembly instructions (in progress) http://www.youtube.com/watch?v=VzjvJEHHRcI&list=PLCBC578BE5586F1D1
Frame and Mechanical Assembly
Sketchup model Dxf files (incomplete) [solidworks assembly]
Electronics
Arduino instructions
Stepper Motors
Power supply: Maybe one or two recycled computer supplies can be used drive it. If 24V is needed, connect output in serial. On some PSU it is easy to adjust output voltage a bit. --Jth 19:07, 25 July 2012 (CEST)
Steppernug v1.1
12V and 5V Voltage Regulator
- Cnctorchtable.svg
CNC 3-Stepper Electronics


The CNC Torch Table uses the heavy duty Electronics Case with the reliable Arduino Uno microcontroller that controls open-source stepper drivers called Steppernugs
External wiring is easy with the use of Terminal Blocks
Fans can be powered with the voltage regulator.
Mechanical
CNC Table Z Axis CNC Table Y Axis CNC Table X Axis CNC Table Base Frame (including legs and holding flats)
Fasteners from BoltDepot Metric hex nuts, Stainless steel 18-8, 5mm x 0.8mm --- x12 Metric socket cap, Stainless steel 18-8, 5mm x 0.8mm x 10mm --- x4 z-axis motor mounting Metric socket cap, Stainless steel 18-8, 5mm x 0.8mm x 16mm --- x12 x and y-axis motor mounting
See Also
Dave (not part of OSE) built a nice cnc torch table which he showed off at NYC Maker Faire 2013. Partial plans are available at https://solar1.net/drupal/plasma_cnc and Dave offered to answer any questions we have.
End Effector
This is the plasma cutter that the CNC Torch Table will be designed to work with. In the event that this cutter is no longer available here are the important specifications: Adjustable Post Flow (power plasma only) control up to 60 seconds to improve consumable and torch life. Front air pressure adjustment makes adjusting pressure easy and painless. (PowerPlasma only) Front air pressure gauge allows quick verification of air pressure. Over Current and Air Pressure light indicators keep you updated on your units operating condition. Suitable for use with 11,000 W "clean power" generators 60AMP 120/220Volt 50/60HZ Plasma Cutter. Cuts 3/8-Inch to 1-1/4-Inch

Status
CNC Torch Table Prototype II
Design is finished. Stepper motor controller is under way.
- Sketchup Model
- Solidworks model - In progress
- First Run of Prototype II:
The first cut was done by "jogging" a single axis. This essentially verified the ability to control the torch (end effector) with a computer interface.
- need to test jogging on both the Y and X axis, Z is low priority for now because we can manually adjust the Z height for each cut.
- need to make a strait cut without Jogging, this would demonstrait an ability to control the end effector with more automation.
- need a more simplified list of instructions for software installation.
I would like to begin a manufacturing procedure for the Torch Table. This should utilize parralel fabrication, and have a complete list of skills needed.
- To fully complete Prototype II I would like to see the following
- manufacturing instructions
- parts list
- software tutorials
- user manual
- how to cut a strait line using the arduino.
- how to cut a X inch diameter circle.
- how to cut an arc.
If we can finalize a Prototype that can do these 3 things we will have both another useful machine at Factor e Farm and somthing people will want to replicate and improve. Then we can start working on other vital machines, and after people have had time to replicate the torch table and generate feedback, we can start prototype III.
- Results: the mechanical structure is robust and lends itself to torch and CNC wood milling operations. Gantry design by Ben Horton. The innovation here is the Arduino-based stepper motor controller, Steppernug - which can be milled on a CNC circuit mill. This system is a replacement for a proprietary version equivalent to the Gecko G540 in terms of current-handling ability.
- Computer Control Overview


Cutting Torch
- Oxyacetylene, oxypropane, oxy-biogas. Oxygen: commercial bottled gas or on-site oxygen generator (purchase [1],[2]) (build [3]). Steel only. Best on thick (1 inch +) steel.
- Plasma torch. Cuts aluminum, stainless, others in addition to steel. PP60 Everlast_Plasma_Cutter (alternate Everlast_PowerPro_256). Plasma gas: air or oxygen. Starting method: pilot arc (HF, blowback), scratch start
Developement Board
Resources
- Issue Tracker- https://github.com/OSE/CNC-Torch-Table-OSE/issues
- 3d models
- Github (solidworks 3d models and issues) - https://github.com/OSE/CNC-Torch-Table-OSE. Use this for new development
- This was originally developed at an old repo and we forked it into the OSE org. Do not use the old repo.
- [4] - Sketchup files - I don't know if there are conversions of the solidworks files in github or something else.
- 2d drawings- [5] - DXFs of motor mounts
Design

Lots of information about the control system in CNC Torch Table 2/Control Overview.
Additional discussion at TorchTableModularTooling
Additional Notes
- As a large x-y-z coordinate table, the Torch Table has potential applications with other tooling besides a cutting torch. One limitation is that the drive system is not powerful enough or stiff enough to support heavy cutting-tool forces.