CNC Torch Table 2/Control Overview: Difference between revisions
(→Marlin) |
(→Marlin) |
||
| Line 41: | Line 41: | ||
* I cloned marlin from github and checked out the Marlin_v1 tag. | * I cloned marlin from github and checked out the Marlin_v1 tag. | ||
* Edited Configuration.h | * Edited Configuration.h | ||
** #define MOTHERBOARD 35 - not sure if this is what we want | ** #define MOTHERBOARD 35 - not sure if this is what we want | ||
| Line 49: | Line 48: | ||
* Edited Configuration_adv.h | * Edited Configuration_adv.h | ||
** Uncommented "#define Y_DUAL_STEPPER_DRIVERS". I used Y because Marlin doesn't support dual drivers on X. We'll use Y as the long axis, X as the short axis, and Z as height. The 2nd Y will be output on the 2nd extruder port (http://reprap.org/wiki/RAMPS_1.4#Wiring) | ** Uncommented "#define Y_DUAL_STEPPER_DRIVERS". I used Y because Marlin doesn't support dual drivers on X. We'll use Y as the long axis, X as the short axis, and Z as height. The 2nd Y will be output on the 2nd extruder port (http://reprap.org/wiki/RAMPS_1.4#Wiring) | ||
* Opened Marlin/Marlin/Marlin.pde in the arduino ide and clicked to compile and load it to the arduio. | |||
=== grbl === | === grbl === | ||
Revision as of 00:48, 31 October 2013
Main > Digital Fabrication > RepLab Tools > Torch Table
Overview
Motor controller and drivers
RAMPS
Dan's using RAMPS in Oct 2013 to get the table up and running ASAP. The plan is then to replace it with something beefier so we can go faster.
Alternatives
See Stepper Motor Controller and Stepper Motor Driver.
Software
G-code Prep
ImplicitCAD (see also Parametric_Design_Pilot_Project)
DXF_to_G-code_Conversion_Tutorial
Nesting software would be useful. Example commercial product here. Anything open source?
Correction for torch cut kerf width ("cutter compensation" in CNC lingo) needed. G40/G41 but grbl does not interpret these.
G Code Runner
aka firmware aka motor controller (distinct from motor driver)
This is the firmware running on Arduino which converts a series of G-code commands to step/direction pulses for the drivers.
Marlin
When Dan Benamy was getting things going again in Oct 2013, he was using Marlin because grbl doesn't work with RAMPS out of the box.
Marlin will need some modifications if we want our 2 long axis motors to be on separate drivers rather than in parallel on one driver. See http://shapeoko.com/forum/viewtopic.php?f=4&t=1095 for someone doing this.
- I cloned marlin from github and checked out the Marlin_v1 tag.
- Edited Configuration.h
- #define MOTHERBOARD 35 - not sure if this is what we want
- #define DISABLE_E true // For all extruders
- #define TEMP_SENSOR_0 0 // Since we don't have temp sensors
- #define TEMP_SENSOR_1 0 // Since we don't have temp sensors
- Edited Configuration_adv.h
- Uncommented "#define Y_DUAL_STEPPER_DRIVERS". I used Y because Marlin doesn't support dual drivers on X. We'll use Y as the long axis, X as the short axis, and Z as height. The 2nd Y will be output on the 2nd extruder port (http://reprap.org/wiki/RAMPS_1.4#Wiring)
- Opened Marlin/Marlin/Marlin.pde in the arduino ide and clicked to compile and load it to the arduio.
grbl
When someone (Chuck?) was working on using the steppernug, they were running a modified grbl fork https://github.com/chuck-h/grbl/tree/edge. Changes from standard grbl [1]:
- Hardware I/O reassignment for steppernug interface
- different pin assignments on Arduino
- I2C extender
- substantially revised homing code
- dual X axis
- deep changes to stepper drive algorithm (implementing independent-axis trapezoidal move control during homing, as opposed to standard coordinated-axis move control for cutting) which should improve performance on long, limited-aceleration axes like torch table X and Y.
Sending G Code to Firmware
Printrun
This is what Dan's using in Oct 2013.
There's good installation instructions at https://github.com/kliment/Printrun. He wanted to do a source install but gave up when it wasn't easy with pip because it needs to use system wide python for access to the display.
- Change baud rate to 250000.
- Click connect.
Other Software
GcodeCommunications: other programs to send the g-code file from a host computer to a controller.
Hardware
Talk to Arduino with USB, or for longer distance RS422 e.g. MAX3488E
Testing
Limits and Homing
Dual-motor homing
The x axis (long axis) has 2 stepper motors. In the steppernug system, these have separate driver modules which receive identical step, direction, and enable signals.
For zeroing, the x axis needs to decouple - so if we get the x axis out of parallel, we can jog the x axes back into parallel by hitting their home switches independently. Steppernug supports this by allowing the Arduino to control a gate which blocks step pulses to the second driver module; in this condition the second motor will freeze and only the first motor will move. There is no provision for moving the second motor without moving the first, but that function is not required for the homing algorithm.
Axis sequence
- We will home the Z axis to its upper position first, just in case there are obstructions to clear during the X and Y axis homing.
- X and Y axes will do their initial fast moves to find home simultaneously (overlapped homing) to save time.
- The Y precision home movement will be performed.
- The dual-X-axis precision home maneuver will be performed.
Limit and home switch configuration
(TODO: add illustration showing distance coded reference mark options)
(Unconfirmed proposal at this time) ChuckH 23:42, 20 October 2012 (CEST)
Each axis has two switches: a limit switch and a home switch.
- The limit switch is activated at *either* end of travel. Its function is to protect against machine damage.
- Attempting to move further into the limit when the limit switch is active will cause all axis movement to stop, the torch to be shut off, and any other "safe shutdown" operation to be performed.
- The limit switch could be hit if the program erroneously commands the tool to move beyond the edge of the table
- The limit switch could also be hit if the torch table loses step (e.g. by hitting an obstruction) and subsequently performs a movement which takes it to the edge of the table
- The limit switch may be implemented as two physical switches wired in parallel, or the machine construction may permit a single switch to be used.
- Repeatable precision of actuation point is not very critical.
- This function is especially important if the table is expected to do automated cutting without constant human supervision.
- The home switch transitions between inactive and active at a point partway through the legal travel of the machine.
- For example, it might be active at the negative end of travel, and go inactive after 6 inches of movement.
- The home switch is used only for locating a repeatable zero position when the machine is powered on (or when recovering from lost steps)
- Note that the logical "machine zero" coordinate may be placed at any programmed position relative to the physical home switch.
- Repeatable precision may be important
- For the dual-motor axis, to establish accurate squareness
- For all axes, to pick up in the middle of an interrupted job
- If fixturing is used for repeat "production style" operations
- (update, 14-July-2103:) Instead of responding to a single flag location, the home switch could be actuated many times by multiple flags along the travel, with carefully designed nonuniform spacing between flags
- This implements "distance coded reference marks" (DCRM), e.g. [[2]], [[3]], [[4]]
- DCRM is often applied to incremental linear encoder systems; the same principle is effective here using motor step count as the "incremental scale".
- Using DCRM, the axis only needs to traverse two flag transitions after startup in order to unambiguously determine absolute position.
- By construction, the home switch is active at one end of travel and inactive at the other
- This allows the machine to know which end of travel it is at in the event the limit switch is activated
- This, in turn, allows the machine to permit recovery movement from the limit condition back into legal travel, while ignoring a command to go further into the limit zone.
There is an alternative switch configuration which places individual limit switches at the positive and negative limits of legal travel. However the configuration above is preferred because it supports faster homing and simpler control logic. Specifically:
- The substantial distance between the end of travel and the home switch location gives the machine overtravel room to do a controlled stop from high speed: maximum slewing speed can be used during initial homing without risk of slamming into the physical end-of-travel.
- Home switch placement can minimize the typical startup time.
- If an axis is usually parked near one end of travel, the home switch can be placed there
- If the axis position on startup is random, placing the home switch in the center of travel will minimize the average seek time.
- DCRM can be implemented to obtain short startup/home times no matter what the starting position.
- The "safety shutdown" limit-switch function can be always active, and is independent of homing
- The alternative approach requires logically repurposing a limit switch as home switch during home operations
Switch Types
The steppernug interface provides 5V power to sensor switches so either electronic or mechanical switches are easily accommodated.
- Mechanical microswitches are simple and effective.
- A Hall switch (e.g. this) is rugged but its position precision is probably only suitable for limits, not home switches.
- An optical interrupter (e.g. Sharp GP1A75EJ000F) can give precisely repeatable homing.
Switch response time
The home switch should respond within one motor step time at the "creep speed" used for final approach. This speed might be ~100 steps/sec which gives us ~10ms.
The limit switch should respond quickly enough so that an emergency stop initiated by the switch will stop the machine motion before it hits a mechanical stop. This time is dependent on a lot of different design parameters, but is probably at least 10ms.
The limited response speed required allows us some latitude for noise suppression.
Since all switch signals pass through the I2C expander for I/O, there is about 150 usec (0.15ms) added, see here.
Torch control
Software can use an M code to start the cut (e.g. open cutting-oxygen valve, strike plasma arc).
A second M code could shut down the entire torch (e.g. at the end of an unsupervised cutting session).
See also CNC_Torch_Table/Research_Development#Cutting_Torch
Plasma Torch
Plasma_Cutter_Design#Plasma_Cutter_PC_Interface
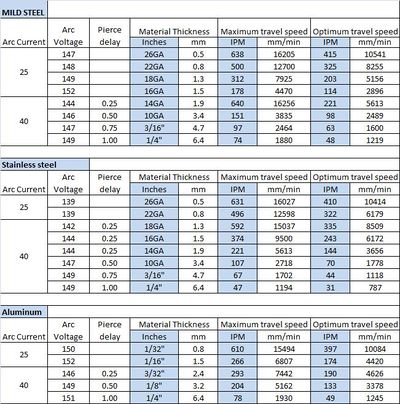
This presentation on plasma-cutting accurate holes also suggests that ramping down plasma current while torch is still moving is good practice. (It makes the electrodes last longer.)
Z-axis arc voltage height control. Needs design work.
Hypertherm:
Oxyfuel (oxyacetylene, oxypropane, etc) cutting torch
During cutting, an oxyfuel cutting torch is literally burning the steel with a blast of oxygen; most of the heat comes from oxidizing the iron. However to start a new cut ("piercing") you must preheat the steel, relying on the acetylene or LPG for heat. After the steel is red hot you boost the oxygen flow and make the cut. We will want an oxygen-rated valve controlled by the microprocessor. "Oxygen-rated" mostly means the valve is thoroughly cleaned of all oil or flammable solvents that tend to explode on contact with pure oxygen; good practical reference here. A solenoid valve like this in combination with an ordinary regulator would give basic on/off control, but see better suggestions below.
Fairly technical application note about how to do good oxyfuel machine cutting from ESAB: [5]
This long forum thread contains a lot of information about implementing small-shop CNC oxyfuel with programmed preheat, pierce, and cutting gas controls, auto ignition, etc. Based partly on this information, here are some control design suggestions for an Arduino-based CNC like CoolRAMPS or Steppernug/grbl:
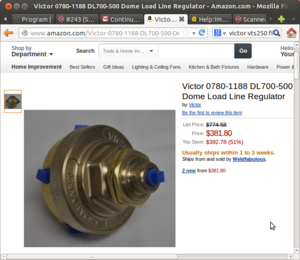
- use dome loaded regulators (e.g. Victor DL700 [6] [7]) driven by regulated shop air
- general description of spring- and dome-loaded regulators here
- It appears that almost any standard screw-handle regulator can be converted to "dome loaded" by sealing up the housing cap and replacing the screw/spring with an air pressure fitting. See video below. A classic dual-stage like the VTS250 should work very nicely for conversion
- As with manual regulators, if oxy- or fuel-tank pressure exceeds inlet rating of dome-loaded regulator, a first-stage tank regulator will be required.
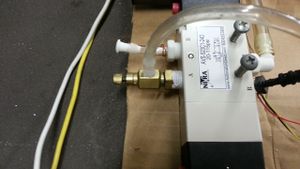
- With the dome-loaded regulators, gas on/off as well as pressure setting can be obtained with low-cost shop air components and small valves (e.g 4V130C,AVS-523C1)
- Using a solid-state pressure sensor for feedback, the Arduino can set the regulated pressures to programmed levels by actuating the pneumatic valves (increase/decrease loading pressure until feedback is correct). See video below and code on github.
- use an electric igniter (RV fridge igniter, BBQ igniter, spark coil).
- follow the sequencing of x,y,z motions, pressure changes, on/off, and ignition described by the folks on the forum thread above.
- Develop a library of pressure/time/positioning parameters for different material thicknesses and tip sizes that can be applied automatically by the G-code programming; this should minimize setup time and tweaking.
Installing a needle valve at the solenoid air valve improved control smoothness a bit compared to video above.
oxygen
The cutting oxygen for the torch must be high purity (according to the ESAB note above less than 95% purity simply will not cut steel, and >99.5% is required for best quality). Until recently, this meant cryogenically separated oxygen, depending on a large capital plant, and thus the user must rely on commercially provided tank oxygen. For some 30 years, pressure-swing-adsorption (PSA) separators have been available, but standard designs do not remove argon and therefore result in about 95%-oxygen, 5%-argon output gas. PSA construction is low-tech and works very nicely at small scale, e.g. portable breathing-oxygen units, and would be quite suitable for OSE. 95% purity is probably adequate for the preheat flame (ChuckH conjecture). For higher-purity cutting oxygen, PSA can be extended with additional zeolite materials [8] or activated carbon [9]; despite this discussion there is no clear record of small-scale DIY implementation of 99% oxygen PSA.
oxyacetylene
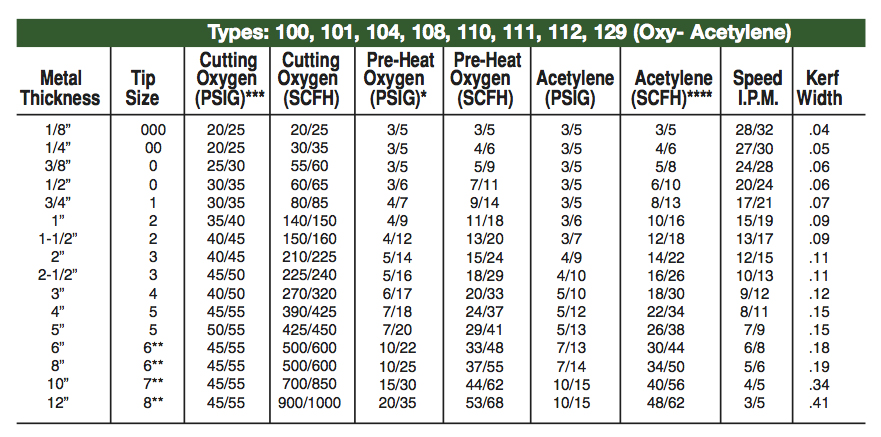
Recommendations from Victor:
Commercial oxy-fuel machine cutting heads
- Czech one with capacitive height sensor feature
Components offered by JB: CNC_Torch_Table_Log#Oct._21.2C_2012
Oxy-propane, -natural gas, etc
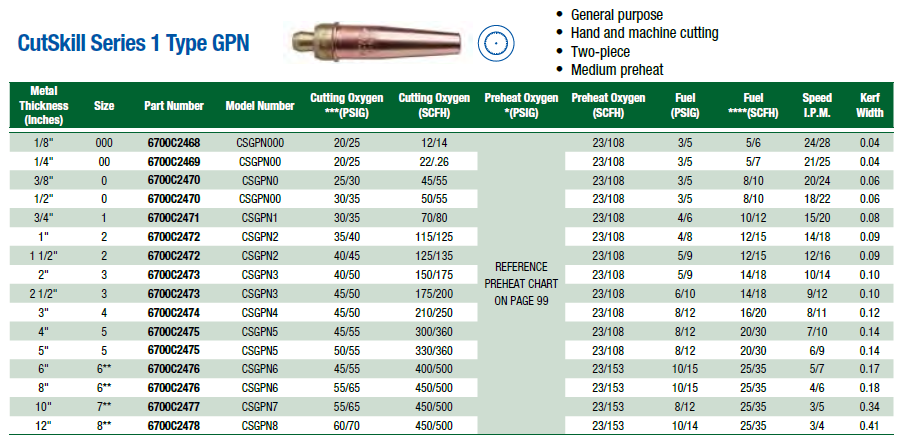
Propane instead of acetylene. Note the large preheat oxygen flow (not in a consistent stoichiometric ratio to fuel) in this chart. Odd.
Would gasifier-gas or biogas & oxygen work? Probably, as natural gas is primarily methane and is a commercially successful cutting-torch fuel.
