Frame Construction Set
![]() Hint: D3D Pro Frame now uses Angle Frame Connector and 1/8" x 1.5" angle iron.
Hint: D3D Pro Frame now uses Angle Frame Connector and 1/8" x 1.5" angle iron.
Introduction
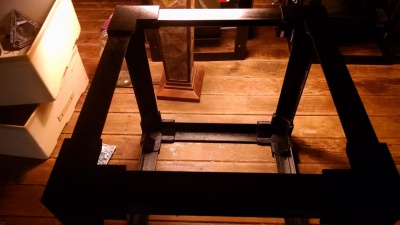
The Universal Frame system is a system for building frames and structural platforms using sheet metal, angle, rebar, or tubing. 3D Printer and CNC Machine frames are just one application.
The sheet metal route is a frame building system where we start with 6 flat sides and weld them together into a space frame. This is the simplest, lowest cost, highest strength option for producing frames for a machines of sizes from 30 cm to about 5 meters - compared to frames with tubular solid cross-sectional members, or compared to frames from aluminum or composites. However, it requires welding.
For the weldless version, see the Angle Frame Connector. This allows one to use angle - without welding.
The third option is box beam - Box Beam Sourcebook.For the OSE implementation - see Tubing Library,
The fourth option is rebar truss - with 1/4" deflection under 1000 lb load.
Frame pieces can be CNC cut from flat sheet, such as for the 3D printer, or they can be made from heavier flats for large frames.
Box beam tubing frame examples: tractor, Power Cube, Ironworker Machine, CNC torch table frame, and Open Source Trailer:
3D Printed Corner Version
Downloads
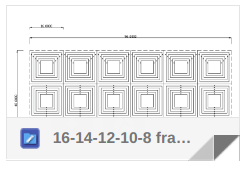
Download cutting file in DXF: File:D3dframe layout.dxf
Download PDF: File:D3dframe.pdf
Design Document
More
There are different options for the D3D frame that have been tested:
- CNC cut from flat - then welded or epoxied - works best with welding, second best with epoxy (more difficult)
- Welded from flat bar
- PVC with Formufit Corners as in D3D Ohio
- Aluminum extrusion as in D3D_v18.06.12#CAD
Build Notes
As of D3D v18.09.2 we are using:
- CNC cut frames for printers up to 20" sides
- 1/8"x1" bar stock, welded together
- 1/8"x2" flat bar for large-scale printers of 1 meter size
- Tall printer (2 meter tall with 8" bed) uses 2 frames with 14" sides connected with 1/4"x2" angle for the 8" bed, 2 meter tall printer.
- Note that a 12" frame can now achieve full 8" bed motion, with the overslung extruder:
Cost Considerations
Steel for a full steel frame costs between $14 and $150.
CNC cutting a set of frames costs at least $150 for a set of 4 nested frames of decreasing size - or about $40 each. See quotes below. Using Formufit Corners with PVC pipe is an inexpensive option - at $18. Note that the bolt lengths for mounting the axes to the frame must be modified if using PVC.
An even less expensive steel frame (in materials but more in labor) is using flat steel bar stock - 1/8"x1". The stock costs $14, see below. To build a frame:
- Cut stock to 13" lengths - 24 of them
- Weld 6 sides from these pieces. Note the overlap of corners makes for a 14" square frame
- Weld the 6 sides together to form your cubic frame
It is best to make one template side or use a jig to do this welding. You can get a Cheap Wire Feed Welder for $120.
Production Engineering
Note that it is much easier in terms of layup to produce 6 square sides and then weld them together. This is much easier to align than starting with angle and welding angle pieces together. This is becuase making flat sides is working in 2 dimensions. If using angle, you are working in 3 dimensions. It is much easier to align things in 2 dimensions than in 3 dimensions. For this reason - do not use stock angle steel unless you have no other option and can afford the extra time.
Frame from Flats
BOM
- 30' of 1/8"x1" flats, $13.50 from Sweiger Shop
- Self mixing epoxy, 3 tubes at $4 each, $13 total [1]
Procedure
- Using 1/8" by 1" flats, here is how you make a frame:
- Cut flats to 12"
- Clean and grind edges to be glued
- Assemble frame over a template
- Fix frame to another metal template with magnetic attachment
- Glue ends with self-mixing epoxy on both sides
Build
We used the old cnc'd square as a form. On top of the form, I placed a thin layer of plastic cut slightly larger than the square (the plastic prevents the epoxy from sticking our new square-from-flats to the old cnc'd square).
Using the square as a guide, I cut the first flat. Because the flat was slightly shorter than the square, I measured an additional distance of 1/2" past the length of the outer-edge-of-square to the inner-edge-of-sqaure. I marked this with soap stone & cut the first (of four) length of flat.
My first flat was going to be the guide for the other 3x flats in the square, so I got it exactly the right length, then I threw it in a vice, and grinded down the ends. I especially ground down the very end to be fine-ish point (like you would with a knife) so that the epoxy could penetrate more easily between the ends. I repeated this process for the 3x other flast, making sure that each was the same length as the first flat.
When all 4x flats were finished, I put them into the shape of a square ontop of the cnc'd square. The plastic obstructs the view of the cnd'd square underneath, but you can feel the edge & line it up fairly well.
Next, I took the other cnc'd square & put 16x magnents on it. I put 2x magnets on either side of the corners, about 3 finger-widths from the inside. Then I flipped this magnet-laden square over ontop of the other squares to make a square-plastic-flats-square sandwich.
I carefully re-aligned the flats into a square (again, using the bottom-most square as a guide) after the magnet shifted it a bit. After ensuring everything was aligned, I followed the directions on the 60-second epoxy & began adhering the flats into a square.
You really do have to work quick with this quick-set epoxy. I stopped for a second to think about how much epoxy I should be applying, and the epoxy hardened in the tip before my 4th join. So I used 2x tips on the first square.
Then I flipped it over carefully (the magnets on the top part of the sandwich did a great job at keeping everything together), and removed the square + plastic layers of the sandwich (which, after flipping, was now on top).
I changed tips & applied epoxy to the other side of the flats, this time without stopping.
I waited 5 minutes, but the form was clearly not set. Our "Devcon home" 1250 psi epoxy (bought at the local hardware store) says "30-60 second handling time", "2-5 minute set time", and "1 hour cure time". So we waited 1 hour.
After the hour, the form was still not strong. All the joints held, but it was very wobbly. And the epoxy was still soft.
Marcin & I were talking about passing on the epoxy solution, but perhaps continuing with the strips-to-build-a-square solution via welding. Or possibly spot welding so it could be done in a setting such as a library.
For more on this, see D3D_frame_built_with_epoxy
CNC Cut File for Starting from Sheet Steel
Material Usage Notes
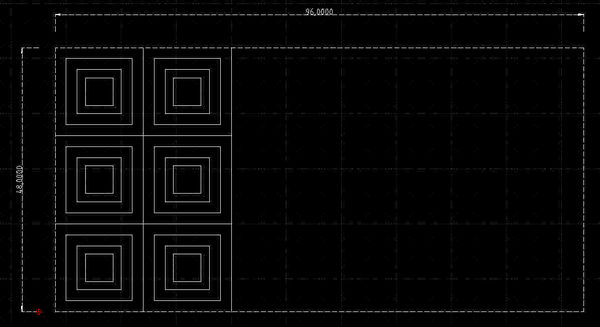
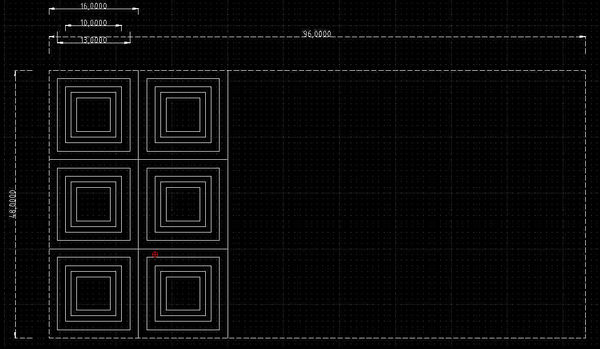
- Frames can be cut from 5x10 foot sheets - 50 sf - at 20, 18, 16, 14, 12" sizes. 5 usable sets. Advantage of having 3 sizes that fit 12" beds.
- Frames can be cut from 4x8 foot sheets - 32 sf - 16, 14, 12 sizes. 3 usable sets. Only one size that fits a 12" bed. Cost is similar.
3-Nested
4-Nested
Cut Request Template
(can use oxyfuel, plasma, laser, or waterjet)
Hello,
Please provide a quote and turnaround time for CNC cutting for the attached file, cut from 4'x8' sheet, 11 gauge.
I need 6 of those nested sets (as shown in the file), which take a total of 32" of a 96" long sheet. I have more notes on this cut job at D3D Frame (below).
Thanks, Marcin
Download
- Download Layout on a 4'x8' sheet of steel: File:D3dframe layout.dxf
- Download Single nested frame piece: File:D3dframe.dxf
Notes:
Online Viewer
View online by uploading the above file - http://dwgfastview.gstarcad.net/Flash/choose.html
Cost Estimates for Various Locations and Quantities
Single (One set of frames from a 48"x32" Piece of Sheet Steel
One set of frames nested with 16-14-12-10 inch sides. If all 4 are used - that makes for $40/frame
- Chile-
- Maine -
- Central California - Excelsior America - $325 - talk to Chris
- Texas Frame Cutting Quote - $157
- USA Missouri - Brian Neal - Seaman and Schuske, St. Joseph Missouri - job cost $150 for cutting of the nested set above.
Multiple (3 Sets of frames Fit on One 4'x8' Sheet of Steel)
- 2017 - 6 sets of frames, 10 ga, no holes, 4 nesting, Seaman and Schuske, St. Joe, Missouri, USA - $575 - 2017
- 6 sets of frames, 10 ga, Seaman and Schuske, with holes, 5 nesting 16-14-12-10-8 - $860 with shipping - $36 down to 10". Note price goes up quite a bit once holes are considered - but that is also due to one additional nesting (5 instead of 4).
Order Email
To Fab shops with CNC:
Hi _________,
Please send a quote and delivery time for the attached (File:D3dframe layout.dxf) cut from 4'x8' sheet of mild steel (ASTM 36 standard hot rolled), 12 gauge preferred, and 11 gauge will work as well. The design is meant to be cut with shared lines.
Laser cutting or plasma cutting will work for us. Laser cutting is preferred for a cleaner finish.
I need one full 4'x8' sheet of this - it should fit with 1/4" border around the items.
Thanks,
Marcin
Missouri Response
1
Marcin,
The two sheets of nested frames for the sum of $820.00 plus $40.00 delivery. About a week of lead time for 11GA. 3-4 working days for 10GA or 12GA mild steel.
My laser operator doesn't think warping will be a factor.
I will be on vacation after today for a week so ask for Randy if I'm not here.
Thanks
Brian Neal
Seaman and Schuske Metal Works
1215 S 4th Street
St. Joseph, MO 64501
Phone 816-232-3337
Mobile 816-752-0315
Email bneal@seamanschuske.com
2
Marcin,
Cost to cut the 96x48 sheet of frames (4 nested set) would be $297.00 plus delivery ($40.00).
Would you want the round holes cut, just like the file you sent me?
We should get them out this week if you decide to go with this.
Thanks
Summary
If 18 frame sets are counted, that is $46/frame without shipping. If we count up to 30 sets, then it is $29 per frame with shipping.
Development Document - 8" Frame
Development Discussion
Other Details
Frame holders for JB Welding -
Social Media
Internal Links
- D3D_frame_built_with_epoxy. Note that 2 part epoxy (not JB Weld) did not work to make each of the 6 sides.
- Angle Frame Connector - 3D printed connector for scalable frames requiring no holes in metal.
External Links
- Critical Path for D3D 2016 - edit
