CEB Press/Manufacturing Instructions/Valve Mount: Difference between revisions
Jump to navigation
Jump to search
(Created page with "{{Category=CEB press building instructions}} {{Template:CEB Press Manufacturing Instructions Navbox}} thumb|400px The valve mount holds the hydraulic sol...") |
No edit summary |
||
| Line 8: | Line 8: | ||
=Materials required= | =Materials required= | ||
*1/4"x6" flatbar: 12" | *1/4"x6" flatbar: 12" | ||
=Diagrams= | |||
[[Image:valvemount.png|thumb|600px|The valve mount]] | |||
=Fabrication instructions= | =Fabrication instructions= | ||
#Find your Hydraulic valve and locate its mounting holes on the back. Put the plate under it so that the mounts on the valve align with the top of the plate. | #Find your Hydraulic valve and locate its mounting holes on the back. Put the plate under it so that the mounts on the valve align with the top of the plate. | ||
Revision as of 10:03, 9 October 2011
Main > Housing and construction > CEB Press > CEB press building instructions
| |||||||||||||||||||||||||
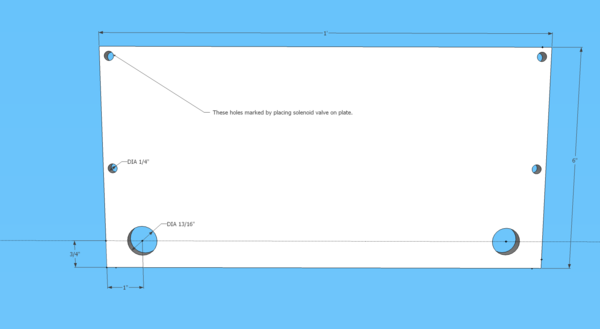
The valve mount holds the hydraulic solenoid valves to the primary arm.
Tools required
- Hole puncher with 13/16" Dies
- Drill Press with 1/4" or larger bit.
Materials required
- 1/4"x6" flatbar: 12"
Diagrams
Fabrication instructions
- Find your Hydraulic valve and locate its mounting holes on the back. Put the plate under it so that the mounts on the valve align with the top of the plate.
- Use spray paint to mark the holes on the mount's location to the 6x12 plate.
- Drill the holes to at least a 1/4" large (you might want to oversize them a bit, as it very difficult to get them in the perfect location.)
- Punch 13/16 holes 1" in and .75" up at the bottom of the plate.
