CEB Press/Manufacturing Instructions/Controller Mount: Difference between revisions
Jump to navigation
Jump to search
| Line 15: | Line 15: | ||
=Fabrication instructions= | =Fabrication instructions= | ||
#Find your controller box and locate its mounting holes on the back. Use spray paint to spray a nice wet coating over the hole locations, then press your 6x15 plat to it, square and so that the top hole is about a 1/2" away from the top, to mark the hole locations. | #Find your controller box and locate its mounting holes on the back. Use spray paint to spray a nice wet coating over the hole locations, then press your 6x15 plat to it, square and so that the top hole is about a 1/2" away from the top, to mark the hole locations. | ||
#Drill the | #Drill the 1/4" holes for the controller box. You can drill them a little bigger (up to 5/16") if you'd like, as it's difficult to get the holes perfectly aligned). | ||
#Punch 13/16 holes 1" in and 1" up at the bottom of the plate. | #Punch 13/16 holes 1" in and 1" up at the bottom of the plate. | ||
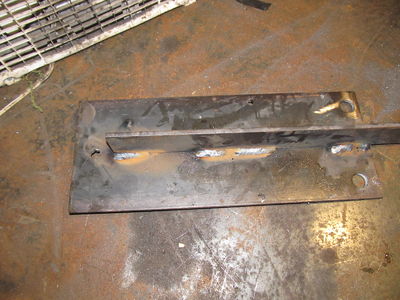
#Weld the 2" flatbar perpendicular to the plate on the back. The bottom should be flush with it, so the top hole for the controller is still accessible. | #Weld the 2" flatbar perpendicular to the plate on the back. The bottom should be flush with it, so the top hole for the controller is still accessible. | ||
Revision as of 18:22, 12 December 2011
Main > Housing and construction > CEB Press > CEB press building instructions
| |||||||||||||||||||||||||
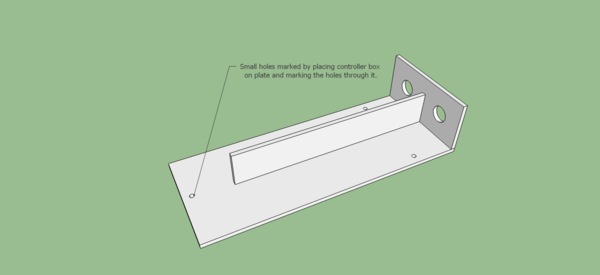
The controller mount attaches the controller box to the primary arms.
Tools Required
- Hole punch with 13/16" die.
- Drill press with 1/4" or larger bit.
- Welder
Materials Required
- 1/4" x 6" flatbar: 15"
- 1/4" x 2" flatbar: 12"
Diagrams
Fabrication instructions
- Find your controller box and locate its mounting holes on the back. Use spray paint to spray a nice wet coating over the hole locations, then press your 6x15 plat to it, square and so that the top hole is about a 1/2" away from the top, to mark the hole locations.
- Drill the 1/4" holes for the controller box. You can drill them a little bigger (up to 5/16") if you'd like, as it's difficult to get the holes perfectly aligned).
- Punch 13/16 holes 1" in and 1" up at the bottom of the plate.
- Weld the 2" flatbar perpendicular to the plate on the back. The bottom should be flush with it, so the top hole for the controller is still accessible.

