CEB Press/Manufacturing Instructions/Frame with main cylinder: Difference between revisions
| Line 98: | Line 98: | ||
===Assembly=== | ===Assembly=== | ||
===Step 1: Mag Drill Holes in Verticals.==== | |||
{{Wanted|Someone to fix the way the numbers reset after I do a bullet point}} | |||
#Gather materials for the “Jig”; this means 6”x12” tubing (52”) and any extra heavy U Channel. If you don't have any laying around, you can use one drawer member, and one spacer on each side. | #Gather materials for the “Jig”; this means 6”x12” tubing (52”) and any extra heavy U Channel. If you don't have any laying around, you can use one drawer member, and one spacer on each side. | ||
#Clamp the vertical pieces to the "Jig" on each end, with extra U channel in between the tubing and the vertical pieces. See the diagram on the right: [[Image:Vertical_Beams.jpgthumb|right|200px|C-Clamp the vertical pieces to the jig as shown.]] | #Clamp the vertical pieces to the "Jig" on each end, with extra U channel in between the tubing and the vertical pieces. See the diagram on the right: [[Image:Vertical_Beams.jpgthumb|right|200px|C-Clamp the vertical pieces to the jig as shown.]] | ||
Revision as of 15:25, 28 August 2011
| |||||||||||||||||||||||||
Tools Required
- Torch
- Hole Punch
- Mag Drill
- 1/2” Allen Wrench
Materials Required
Steel
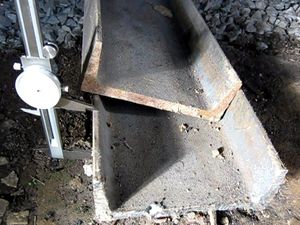
- 6” Heavy (7/16”) U-Channel- 274 1/2”
- A- 54” (2); Vertical Members
- B- 20 3/4” (4); Horizontal Members
- C- 28 3/4” (2); Drawer Members
- D- 13” (2); Spacers
- 6" Light (1/4") U-Channel-41.5"; Cylinder support: 20 3/4" (2)
- 2"x2"x1/4" Angle: 12"; Dirt Blockers: 6” (2)
- 1 1/2” DOM Roundstock: 12”; Cylinder Pin: 8 1/2”, Press Foot Filler: 3 1/2”
- 1 1/2” Inter Diameter DOM Tubing: 2 1/2"; Pin Receptors:1 1/4” (2)
- 1”x4” Plate: Lower Press Foot: 10” (1)
- 1”x6” Plate: Upper Press Foot: 12” (1)
- 2” U-Channel: 1.5” (2); Cylinder Spacers
- 1” Pipe: 1.5” (2); Cylinder Spacers
- 1/4”x1” Flatbar: 13” (1); Magnet holder
- 3/8” Rebar: 3.5” (2); Sensor Holder
- For Optional “Jig”: 6”x12” Tubing: 52”
Nuts and Bolts
- 3/4”x1.5” Bolts (28)
- 3/4” x 2.5” Bolts (6)
- 3/4” Steel Nuts (9)
- 3/4” Galvanized Nuts (40)
- 3/4” Threaded Rod: 16”
Hydraulics
- 5”x12” 3000 PSI Hydraulic cylinder Buy (1)
- 3/4” to 3/4” Hydraulic Coupler (2)
- 3/4” Female Quick Coupler (1)
- 3/4” Male Quick Coupler (1)
Fabrication Instructions:
Pre Assembly
The following can be done in any order, prior to assembly.
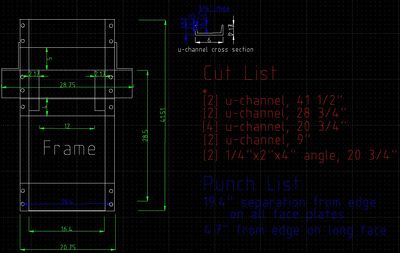
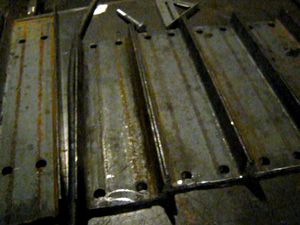
Punch the holes in the horizontal members (B) and in the drawer members (C)
- In the horizontal members, the holes should be 7/8” in from the long side, and as close as you can get them to the wall of the U-channel. There are 4 holes in each piece.
- In the drawer members, the holes should be 4 7/8” in from the long side, and as close as you can get them to the wall of the U-Channel. There are 4 holes in each piece.
Prepare the main cylinder
Prepare the press feet
- Mark and magdrill 13/16" holes in 1"x4"x10" plate for the lower press foot. They should be centered shortways, and 1" from the edge to the center of the holes long ways.
- Place this centered on the 1"x6"x12" upper press plate and transfer punch and drill those holes again.
- Torch out a 4 1/4" x 2 3/4" rectangular hole in the lower press plate. Grind it smooth.
- Cut two 2.5" pieces of 3/4" threaded rod.
- Plug weld the threaded rod into the upper press plate, so that the threaded rod is about 1/4" deep in the plate. Fill the hole, then grind it flush.
Attach them to the cylinder
- Expand the cylinder so the shaft is fully extended.
- You can do this either by attaching a hydraulic hose between the ports, and pulling it manually (Requires a lot of muscle!) or by attaching it to some sort of hydraulic motor (We use our power cubes) and using a valve to do it.
- The Prince brand cylinder uses a really large allen wrench for their plugs. If you can't find one, you can make one like we did. media:allentool.jpg
- Weld a 3.5" piece of 1.5" DOM roundstock inside of the tubing at the end of the shaft.
![]() Warning: Take care that the top of the shaft doesn't get hot; there is a rubber seal between that and the cylinder that will melt and cause leaking if you're not careful. If it starts getting warm, dunk the shaft in water to cool it down.
Warning: Take care that the top of the shaft doesn't get hot; there is a rubber seal between that and the cylinder that will melt and cause leaking if you're not careful. If it starts getting warm, dunk the shaft in water to cool it down.
- Stand the cylinder up vertically and support it using some sort of rope so it is as close to square vertically as possible. . Place the tubing at the end inside of the hole in the lower press foot.
- Insure the cylinder is square to the plate in all directions.
![]() Hint: Since there is a lip on the cylinder, its hard to tell if its square unless you use two squares, one on the lip and against the other one which rests on the table
Hint: Since there is a lip on the cylinder, its hard to tell if its square unless you use two squares, one on the lip and against the other one which rests on the table
- Tack the lower press foot from all dimensions.
- Insure the cylinder is still square with it, if not, remove the tacks and fix it.
- Weld the two together on the top. There will need to be at least 2 layers of weld.
![]() Warning: Dunk this frequently, even if the shaft is not getting hot! The plate will warp upwards and cause you lots of woe (trust me) if you do not.
Warning: Dunk this frequently, even if the shaft is not getting hot! The plate will warp upwards and cause you lots of woe (trust me) if you do not.
- Gather some press foot support pieces. We used scrap 1" plate torchings, but anything close to a 1"x1"x2.5" piece will do.
- Weld these as close as you can to the tubing and the press plate
- Lower the hanging cylinder and flip it upside down.
- Fill in the bottom side of it with welds. This will require many layers of welds and many dunks to cool it.
- Grind it flush with the rest of the plate. A few spots where the welds are below the surface is OK, but the majority of the surface should be level.
- Put the upper press foot into the lower one and tighten nuts onto the threaded rod.
- Stand the cylinder up again and insure the press plate is still square with the cylinder.
- If its not, you'll need to add shims between the two press plates until they are square. with the cylinder
Prepare the wide cylinder supports
- Punch 3/4" holes in the thin U-Channel in the same manner as with the horizontal members.
- Weld the 2"x2" angle (5.5") centered and squared on one side of the U-Channel.
- Torch a hole 3/4" away from the end of the 2"x2" for a 3/4" bolt and grind it clean.
- Place a steel nut over the hole and ensure it is clear for a bolt and flush.
- Weld the nut in place.
Prepare the thin cylinder supports
- Weld some 3/4" ID pipe (3/4" to 1") to the 3" U-channel. 4-8 good tacks is sufficient.
- Make some 6" long 3/4" bolts. See Making Bolts
Prepare the magnet holder
- Shield the threaded rod from spatter by putting 2 nuts on it.
- Prop up the 1/2"x1" flatbar so it's level with the center of the threaded rod, ensuring they are parallel.
- Weld the two together and remove the nuts.
Prepare the sensor holders
- You will need one later which attaches to the arms, so it's suggested you make two.
- Weld 3.5" of rebar to 3.5" of threaded rod at a right angle, taking care to protect the threads from spatter.
Assembly
Step 1: Mag Drill Holes in Verticals.=
Wanted: Someone to fix the way the numbers reset after I do a bullet point
- Gather materials for the “Jig”; this means 6”x12” tubing (52”) and any extra heavy U Channel. If you don't have any laying around, you can use one drawer member, and one spacer on each side.
- Clamp the vertical pieces to the "Jig" on each end, with extra U channel in between the tubing and the vertical pieces. See the diagram on the right:
- Clamp one horizontal member at each end of the jig.
- Ensure they are square with the jig by using a large square
- Clamp using 1 or 2 vise grips on either side.
- Transfer Punch thru the holes on B.
![]() Hint: It really helps to label each piece before taking it apart, so that if you end up unbolting the piece later, you'll know exactly where it goes and in what orientation.
Hint: It really helps to label each piece before taking it apart, so that if you end up unbolting the piece later, you'll know exactly where it goes and in what orientation.
- Mark where the edge of the horizontal member is in relation to the vertical members on the vertical member. Use a square to mark the same location on the opposite side. Do this on all four locations.
- Remove the horizontal members.
- Use a Mag-Drill to drill 3/4" holes in each spot you transfer punched.
- Flip the jig over so you have access to drill the other holes.
- Align the other horizontal members with the marks you previously made, and insure once more that they are square.
- If it is on the mark on each side, but not square, just get it as close as you can to the marks while insuring it is square.
- Clamp the members in place.
- Transfer punch them.
- Remove them.
- Mag Drill them.
- Unclamp the verticals from the jig.
Step 2: Assemble top/bottom
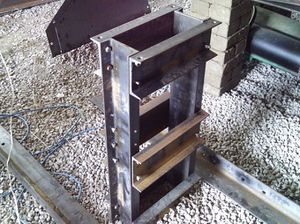
- Loosely bolt the crossmembers on one side in place.
- Square them up with the verticals using a large square.
- If they're not lining up properly square it up on the top of the cylinder first and tighten those bolts. Then square out the other side and torch out any spots prohibiting the bolts from going thru.
- Tighten all of those bolts.
- Flip over the frame.
- Loosely bolt the crossmembers on this side and square them. Insure the members on the other side are level with this one.
- Tighten these bolts.
Step 3: Mag-Drill the holes for the wide cylinder supports and drawer members
- Clamp the drawer member centered, 5" from the upper cross member.
- Clamp the wide cylinder support directly below it.
- Transfer punch thru those holes.
- Mag-Drill 1" holes at these centers.
- Flip the frame over and do the same thing on the other side.
Step 4: Torch the roller slots
- The center of them is located 9 5/16" away from the top of the machine, 2 inches in from one side of the U-Channel.
- They are to be 1.5" tall, and 5/8" wide.
Step 5: Weld the spacers
- With the frame laid down, and one of the drawer members in place, place the spacers on each side. The end of them is to be 5 1/8" away from the upper cross member.
- Insure they are parallel with the U-channel and C-clamp in two places for each.
- Tack the top in 3 spots.
- On the bottom edge, weld the interior inwards as far as you can. This should be an inch or more.
- Weld the top 100%.
- Grind the top weld flush with the U=channel.
- Flip over the frame.
- Remove the other drawer member, and repeat steps 3-6.
To be continued, during the month of August, 2011...
Diagrams
Step 1: Gather the Form Pieces
Step 2: Put the Form Pieces Together
Step 3: Line the Vertical Beams along the Form and C-Clamp them in Place
Step 4: Place One Each of the Upper and Lower Cross Beams
Step 5: Flip the Frame
Step 6: Place the Remaining Cross Beams
This diagram shows the pieces needed for the frame. Click to enlarge:

Video Explantion


