CEB Press/Manufacturing Instructions/Brick Holder Plate: Difference between revisions
Jump to navigation
Jump to search
m (moved Brickholder plate to CEB Press/Manufacturing Instructions/Brick Holder Plate: in line with other parts) |
|||
| Line 11: | Line 11: | ||
{{Wanted|Better diagram}} | {{Wanted|Better diagram}} | ||
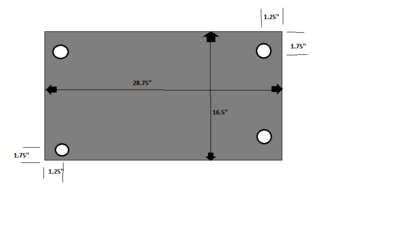
[[Image:brickholder.png|thumb|400px|The brickholder plate hole locations.]] | [[Image:brickholder.png|thumb|400px|The brickholder plate hole locations.]] | ||
<html> | |||
<iframe src="http://sketchup.google.com/3dwarehouse/mini?mid=c12a8812826fae5fb38804396e417a9b&etyp=im&width=400&height=300" frameborder="0" scrolling="no" marginheight="0" marginwidth="0" width="400" height="300"></iframe> | |||
</html> | |||
=Fabrication steps= | =Fabrication steps= | ||
Punch the 1" holes in the proper locations. They are 1 1/4" away from 17" side, and 2" away from 29" side. | Punch the 1" holes in the proper locations. They are 1 1/4" away from 17" side, and 2" away from 29" side. | ||
Revision as of 04:52, 23 September 2011
Main > Housing and construction > CEB Press > CEB press building instructions
| |||||||||||||||||||||||||
The brickholder plate attaches to the primary arms and is where the bricks go when the machine spits them out. You could also replace the plate with some rollers.
Tools Required
- Hole Punch with 1" dies
Materials
- 1/4" Plate: 17"x29"
Diagrams
Wanted: Better diagram
Fabrication steps
Punch the 1" holes in the proper locations. They are 1 1/4" away from 17" side, and 2" away from 29" side.
