CEB Press/Manufacturing Instructions/Soil loading drawer: Difference between revisions
William Neal (talk | contribs) No edit summary |
|||
| (98 intermediate revisions by 4 users not shown) | |||
| Line 1: | Line 1: | ||
{{ | {{Template:CEB Press Manufacturing Instructions Navbox}} | ||
{{Warning|The documentation for the CEB Press is undergoing a thorough overhaul. CAD models and written directions are presently obsolete. For more information, see [[Talk:CEB_Press#Documentation_overhaul_in_progress]]. When the models, specifications and text on this article have been thoroughly reviewed, updated when necessary, and confirmed as whole and accurate, this warning may be removed.}} | |||
[[File:Final Drawer 2.jpg|right|400px]] | |||
== Tools Required == | == Tools Required == | ||
| Line 13: | Line 15: | ||
== Diagrams == | == Diagrams == | ||
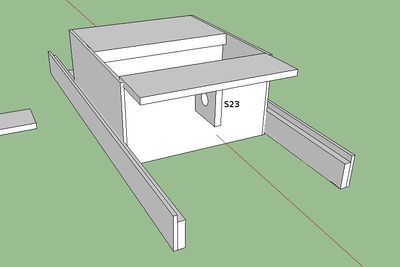
<html><iframe src="http://sketchup.google.com/3dwarehouse/mini?mid=c9c911041cdbdaad1211da1f85706ccd&etyp=im&width=400&height=300" frameborder="0" scrolling="no" marginheight="0" marginwidth="0" width="400" height="300"></iframe></html> | |||
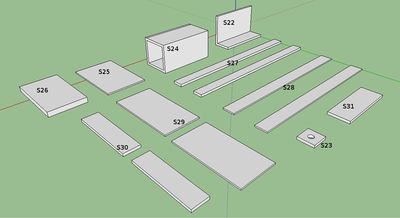
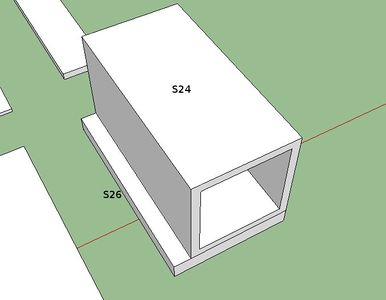
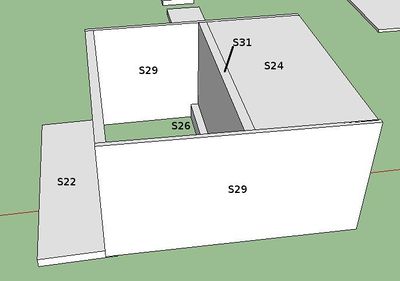
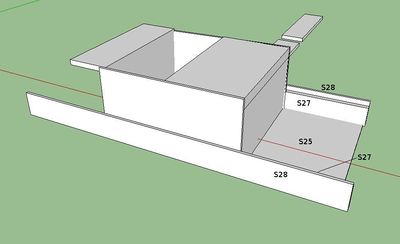
The alphanumeric identifiers (i.e. S24) match up with the ID column in the [[#Materials Required|Materials Required]] section | |||
[[ | |||
<gallery heights="300" widths="400" perrow="2" align="center"> | |||
File:Drawer_Parts.jpg|<html><h3>Drawer Parts</h3></html> | |||
File:Assemble_Drawer_1.jpg|<html><h3>Drawer Assembly Step 1</h3></html> | |||
File:Assemble_Drawer_2.jpg|<html><h3>Drawer Assembly Steps 2-3</h3></html> | |||
File:FinalDrawer1.jpg|<html><h3>Steps 4-6</h3></html> | |||
File:Final_Drawer_2.jpg|<html><h3>Drawer Assembly Step 9</h3></html> | |||
</gallery> | |||
| Line 32: | Line 32: | ||
== Fabrication Steps == | == Fabrication Steps == | ||
(note: part numbers refer to the recently-published parts list on the Bill of Materials page) | (note: part numbers refer to the recently-published parts list on the Bill of Materials page) | ||
# | ===Step 1: Weld Press Plate and Spacer Assembly=== | ||
#Lay the spacer tube on top of the press plate, align the sides and make the back edge flush. [[Image:Tubepress.jpg|thumb|200px|Steps 1b, 1c]] | |||
# | {{Warning|Ensure all edges are tight and squared; this piece is critical, it must be a uniform height throughout the entire item. Grind off any imperfections.}} | ||
# | <ol><li value="2">Tack weld the two together in many places (at least 3 on each side) to ensure nothing will warp.[[Image:Verttube.jpg|thumb|200px|Step 1e]] | ||
# | <ul><li>Double check everything for squareness!! </ul> | ||
# | <li>Weld the two together on all edges where they touch. | ||
# Tack | {{Hint|It is a good idea to weld in 1” or 2” increments, skipping around to different places to prevent warpage. | ||
# | You will need to weld multiple layers where the tubing is rounded.}} | ||
# | <li>Grind off any weld which prevents the vertical support from being square and flush with both the spacer tube and the press plate. | ||
<li>Weld the vertical support to the press plate and spacer tube assembly. | |||
<li>Grind down the welds on the open end of the tube so they are flush with the rest of the tube.</ol> | |||
===Step 2: Tack Sides=== | |||
[[Image:Sides.jpg|thumb|200px|left|Step 2c]] | |||
#Lay the spacer/press plate assembly down so the press plate is touching the table. | |||
#Align side pieces with spacer and press plate assembly. Insure the two are square vertically and horizontally with the spacer, and that everything is touching the table. | |||
{{Hint|It helps to use angle iron tacked to your table and the sides, so it insures they are vertically square. This also makes it a bit easier to align everything else. [[Image:Anglehelp.jpg|thumb|200px|right|Using angle to insure vertical and horizontal squareness]] | |||
*Also, it may help to use paper shims (see between the sides and the tube to properly space them.}} | |||
**See [http://www.youtube.com/watch?v=HnFXzrwzsjg&list=UUjvBN1r7UXXqmIbx_u7bIAw&index=339&feature=plpp_video Squaring Drawer video] | |||
**See [http://www.youtube.com/watch?v=bahhYtxy4Zg&list=UUjvBN1r7UXXqmIbx_u7bIAw&index=203&feature=plpp_video Shims video] | |||
<ol><li value="3">Tack the sides to the tube on all sides in multiple places except where it is touching the table. Add a few 1" seams to prohibit them from moving.</ol> | |||
===Step 3: Tack back=== | |||
[[Image:Back.jpg|thumb|200px|left|Step 3: the back in place]] | |||
#Place the back piece. | |||
#Tack the back piece in a few spots, with a 1" seam on each side. | |||
===Step 4: Tack Roof, Inner Rails=== | |||
[[Image:drawer4.jpg|thumb|200px|right|Step 4]] | |||
#Grind off the welds for the back and side pieces so that the entire drawer is flush. | |||
#Flip the drawer over and tack the sides from the top. | |||
#Place the roof and inner rails in their respective places. The inner rail placement differs from the diagram shown. They should be sticking out 5" from the roof, therefore about 5" from the back. Ensure inner rails are perfectly parallel (varying no more than a 16th of an inch) and square throughout the entire length. | |||
#Tack them in multiple places except where they are touching the table. | |||
===Step 5: Tack outer rails === | |||
{{Warning| Ensure they are perfectly parallel; otherwise they will leave the roller guides. Insure it varies no more than 1/16" over the entire length.}} | |||
{{Hint|Use the paper shims for this.}} | |||
*Tack them in multiple places except where they are touching the table. | |||
===Step 6: Weld entire drawer=== | |||
[[Image:shortwelds.jpg|thumb|200px|left|Welding little pieces at a time]] | |||
{{Hint|Weld short lengths at a time and jump around a lot to minimize warping.}} | |||
#All the seams should be completely welded except the difficult to reach places between the inner and outer rails, those can be welded about 50%. | |||
#You may want to grind off the welds in between passes around the drawer to allow it to cool. | |||
===Step 7: Grind the entire drawer flush=== | |||
{{Warning|There cannot be any outstanding bumps or welds anywhere; the drawer will be sliding in and out of a tight spot and bumps will catch on the frame crossmembers.}} | |||
*Make sure there's no welding spatter where the rollers will be rolling. Grind any off with a small grinder. | |||
===Step 8: Check the Rails=== | |||
[[Image:Railcclamp.jpg|thumb|200px|Pinching the rails inwards using C-clamps]] | |||
*The rails likely got warped outwards on the side with the back while you were welding. | |||
*If they are not still parallel, you will need to pinch them inwards so that they are. You can do so using two C-Clamps. | |||
===Step 9: Weld the tongue in place to the back of the drawer, ensuring it is square and centered.=== | |||
Latest revision as of 22:57, 14 December 2011
| |||||||||||||||||||||||||
![]() Warning: The documentation for the CEB Press is undergoing a thorough overhaul. CAD models and written directions are presently obsolete. For more information, see Talk:CEB_Press#Documentation_overhaul_in_progress. When the models, specifications and text on this article have been thoroughly reviewed, updated when necessary, and confirmed as whole and accurate, this warning may be removed.
Warning: The documentation for the CEB Press is undergoing a thorough overhaul. CAD models and written directions are presently obsolete. For more information, see Talk:CEB_Press#Documentation_overhaul_in_progress. When the models, specifications and text on this article have been thoroughly reviewed, updated when necessary, and confirmed as whole and accurate, this warning may be removed.

Tools Required
Materials Required
| ID | Quant | Type | Length | Total | Name | Detail |
Diagrams
The alphanumeric identifiers (i.e. S24) match up with the ID column in the Materials Required section
Drawer Parts
Drawer Assembly Step 1
Drawer Assembly Steps 2-3
Steps 4-6
Drawer Assembly Step 9


Fabrication Steps
(note: part numbers refer to the recently-published parts list on the Bill of Materials page)
Step 1: Weld Press Plate and Spacer Assembly
- Lay the spacer tube on top of the press plate, align the sides and make the back edge flush.

![]() Warning: Ensure all edges are tight and squared; this piece is critical, it must be a uniform height throughout the entire item. Grind off any imperfections.
Warning: Ensure all edges are tight and squared; this piece is critical, it must be a uniform height throughout the entire item. Grind off any imperfections.
- Tack weld the two together in many places (at least 3 on each side) to ensure nothing will warp.
- Double check everything for squareness!!
- Weld the two together on all edges where they touch.
 Hint: It is a good idea to weld in 1” or 2” increments, skipping around to different places to prevent warpage.
You will need to weld multiple layers where the tubing is rounded.
Hint: It is a good idea to weld in 1” or 2” increments, skipping around to different places to prevent warpage.
You will need to weld multiple layers where the tubing is rounded.
- Grind off any weld which prevents the vertical support from being square and flush with both the spacer tube and the press plate.
- Weld the vertical support to the press plate and spacer tube assembly.
- Grind down the welds on the open end of the tube so they are flush with the rest of the tube.

Step 2: Tack Sides

- Lay the spacer/press plate assembly down so the press plate is touching the table.
- Align side pieces with spacer and press plate assembly. Insure the two are square vertically and horizontally with the spacer, and that everything is touching the table.

- Also, it may help to use paper shims (see between the sides and the tube to properly space them.
- See Squaring Drawer video
- See Shims video
- Tack the sides to the tube on all sides in multiple places except where it is touching the table. Add a few 1" seams to prohibit them from moving.
Step 3: Tack back

- Place the back piece.
- Tack the back piece in a few spots, with a 1" seam on each side.
Step 4: Tack Roof, Inner Rails

- Grind off the welds for the back and side pieces so that the entire drawer is flush.
- Flip the drawer over and tack the sides from the top.
- Place the roof and inner rails in their respective places. The inner rail placement differs from the diagram shown. They should be sticking out 5" from the roof, therefore about 5" from the back. Ensure inner rails are perfectly parallel (varying no more than a 16th of an inch) and square throughout the entire length.
- Tack them in multiple places except where they are touching the table.
Step 5: Tack outer rails
![]() Warning: Ensure they are perfectly parallel; otherwise they will leave the roller guides. Insure it varies no more than 1/16" over the entire length.
Warning: Ensure they are perfectly parallel; otherwise they will leave the roller guides. Insure it varies no more than 1/16" over the entire length.
![]() Hint: Use the paper shims for this.
Hint: Use the paper shims for this.
- Tack them in multiple places except where they are touching the table.
Step 6: Weld entire drawer

![]() Hint: Weld short lengths at a time and jump around a lot to minimize warping.
Hint: Weld short lengths at a time and jump around a lot to minimize warping.
- All the seams should be completely welded except the difficult to reach places between the inner and outer rails, those can be welded about 50%.
- You may want to grind off the welds in between passes around the drawer to allow it to cool.
Step 7: Grind the entire drawer flush
![]() Warning: There cannot be any outstanding bumps or welds anywhere; the drawer will be sliding in and out of a tight spot and bumps will catch on the frame crossmembers.
Warning: There cannot be any outstanding bumps or welds anywhere; the drawer will be sliding in and out of a tight spot and bumps will catch on the frame crossmembers.
- Make sure there's no welding spatter where the rollers will be rolling. Grind any off with a small grinder.
Step 8: Check the Rails

- The rails likely got warped outwards on the side with the back while you were welding.
- If they are not still parallel, you will need to pinch them inwards so that they are. You can do so using two C-Clamps.