CEB Press/Manufacturing Instructions/Hopper sheet metal: Difference between revisions
Jump to navigation
Jump to search
| Line 51: | Line 51: | ||
===Mounting the hinge plates to the hopper metal=== | ===Mounting the hinge plates to the hopper metal=== | ||
[[Image: | |||
#Torch the hopper shapes. (See diagrams above) | |||
#Get one of the side pieces and clamp the holey side of the hinge plate to one side of it. | |||
#*Make sure that when the side piece is in place, the hinge pins will be facing down. | |||
#*Clamp it so that it has just enough clearance for the other hopper metal, so there will be as small of a gap as possible once the hopper is assembled. | |||
#Transfer punch thru the holes using a 1/2" transfer. Put the transfer in the bottom of the hole, near the edge of the hopper metal. | |||
#Mark both pieces to ensure this exact plate goes back to this side. | |||
#Repeat the above steps for the opposite side of the side piece, with a different hinge plate, Still insuring the pins will be facing down. | |||
#Do the same for the other side piece. Make sure that it will be a mirror image of this one, not oriented the same. | |||
#Punch all of the 1/2" holes where you center marked. | |||
# | |||
*Punch 3/4" holes in all 28 hinges, in center of rounded part | *Punch 3/4" holes in all 28 hinges, in center of rounded part | ||
Revision as of 18:33, 29 September 2011
| |||||||||||||||||||||||||
![]() Warning: The documentation for the CEB Press is undergoing a thorough overhaul. CAD models and written directions are presently obsolete. For more information, see Talk:CEB_Press#Documentation_overhaul_in_progress. When the models, specifications and text on this article have been thoroughly reviewed, updated when necessary, and confirmed as whole and accurate, this warning may be removed.
Warning: The documentation for the CEB Press is undergoing a thorough overhaul. CAD models and written directions are presently obsolete. For more information, see Talk:CEB_Press#Documentation_overhaul_in_progress. When the models, specifications and text on this article have been thoroughly reviewed, updated when necessary, and confirmed as whole and accurate, this warning may be removed.
Tools Required
- Torch
- Welder
- Hole punch with 3/4" dies
Materials Required
- Door Hinges (12)
- 1/2" x 1 1/2" bolts (12)
- 1/2" washers (12)
- 1/2" lockwashers (12)
- 1/2" nuts (12)
- one 5X10 or two 4X8 sheets of 1/8" steel
- 24' of 1/8" thick x 3" or 4" flatbar: Cut into 3' (8 total) pieces.
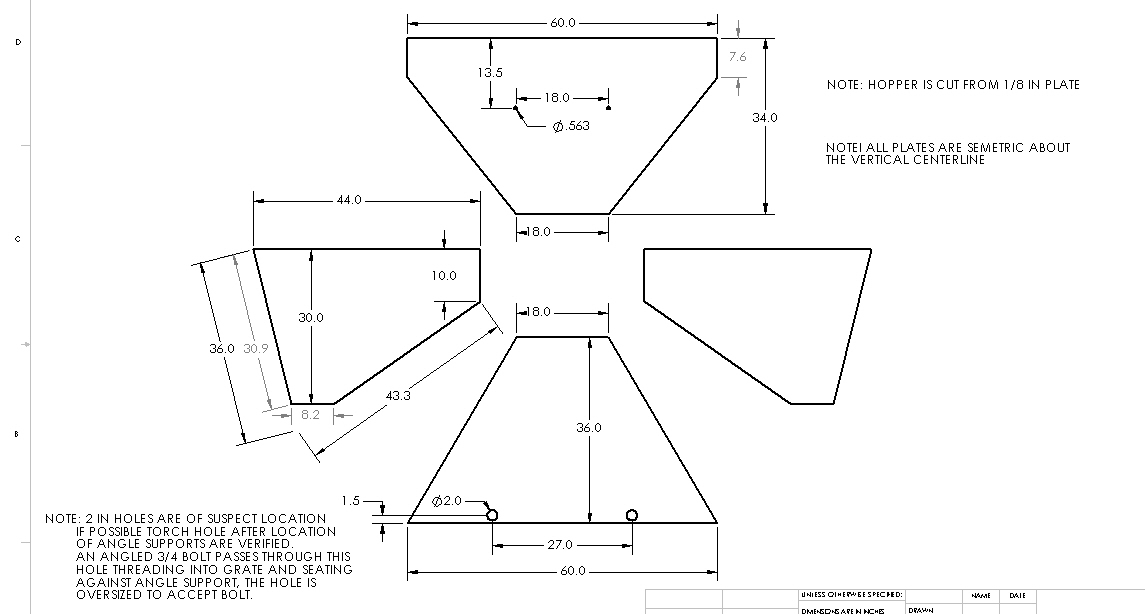
Diagrams
Fabrication Steps
Prepare the hinge plates
- Punch 3/4" holes in 4 of the hinge plates as shown. The hole locations are not critical.
- Place three hinges between one of the holey plates, and one without holes to weld.
- Make sure the plates are a 1/2" apart or more, otherwise the metal won't hinge enough to attach to the hopper.
- The pins inside the hinge should all be facing the same direction; these will need to be facing down when the hopper is erected so that the pins won't jiggle out over time.
- On two of the hinge plates, the pins should face right, and the other two, they should face left, for the reasons stated above.
- Make sure the side of the hinge that sticks out most is on the top; this way it won't interfere with the hopper metal below when installing the hopper.
- Plug weld thru the holes in the hinges to the plates below, joining all 3 hinges to each plate.
Mounting the hinge plates to the hopper metal
[[Image:
- Torch the hopper shapes. (See diagrams above)
- Get one of the side pieces and clamp the holey side of the hinge plate to one side of it.
- Make sure that when the side piece is in place, the hinge pins will be facing down.
- Clamp it so that it has just enough clearance for the other hopper metal, so there will be as small of a gap as possible once the hopper is assembled.
- Transfer punch thru the holes using a 1/2" transfer. Put the transfer in the bottom of the hole, near the edge of the hopper metal.
- Mark both pieces to ensure this exact plate goes back to this side.
- Repeat the above steps for the opposite side of the side piece, with a different hinge plate, Still insuring the pins will be facing down.
- Do the same for the other side piece. Make sure that it will be a mirror image of this one, not oriented the same.
- Punch all of the 1/2" holes where you center marked.
- Punch 3/4" holes in all 28 hinges, in center of rounded part
- Punch holes in hopper sheet metal (all the blue holes, 3/4")
- Bolt all hinges to sheet metal at the red locations marked "1" with 3/4" bolts
- Weld bottom hinges of hopper sheet 1 to hopper mount plate
- Weld top hinges of hopper sheet 1 to grate
- Install hopper supports to hold hopper sheet 1, and bolt with the 2 bolts (1/2")
- Weld hinges to hopper supports for sheet 2
- Weld hinges at base of sheets 2, 3, 4
- Weld hinges between sheets 3&1, 4&1, and between 2&3, and 2&4
- At this point, the entire hopper is erected. It remains to weld the remaining hinges to the grate.
- Upon completing these steps, the 3/4" bolts can be replaced with 1/2" bolts for successive deconstruction and reconstruction of the hopper.


