CEB Press/Manufacturing Instructions/Soil grate: Difference between revisions
No edit summary |
|||
| Line 17: | Line 17: | ||
== Diagrams == | == Diagrams == | ||
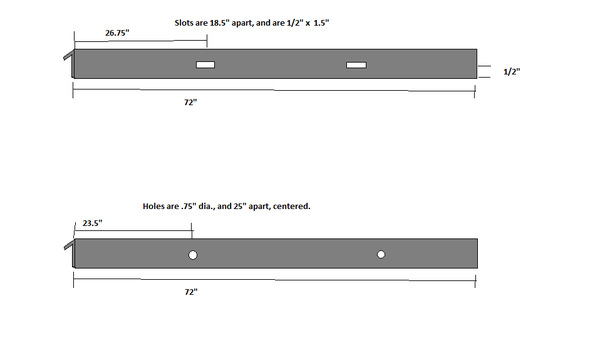
Where to torch the holes on the grate: <br/> | Where to torch the holes on the grate: <br/> | ||
[[Image:gratetorch.png|600px|Where to torch the holes on the grate]] | [[Image:gratetorch.png|600px|Where to torch the holes on the grate]]<br/> | ||
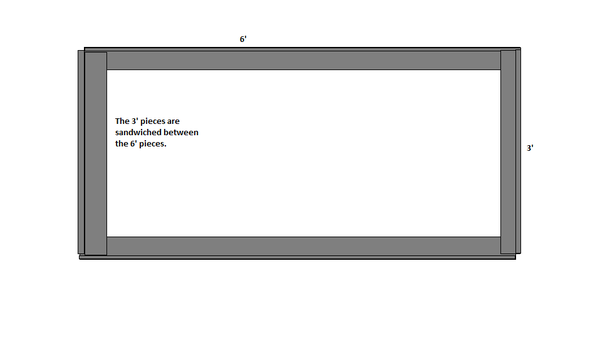
How to weld the frame pieces together: <br/> | How to weld the frame pieces together: <br/> | ||
[[Image:weldgrate.png|600px]] | [[Image:weldgrate.png|600px]]<br/> | ||
The grate: <br/> | The grate: <br/> | ||
[[Image:grate. | [[Image:grate.gif|600px|The grate]] | ||
== Fabrication Steps == | == Fabrication Steps == | ||
Revision as of 02:21, 9 October 2011
| |||||||||||||||||||||||||
![]() Warning: The documentation for the CEB Press is undergoing a thorough overhaul. CAD models and written directions are presently obsolete. For more information, see Talk:CEB_Press#Documentation_overhaul_in_progress. When the models, specifications and text on this article have been thoroughly reviewed, updated when necessary, and confirmed as whole and accurate, this warning may be removed.
Warning: The documentation for the CEB Press is undergoing a thorough overhaul. CAD models and written directions are presently obsolete. For more information, see Talk:CEB_Press#Documentation_overhaul_in_progress. When the models, specifications and text on this article have been thoroughly reviewed, updated when necessary, and confirmed as whole and accurate, this warning may be removed.
The grate shakes the soil into the hopper. It connects to the machine via the hopper supports and the grate supports.
Tools Required
- Welder
- Angle Grinder
- Clamps
- Torch
Materials Required
- 1/4”x2”x2” angle, 6' (2)
- 1/4”x2”x2” angle, 3' (2)
- 1/4”x2” bar, 71.5”
- 1/2” rebar, 99': 3' (33 ct)
- 3/4" Steel nuts (2)
Diagrams
Where to torch the holes on the grate:

How to weld the frame pieces together:

The grate:

Fabrication Steps
The grate is 6 by 3 feet (91.4 by 182.9 cm). Made from 33 pieces of half-inch rebar, each three feet in length. These pieces of rebar fit into a frame made of 1/4" angle. There is a one-and-a-half inch between each of the rebars, which means 2 inches from the center of one to the center of the next.
- Prepare the 6' pieces. One needs nuts welded to it, where it will attach to the grate supports. The other needs holes torched in it where it attaches to the hopper supports.
- Torch the holes according to the diagram, and grind off all the slag.
- Weld the nuts to the piece with the round holes, so the nuts are on the outside of the angle. Make sure you protect the threads with some nuts.