D3D v20.04: Difference between revisions
No edit summary |
|||
| (47 intermediate revisions by 2 users not shown) | |||
| Line 1: | Line 1: | ||
=Summary= | |||
D3D printer with 12", insulated heatbed. This is the next to last iteration of build prior to upgrading to the single-piece 3D printed axis pieces. | |||
= | =Developent Template= | ||
{| class="wikitable" | |||
|+ D3D v20.04 | |||
! | |||
! Description | |||
! Link to Work Product | |||
! % | |||
|- | |||
! scope=row | | |||
| '''DESIGN''' || || | |||
|- | |||
! scope=row | 1 | |||
| [[Requirements + Value Proposition]] || [[D3D_v20.04 Requirements + Value Proposition]] || {{{1}}} | |||
|- | |||
! scope=row | 2 | |||
| [[Industry_Standards]] || [[D3D_v20.04 Industry Standards]] || {{{2}}} | |||
|- | |||
! scope=row | 3 | |||
| [[Conceptual Design]] || [[D3D_v20.04 Conceptual Design]] || {{{3}}} | |||
|- | |||
! scope=row | 4 | |||
| [[Module Breakdown]] || [[D3D_v20.04 Module Breakdown]] || 20 | |||
|- | |||
! scope=row | 5 | |||
| [[3D CAD]] || [[D3D_v20.04#3D CAD]] || 20 | |||
|- | |||
! scope=row | 6 | |||
| [[Calculations]] || [[D3D_v20.04 Calculations]] || {{{6}}} | |||
|- | |||
! scope=row | 7 | |||
| [[Electronics Design]] || [[D3D_v20.04 Electronics Design]] || {{{7}}} | |||
|- | |||
! scope=row | 8 | |||
| [[Wiring and Plumbing]] || [[D3D_v20.04 Wiring and Plumbing]] || {{{8}}} | |||
|- | |||
! scope=row | 9 | |||
| [[Software]] || [[D3D_v20.04 Software]] || {{{9}}} | |||
|- | |||
! scope=row | | |||
| '''BILL OF MATERIALS || || | |||
|- | |||
! scope=row | 10 | |||
| [[BOM]] || [[D3D_v20.04 BOM]] || {{{10}}} | |||
|- | |||
! scope=row | '''21''' | |||
| [[BOM Optimization]] || [[D3D_v20.04 BOM Optimization]] || {{{21}}} | |||
|- | |||
! scope=row | 11 | |||
| [[vBOM]] || [[D3D_v20.04 vBOM]] || {{{11}}} | |||
|- | |||
! scope=row | 12 | |||
| [[CAM Files]] || [[D3D_v20.04 CAM Files]] || {{{12}}} | |||
|- | |||
! scope=row | 13 | |||
| [[Cut List]] || [[D3D_v20.04 Cut List]] || {{{13}}} | |||
|- | |||
! scope=row | | |||
| '''BUILD''' || || | |||
|- | |||
! scope=row | 14 | |||
| [[Build Instructions]] || [[D3D_v20.04 Build Instructions]] || {{{14}}} | |||
|- | |||
! scope=row | 22 | |||
| [[Quality Control Checklist]] || [[D3D_v20.04 Quality Control Checklist]] || {{{22}}} | |||
|- | |||
! scope=row | 15 | |||
| [[Fabrication Drawings]] || [[D3D_v20.04 Fabrication Drawings]] || {{{15}}} | |||
|- | |||
! scope=row | 16 | |||
| [[Exploded Part Diagram]] || [[D3D_v20.04 Exploded Part Diagram]] || {{{16}}} | |||
|- | |||
! scope=row | 17 | |||
| [[Production Engineering]] || [[D3D_v20.04 Production Engineering]] || {{{17}}} | |||
|- | |||
! scope=row | | |||
| '''DATA COLLECTION''' || || | |||
|- | |||
! scope=row | 18 | |||
| [[Build Pictures and Video]] || [[D3D_v20.04 Build Pictures and Video]] || {{{18}}} | |||
|- | |||
! scope=row | 23 | |||
| [[Troubleshooting and Repair]] || [[D3D_v20.04 Troubleshooting and Repair]] || {{{23}}} | |||
|- | |||
! scope=row | 19 | |||
| [[Data Collection]] || [[D3D_v20.04 Data Collection]] || 15 | |||
|- | |||
! scope=row | 20 | |||
| [[Future Work]] || [[D3D_v20.04 Future Work]] || 100 | |||
|} | |||
=Working Doc= | =Working Doc= | ||
| Line 14: | Line 127: | ||
[https://docs.google.com/presentation/d/1-tsozcFWVngwjjhr9Mp4843hSGy8iQDH__hKvnzkPew/edit#slide=id.g5c3be0ce2d_1_28 edit] | [https://docs.google.com/presentation/d/1-tsozcFWVngwjjhr9Mp4843hSGy8iQDH__hKvnzkPew/edit#slide=id.g5c3be0ce2d_1_28 edit] | ||
= | =3D CAD= | ||
[[File:d3d_v2004.png|100px]][[File:withsidehole.png|100px]][[File:fattened.png|100px]][[File:autop.png|100px]] | [[File:d3d_v2004.png|100px]][[File:withsidehole.png|100px]][[File:fattened.png|100px]][[File:autop.png|100px]][[File:newbedholder.png|100px]][[File:newbedholder2.png|100px]][[File:newbedholder3.png|100px]][[File:panelholder.png|100px]][[File:endstopstopcombo.png|100px]][[File:extendedpanelholder.png|100px]][[File:bespacer.png|100px]][[File:transversebedholder.png|100px]][[File:transversebedholder2.png|100px]][[File:counterweightconcept.png|100px]][[File:autoparallelredone.png|100px]][[File:idlermountnew.png|100px]] | ||
<gallery perrow=6> | <gallery perrow=6> | ||
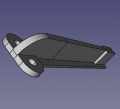
File:idlermountnew.png|'''New idler mount''' - FreeCAD -[[File:newidlermount.fcstd]] | |||
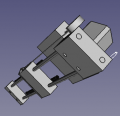
File:d3d_v2004.png|'''D3D v2004 Assembly''' - FreeCAD -[[File:d3d_v2004.fcstd]] | File:d3d_v2004.png|'''D3D v2004 Assembly''' - FreeCAD -[[File:d3d_v2004.fcstd]] | ||
File:autoparallelredone.png|'''Auto parallel piece.''' Can be used on Y for auto parallel, Z for equal bottoming. File: [[File:autoparallel.fcstd]] [[File:autoparallel.stl]] | |||
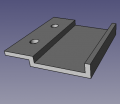
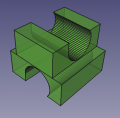
File:newbedholder3.png|'''New bed holder.''' File: [[File:newbedholder.fcstd]] [[File:newbedholder.stl]] | |||
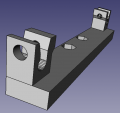
File:extendedpanelholder.png|'''Panel holder.''' File: [[File:panelholder.fcstd]] [[File:panelholder.stl]] | |||
File:bespacer.png|'''Bed spacer.''' File: [[File:bedspacer.fcstd]] [[File:bedspacer.stl]] | |||
File:transversebedholder2.png|'''Transverse bed holder.''' File: [[File:transversebedholder.fcstd]] [[File:transversebedholder.stl]] | |||
File:counterweightconcept.png|'''Counterweight.''' File: [[File:counterweightconcept.fcstd]] [[File:counterweightconcept.stl]] | |||
</gallery> | |||
=Cut List= | |||
Using [[3D Printer Workbench 2020]]: | |||
#[2] 22” - X | |||
#[4] 21” - Y | |||
[ | #[9] 17” Z, bed, spool holder | ||
=Heater Element Wrapping Procedure= | =Heater Element Wrapping Procedure= | ||
| Line 67: | Line 165: | ||
#Once enough to go inside a cordless drill chuck - grab the nichrome wrap and turn on the drill in reverse to start wrapping. Tension the sleeve against the rotor | #Once enough to go inside a cordless drill chuck - grab the nichrome wrap and turn on the drill in reverse to start wrapping. Tension the sleeve against the rotor | ||
#Wrap away! A person should be able to wrap 4 feet long just by holding a cordless drill | #Wrap away! A person should be able to wrap 4 feet long just by holding a cordless drill | ||
=Questions= | |||
-Back to working some on PVC 12" - was there enough torque to lift that bed with 2 Z steppers? I don't seem to have enough with properly tightened axis. | |||
Latest revision as of 01:52, 17 September 2020
Summary
D3D printer with 12", insulated heatbed. This is the next to last iteration of build prior to upgrading to the single-piece 3D printed axis pieces.
Developent Template
Working Doc
3D CAD


New idler mount - FreeCAD -File:Newidlermount.fcstd
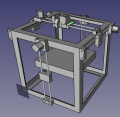
D3D v2004 Assembly - FreeCAD -File:D3d v2004.fcstd
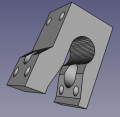
Auto parallel piece. Can be used on Y for auto parallel, Z for equal bottoming. File: File:Autoparallel.fcstd File:Autoparallel.stl
New bed holder. File: File:Newbedholder.fcstd File:Newbedholder.stl
Panel holder. File: File:Panelholder.fcstd File:Panelholder.stl
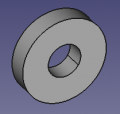
Bed spacer. File: File:Bedspacer.fcstd File:Bedspacer.stl
Transverse bed holder. File: File:Transversebedholder.fcstd File:Transversebedholder.stl
Counterweight. File: File:Counterweightconcept.fcstd File:Counterweightconcept.stl
Cut List
Using 3D Printer Workbench 2020:
- [2] 22” - X
- [4] 21” - Y
- [9] 17” Z, bed, spool holder
Heater Element Wrapping Procedure
- Cut 14' of ga 24 nichrome
- Cut 5' of tight 2 mm fiberglass sleeve
- start the wrap of nichrome on one end of sleeve
- Attach other end of sleeve to a free-spinning rotor
- Once enough to go inside a cordless drill chuck - grab the nichrome wrap and turn on the drill in reverse to start wrapping. Tension the sleeve against the rotor
- Wrap away! A person should be able to wrap 4 feet long just by holding a cordless drill
Questions
-Back to working some on PVC 12" - was there enough torque to lift that bed with 2 Z steppers? I don't seem to have enough with properly tightened axis.